Making Chocolate Covered Coffee Beans at Home
Quick answer
- Yes, you can make chocolate-covered coffee beans at home with a few simple ingredients and steps.
- Choose good quality coffee beans and chocolate for the best flavor.
- Tempering the chocolate is key to a smooth, glossy finish and preventing bloom.
- Ensure beans are completely dry before coating.
- Allow ample drying and setting time for the chocolate to harden properly.
- Experiment with different types of chocolate and bean roasts to find your favorite combination.
Who this is for
- Coffee enthusiasts looking to create a unique homemade treat.
- Home cooks interested in a fun and relatively simple confectionery project.
- Anyone seeking a sophisticated, edible gift or party favor.
What to check first
Coffee Bean Preparation
Before you begin coating, ensure your coffee beans are ready. This means they should be at room temperature and completely dry. Moisture on the beans can cause the chocolate to seize or bloom. If your beans have been in the refrigerator, let them sit out for at least an hour to reach equilibrium with the room temperature and humidity.
Chocolate Selection and Preparation
The type and quality of chocolate you use will significantly impact the final taste and texture. Opt for good quality chocolate, whether it’s dark, milk, or white chocolate. You’ll need to melt this chocolate carefully. If you’re new to working with chocolate, using chocolate chips or wafers designed for melting can be easier than chopping a bar.
If you’re new to working with chocolate, using chocolate chips or wafers designed for melting can be easier than chopping a bar. Consider using high-quality chocolate melting wafers for a smooth and consistent coating.

- Melting consistency: They melt easily and evenly, making them ideal for coating various treats.
- Versatility: They can be used for coating fruits, nuts, cookies, cakes, pretzels, and other confections to create a smooth and professional-looking finish.
- Flavor variety: They come in various chocolate flavors such as milk chocolate, dark chocolate, white chocolate, and flavored varieties, allowing for customization based on taste preferences and recipe requirements.
- Decorative possibilities: With their smooth texture and vibrant color, Coating Melting Wafers Chocolate can be used for decorative purposes, such as drizzling, swirling, or creating intricate designs on desserts.
- Overall, the specialty of Coating Melting Wafers Chocolate lies in their ability to effortlessly elevate the appearance and taste of homemade treats, making them a favorite among home bakers and professional pastry chefs alike.
Tempering Chocolate (Optional but Recommended)
Tempering chocolate is a process that stabilizes the cocoa butter, resulting in a chocolate coating that is shiny, snaps when broken, and doesn’t melt easily in your hands. While you can coat beans without tempering, the results might be dull, streaky, or prone to white streaks (bloom) as the chocolate ages. For a professional finish, learning to temper chocolate is highly recommended. This typically involves heating and cooling the chocolate to specific temperatures.
For a professional finish, learning to temper chocolate is highly recommended. Using a candy thermometer is essential for accurately monitoring the chocolate’s temperature during tempering.
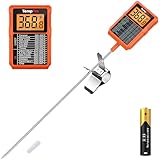
- 【Backlit 90° Rotating Display】The large 90-degree rotating screen enables effortless angle adjustment for optimal visibility, while the backlight ensures precise food temperature readings even in dimly lit environment
- 【More Accurate Reading】Food thermometer delivers precise temperature readings in 1 second with an accuracy of ±0.9 ℉, making it much faster and more reliable than traditional analog thermometers
- 【Easier to Clean】With IPX5 rated waterproof design, this kitchen thermometer probe cleans up in seconds, just rinse it under running water with no worries
- 【Durable to Use】Candy thermometer digital includes 1 AAA battery, made of sturdy plastic and food-grade stainless steel, features large capacity that enables long-lasting usage without requiring frequent battery replacement
- 【Temperature Chart】Featuring a printed temperature reference chart, this cooking thermometer covers a wide range from -58°F to 572°F, making it ideal for candy making, frying oil, meat, baking and liquids
Step-by-step (brew workflow)
1. Gather your ingredients: You’ll need roasted coffee beans (whole, not ground) and your chosen chocolate (chips, wafers, or chopped bar).
- What “good” looks like: All ingredients are measured and ready for use.
- Common mistake: Not having enough chocolate for the amount of beans you have.
- How to avoid it: Start with a 1:1 or 2:1 ratio of chocolate to beans by weight, and have extra chocolate on hand.
2. Ensure beans are dry and at room temperature: Spread your coffee beans on a clean, dry surface or paper towel.
- What “good” looks like: Beans feel dry to the touch and are not cold.
- Common mistake: Using beans straight from the fridge or a humid environment.
- How to avoid it: Allow beans to air dry for at least an hour at room temperature.
3. Melt the chocolate: Use a double boiler or microwave in short, 30-second intervals, stirring frequently.
- What “good” looks like: The chocolate is smooth and fully melted, with no lumps.
- Common mistake: Overheating the chocolate, which can cause it to burn or seize.
- How to avoid it: Melt gently and stir often. If using a microwave, stop and stir before it’s completely melted, letting residual heat finish the job.
4. Temper the chocolate (if desired): Follow your preferred tempering method (e.g., seeding, tabling).
- What “good” looks like: Chocolate is smooth, glossy, and reaches the correct temperature range for your chocolate type (consult a tempering guide).
- Common mistake: Not reaching or maintaining the correct temperature, leading to dull or bloomed chocolate.
- How to avoid it: Use a thermometer and be patient. If it’s not working, you can often re-temper or use it as a non-tempered coating.
5. Coat the coffee beans: Add the dry coffee beans to the melted chocolate, stirring to coat each bean evenly.
- What “good” looks like: Every bean is covered in a thin, even layer of chocolate.
- Common mistake: Overcrowding the chocolate, making it hard to coat beans individually.
- How to avoid it: Work in small batches if necessary.
6. Remove excess chocolate: Lift beans with a fork or slotted spoon, allowing excess chocolate to drip back into the bowl.
- What “good” looks like: Beans are coated but not drowning in a thick pool of chocolate.
- Common mistake: Leaving too much excess chocolate, which results in thick, uneven blobs.
- How to avoid it: Gently tap the utensil against the side of the bowl to shake off excess.
7. Place beans on parchment paper: Arrange the coated beans on a baking sheet lined with parchment or wax paper. Separate them so they don’t stick together.
- What “good” looks like: Beans are neatly spaced and will not touch as they set.
- Common mistake: Beans touching each other, causing them to freeze together.
- How to avoid it: Ensure ample space between each bean.
8. Allow to set: Let the beans sit at room temperature until the chocolate is completely firm. This can take 30 minutes to a few hours, depending on humidity and temperature.
- What “good” looks like: The chocolate is hard to the touch and no longer sticky.
- Common mistake: Rushing the setting process by putting them in the refrigerator too soon.
- How to avoid it: Patience is key. Refrigeration can sometimes cause bloom if the chocolate isn’t fully set.
9. Optional: Second coat: For a thicker coating, repeat steps 5-8 after the first layer has fully set.
- What “good” looks like: A more substantial, even chocolate layer.
- Common mistake: Applying a second coat before the first is completely dry.
- How to avoid it: Wait until the first layer is firm and solid.
10. Storage: Once fully hardened, store in an airtight container at cool room temperature.
- What “good” looks like: Beans are stored to maintain freshness and prevent melting or spoilage.
- Common mistake: Storing them in a warm place or an unsealed container.
- How to avoid it: Use a quality airtight container and find a cool, dry spot.
Common mistakes (and what happens if you ignore them)
| Mistake | What it causes | Fix |
|---|---|---|
| Using moist coffee beans | Chocolate seizes, becomes lumpy, or doesn’t adhere well. | Ensure beans are completely dry and at room temperature before coating. |
| Overheating chocolate | Chocolate burns, becomes grainy, or develops a dull, chalky appearance. | Melt chocolate gently over low heat or in short microwave bursts, stirring frequently. |
| Skipping tempering | Chocolate coating is dull, soft, melts easily, or develops white bloom. | Learn and practice chocolate tempering techniques for a professional finish. |
| Insufficient chocolate | Not enough chocolate to coat all the beans evenly, resulting in patchy coverage. | Start with a higher ratio of chocolate to beans and have extra on hand. |
| Overcrowding beans in chocolate | Difficult to coat beans individually, leading to clumping and uneven layers. | Work in smaller batches if necessary, coating beans in a single layer. |
| Not draining excess chocolate | Beans have thick, uneven chocolate bases, making them look messy. | Gently tap the utensil against the bowl to remove excess chocolate before placing on parchment. |
| Placing beans too close together | Beans stick together as they set, forming clusters instead of individual pieces. | Ensure adequate spacing between each bean on the parchment-lined baking sheet. |
| Rushing the setting process | Chocolate may not harden properly, leading to a soft or sticky coating. | Allow beans to set fully at room temperature; avoid refrigerating until completely firm. |
| Storing in a warm environment | Chocolate melts, becomes soft, and can develop bloom. | Store in an airtight container in a cool, dry place away from direct sunlight. |
| Using low-quality chocolate | Poor flavor, texture, and melting properties. | Invest in good quality chocolate for the best taste and finish. |
Decision rules (simple if/then)
- If your chocolate coating is dull and streaky, then it likely wasn’t tempered properly because tempering stabilizes the fat crystals for a glossy finish.
- If your chocolate coating feels soft and melts easily in your hands, then it likely wasn’t tempered correctly or wasn’t allowed to set fully because proper tempering and setting create a firm snap.
- If your chocolate has white, powdery streaks (bloom), then it may have been stored improperly or experienced temperature fluctuations because bloom is a sign of fat or sugar migration.
- If your chocolate is lumpy and difficult to work with, then it may have gotten too hot or encountered moisture because overheating or water can cause chocolate to seize.
- If your beans are sticking together, then you likely placed them too close on the parchment paper because they need space to set individually.
- If you want a thicker coating, then apply a second layer after the first has completely set because applying it too soon can cause the layers to merge unevenly.
- If you’re using white chocolate, then be extra careful with temperature as it’s more sensitive than dark or milk chocolate because it has a lower melting point.
- If your beans taste bitter after coating, then the coffee bean roast might be too dark for your preference with chocolate, or the chocolate itself is very dark; consider a lighter roast or sweeter chocolate next time.
- If you want to add flavor, then consider adding a pinch of sea salt or a tiny amount of espresso powder to the melted chocolate before coating because these can enhance the coffee and chocolate notes.
- If you see condensation on your beans after chilling, then they were likely chilled too quickly or in a humid environment, which can lead to bloom.
FAQ
Can I use any type of coffee bean?
Yes, you can use any roasted whole coffee bean. Lighter roasts will offer a brighter, more acidic coffee flavor, while darker roasts will provide a more intense, chocolatey, or smoky coffee note. Experiment to see what you prefer.
What kind of chocolate is best for coating coffee beans?
High-quality chocolate will give the best results. Dark chocolate (60-70% cacao) offers a classic pairing with coffee’s bitterness. Milk chocolate provides a sweeter, creamier contrast. White chocolate offers a sweet, vanilla-like flavor that can be a unique pairing.
Do I need to temper the chocolate?
Tempering chocolate is not strictly necessary, but it is highly recommended for a professional finish. Untempered chocolate will still coat the beans but may appear dull, soft, and be more prone to developing white streaks (bloom) over time.
How do I know if my chocolate is tempered correctly?
Tempered chocolate will be smooth, glossy, and have a pleasant snap when broken. It will also set firm at room temperature and melt cleanly on your tongue. Using a confectionery thermometer to reach specific temperature ranges for your chocolate type is the most reliable method.
How long does it take for the chocolate to set?
It can take anywhere from 30 minutes to a few hours for the chocolate to fully set at room temperature, depending on the ambient humidity and temperature. Avoid refrigerating them to speed up the process, as this can sometimes lead to bloom.
Can I add other flavors to the chocolate?
Yes, you can add a pinch of sea salt, a tiny amount of espresso powder for an extra coffee kick, or even a touch of chili powder for a spicy twist to the melted chocolate before coating the beans.
How should I store chocolate-covered coffee beans?
Store them in an airtight container in a cool, dry place, away from direct sunlight and heat. This will help prevent the chocolate from melting and maintain its quality.
Will the coffee beans lose their flavor when covered in chocolate?
The chocolate coating will protect the beans and their flavor. However, the intense flavor of the coffee may be slightly muted by the sweetness and richness of the chocolate.
What this page does NOT cover (and where to go next)
- Detailed instructions on specific chocolate tempering methods (e.g., seeding, tabling, tempering machines).
- Advanced chocolate decoration techniques like drizzling contrasting chocolate or adding edible glitter.
- Recipes for chocolate-based sauces or ganaches to use with coffee beans.
- The science behind chocolate bloom and how to prevent it in all situations.