Edible Chocolate Cups For Coffee Drinks
Quick answer
- Think of edible chocolate cups as a fun, decadent way to enjoy your coffee.
- You’ll need good quality chocolate, molds, and a bit of patience.
- Don’t aim for perfection on the first try. It’s about the experience.
- Warm your coffee slightly if you plan to drink it all at once.
- Consider a thicker chocolate layer for a sturdier cup.
- Have fun with it! This is a treat.
Who this is for
- Coffee lovers looking for a novel way to elevate their daily brew.
- Home bakers who enjoy experimenting with creative recipes.
- Anyone hosting a party or special occasion who wants a unique dessert or drink experience.
What to check first
Brewer type and filter type
- For edible chocolate cups, your existing coffee maker doesn’t really matter. The magic happens after the coffee is brewed.
- However, if you’re pairing this with a specific coffee brewing method, consider how the coffee’s flavor profile will interact with the chocolate. A dark roast might be too intense with dark chocolate, for example.
Water quality and temperature
- Again, not directly relevant to making the cups themselves. But for your coffee, good water makes a difference. Filtered water is always a good bet.
- For the chocolate, you’ll want to avoid water contamination. Keep your workspace dry.
Grind size and coffee freshness
- This only applies to the coffee you’ll be filling the cups with. Freshly ground beans always yield the best flavor.
- Grind size depends on your brewer. Espresso, drip, French press – each needs a different grind.
Coffee-to-water ratio
- This is for your brewed coffee, not the chocolate cups. A common starting point for drip coffee is about 1:15 to 1:18 (coffee to water by weight).
- Adjust to your taste. Some folks like it strong, some like it mellow.
Cleanliness/descale status
- This is crucial for your coffee maker to ensure a clean-tasting brew. Descale your machine regularly according to the manufacturer’s instructions.
- For the chocolate cups, a clean workspace and clean hands are non-negotiable. You don’t want stray coffee grounds or dust in your chocolate.
Step-by-step (brew workflow)
This isn’t a traditional brew workflow, but rather a workflow for creating and using your edible chocolate cups.
1. Gather your supplies. You’ll need good quality chocolate (chips, bars, or wafers), silicone molds (cupcake or specific chocolate molds work well), and your favorite coffee.
- What “good” looks like: Chocolate that melts smoothly and has a rich flavor. Silicone molds that are flexible and easy to clean.
- Common mistake: Using cheap chocolate that seizes up or tastes waxy.
- Avoid it: Invest in decent chocolate, like a good quality semi-sweet or dark chocolate.
For creating these delightful edible cups, having the right tools is key. High-quality silicone chocolate molds are essential for achieving perfectly shaped and easily demolded cups.
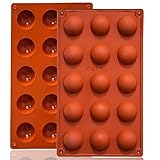
- 【 OVEN SAFE & FLEXIBLE SILICONE MOLD 】: Lerykin silicone molds are made of 100% Food Grade silicone, BPA free, Non-toxic, heat-resistant can withstand temperatures ranging from -40°F to +446°F (-40℃ to +230℃), it's safe for the oven, microwave oven, freezer, refrigerator & dishwasher.
- 【 QUICK RELEASE & NON-STICK 】: These flexible and durable semicircle silicone molds can be easily Released, after cooling , they JUST POP OUT with pressed finger. The reusable Lerykin silicone mold has a non-stick surface, and the chocolate can be easily removed from the mold completely without worrying about cracking or the recipe sticking to it.
- 【 EASY TO USE & DURABLE 】: Lerykin Flexible and durable Semi-circular silicone molds are easy to fill, Just fill your favorite recipe into the mold, and wait untill they are cooled completely, then turn it upside down, pop right out with a little push from the bottom, it is very easy to use and time saving. Besides these durable silicone molds are not easily deformed or torn.
- 【 MULTI-FUNCTIONAL USE 】 : Our food-grade silicone molds can be used for making cakes such as mousse, chocolate bombe, raindrop cake, ice cream cake, chiffon cake, muffin & dessert for example gumdrop, yogurt drop, gelatin drop, jelly, pudding, Bread, prepared food, even handmade soap, wax, resin dome and bath bomb.
- Lerykin focuses on kitchenware research and development. We are confident that we provide our customers with Healthy, Eco-friendly kitchenware & Best service last forever. You can rest assured that we sell the best silicone kitchenware on the market.
2. Prepare your workspace. Make sure it’s clean, dry, and free of any strong odors that could transfer to the chocolate.
- What “good” looks like: A tidy counter, clean hands, and no competing smells.
- Common mistake: Working in a kitchen that smells strongly of onions or fish.
- Avoid it: Air out your kitchen or prepare the cups when your kitchen is neutral-smelling.
3. Melt the chocolate. Use a double boiler or microwave in short, 30-second intervals, stirring between each.
- What “good” looks like: Smooth, glossy, fully melted chocolate with no lumps.
- Common mistake: Overheating and burning the chocolate, or getting water into it, which causes it to seize.
- Avoid it: Melt slowly and stir frequently. Never let water touch your melting chocolate.
4. Coat the molds. Spoon melted chocolate into your molds, then swirl and tilt to coat the sides and bottom evenly. Aim for a layer about 1/8 to 1/4 inch thick.
- What “good” looks like: A consistent layer of chocolate covering the entire inside of the mold.
- Common mistake: Leaving thin spots or drips, which can lead to weak cups.
- Avoid it: Don’t be shy with the chocolate. A little extra ensures strength.
5. Chill to set. Place the filled molds in the refrigerator for about 15-30 minutes, or until the chocolate is firm.
- What “good” looks like: The chocolate should be completely hard and opaque.
- Common mistake: Trying to unmold before it’s fully set, leading to a mess.
- Avoid it: Be patient. A quick tap on the mold should tell you if it’s firm.
6. Apply a second coat (optional but recommended). Once the first layer is set, melt more chocolate and apply a second layer to reinforce the cups. This is especially helpful for larger cups or if your first layer was thin.
- What “good” looks like: A thicker, more robust shell.
- Common mistake: Not letting the first layer set completely before adding the second.
- Avoid it: Ensure the first coat is solid before adding more chocolate.
7. Chill again. Refrigerate for another 15-30 minutes until the second layer is firm.
- What “good” looks like: Solid, firm chocolate cups ready for demolding.
- Common mistake: Rushing the chilling process.
- Avoid it: Give it adequate time to harden.
8. Demold carefully. Gently flex the silicone mold to release the chocolate cups.
- What “good” looks like: Cleanly released, intact chocolate cups.
- Common mistake: Forcing them out, which can break them.
- Avoid it: Work slowly and gently. If they stick, pop them back in the fridge for a few more minutes.
9. Brew your coffee. Make your favorite coffee using your preferred method.
- What “good” looks like: A delicious, aromatic cup of coffee.
- Common mistake: Brewing coffee that’s too hot, which can melt the chocolate cup prematurely.
- Avoid it: Let your coffee cool slightly, or brew it a few minutes ahead of time.
10. Fill and serve. Carefully place the chocolate cup on a saucer, then pour your slightly cooled coffee into it.
- What “good” looks like: A stable cup filled with hot coffee, ready to be enjoyed.
- Common mistake: Overfilling the cup, causing it to spill.
- Avoid it: Leave a little space at the top.
11. Enjoy! Sip your coffee and then eat the delicious chocolate cup.
- What “good” looks like: A delightful combination of coffee and chocolate.
- Common mistake: Not savoring the moment.
- Avoid it: Take your time and enjoy this unique treat.
Common mistakes (and what happens if you ignore them)
| Mistake | What it causes | Fix |
|---|---|---|
| Using low-quality chocolate | Seizing, grainy texture, poor flavor, brittle cups | Use good quality chocolate (couverture or baking chocolate) for best results. |
| Getting water in melted chocolate | Chocolate seizes, becomes lumpy and unusable | Keep all utensils and bowls completely dry. Melt chocolate gently. |
| Overheating chocolate | Burnt flavor, grainy texture, loss of shine | Melt chocolate slowly using a double boiler or short microwave bursts, stirring frequently. |
| Thin, uneven chocolate coating | Cups break easily, leak, or don’t hold their shape | Apply a second layer of chocolate. Ensure even coverage when coating the molds. |
| Demolding before chocolate is fully set | Cups warp, break, or stick to the mold | Chill thoroughly until completely firm. Gently flex the silicone mold to release. |
| Using coffee that’s too hot | Melts the chocolate cup too quickly, creating a mess | Let coffee cool for a few minutes after brewing, or brew it ahead of time. |
| Not preparing molds properly | Chocolate sticks, cups tear during demolding | Ensure molds are clean and dry. A light spray of cooking oil (for non-silicone) might help, but usually not needed for silicone. |
| Storing chocolate cups improperly | Can melt, lose shape, or absorb odors | Store in a cool, dry place. If stacking, use parchment paper between layers. |
| Trying to drink the coffee too fast | Chocolate cup melts unevenly or too quickly | Sip slowly, allowing the chocolate to melt gradually into the coffee. |
| Not cleaning molds immediately | Chocolate residue hardens, making cleaning difficult | Wash molds with warm, soapy water right after use. |
Decision rules (simple if/then)
- If your chocolate is seizing, then stop melting and start over with fresh chocolate because water contamination is the most common cause.
- If your cups are too thin, then apply a second coat of chocolate because it adds strength and durability.
- If you’re making these for a party, then make them a day in advance because they need time to set properly.
- If you want a darker chocolate flavor, then use dark chocolate (60% cacao or higher) because it offers a more intense taste.
- If your coffee is very acidic, then consider a sweeter chocolate to balance the flavors because acidity can clash with certain chocolate notes.
- If you’re using plastic molds (not recommended), then ensure they are food-grade and heat-safe because some plastics can leach chemicals when heated.
- If your chocolate cups break during demolding, then chill them for longer because they might not be fully set.
- If you want a faster setting time, then use chocolate wafers or compound chocolate because they often set faster than couverture chocolate.
- If you want to add flavor, then consider adding a touch of peppermint extract or chili powder to the melted chocolate because these complement coffee well.
- If you notice white streaks (bloom) on your chocolate cups after setting, then it’s usually just cosmetic and safe to eat, but it means the chocolate wasn’t tempered perfectly.
- If you’re serving these outdoors, then keep them in a cooler or a shaded spot because heat will melt them quickly.
FAQ
Can I use any kind of chocolate?
Generally, yes, but good quality chocolate will give you the best results. Compound chocolate melts and sets faster but might not taste as good as real chocolate.
How thick should the chocolate layer be?
Aim for about 1/8 to 1/4 inch thick. This provides enough structure to hold the coffee without being too thick to eat.
What if my chocolate cups are melting too fast?
Your coffee might be too hot. Let it cool for a few minutes before pouring, or brew it a bit ahead of time.
Can I make these ahead of time?
Absolutely. Chocolate cups can be made a day or two in advance and stored in a cool, dry place.
Can I add flavors to the chocolate?
Yes, you can add a small amount of extracts like vanilla or peppermint, or even a pinch of chili powder for a kick. Don’t add liquids directly unless they are oil-based.
Are edible chocolate cups messy?
They can be, especially if the chocolate melts too quickly. Using a saucer helps catch any drips.
What kind of coffee works best?
Any coffee you enjoy! However, a medium to dark roast often pairs well with chocolate.
How do I store leftover chocolate cups?
Store them in an airtight container at room temperature, away from heat and direct sunlight. Avoid refrigerating if possible, as it can cause condensation.
What this page does NOT cover (and where to go next)
- Specific chocolate tempering techniques for professional results. (Look into tempering chocolate for candy making.)
- Detailed flavor pairing guides for specific coffee beans and chocolate types. (Explore coffee and chocolate connoisseur resources.)
- Advanced mold-making or custom mold creation. (Research specialized confectionery supplies.)
- Nutritional information or calorie counts for chocolate coffee cups. (Consult a nutritionist or food database.)
- Commercial production methods for edible drinkware. (Investigate food science and manufacturing guides.)