Crafting Your Own Coffee Chocolate Bar from Scratch
Quick answer
- Start with high-quality chocolate and freshly roasted coffee beans.
- Grind your coffee finely for infusion or coarsely for texture.
- Temper your chocolate carefully for a smooth, stable finish.
- Infuse coffee into melted chocolate or mix in grounds/nibs.
- Pour into molds and allow to set completely for best results.
- Experiment with coffee varieties and roast levels for different flavor profiles.
- Store your finished bars properly to maintain freshness and texture.
Who this is for
- Home cooks and DIY enthusiasts looking for a creative kitchen project.
- Coffee lovers who want to explore new ways to enjoy their favorite brew.
- Anyone interested in making personalized gifts or gourmet treats.
What to check first
Brewer type and filter type
For infusing coffee flavor into chocolate, you’ll typically be using finely ground coffee. The “brewer type” here refers to how you might extract a strong coffee essence, or simply how fine you can grind your beans. If you’re infusing, a very fine grind (like espresso grind) is often preferred for maximum surface area and flavor extraction. If you’re mixing in grounds for texture, a coarser grind might be desired.
Water quality and temperature
While you won’t be brewing coffee with water for this recipe, the principles of good coffee apply. If you’re using brewed coffee concentrate for flavor, ensure that concentrate was made with filtered, clean water. For direct infusion into chocolate, the coffee grounds themselves should be fresh and free of any off-flavors.
Achieving that smooth, glossy finish is all about tempering your chocolate correctly. Using high-quality tempering chocolate ensures a professional result every time.

- MILK MELTING CHOCOLATE - Create deliciously creamy and velvety sweet treats with premium milk chocolate melting discs! Our chocolate melts feature professional taste and quality whether you’re a home baker or a seasoned candy-maker.
- MELTING CHOCOLATE DISCS - With our melting chocolate, the possibilities for amazing desserts and candies are endless! These wafers are formulated to melt smoothly and consistently, great for dipping, baking, molding, and decorating! Our Melting Chocolate Discs are ideal for decorating cakes and pastries, and crafting homemade chocolates.
- DESSERT CHOCOLATE- Making delectable chocolate confections is a cinch with our premium wafers. It’s perfect for all your favorites, including chocolate covered strawberries, fondue, chocolate bark, fudge, and anything else that needs a touch of chocolatey delight.
- BULK CHOCOLATE - Want to whip up something sweet for friends and family? Have a special event coming up? We’ve got you covered with a bulk supply of chocolate melts to satisfy a crowd. Let the delicious culinary creations begin!
- CHOCOLATE WORKS - Celebrating life with chocolate since 1973, our mission is to create happiness one chocolate smile at a time. With a tradition of hand crafting Belgian chocolates, our master chocolatiers start their creations using heirloom recipes and the freshest ingredients to hand mold and dip specialty chocolates.
Grind size and coffee freshness
This is crucial for your coffee chocolate bar.
- For infusion (flavor without grittiness): You’ll want a very fine grind, almost like powdered sugar, to maximize surface area for flavor extraction into the fat of the chocolate. Freshly ground coffee will always yield the best flavor.
- For texture (chewable bits): A medium-coarse grind, similar to French press, or even crushed coffee beans/nibs, can add a pleasant crunch and more intense coffee bursts.
- Coffee freshness: Use freshly roasted coffee beans. Stale coffee will impart a flat or bitter taste to your chocolate.
Coffee-to-water ratio
This applies if you’re making a coffee concentrate to add to your chocolate. For a strong concentrate, you’d use a much higher coffee-to-water ratio than a standard brew, perhaps 1:5 or even 1:4 coffee to water by weight, and then reduce it further. If you’re directly infusing grounds into melted chocolate, there’s no water involved, but the ratio of coffee grounds to chocolate will heavily influence the final flavor intensity.
Cleanliness/descale status
Ensure all your equipment – bowls, spatulas, molds, and any grinders – are scrupulously clean and dry. Any water, even a tiny drop, can cause melted chocolate to seize and become unusable. Residual flavors from previous cooking can also transfer to your delicate chocolate.
Step-by-step how to make coffee chocolate bar (brew workflow)
1. Prepare your coffee: Decide if you want infused flavor or textural bits. For infusion, finely grind fresh coffee beans (espresso-fine or finer). For texture, grind medium-coarse or use roasted coffee nibs.
- Good looks like: Uniformly ground coffee, smelling intensely fresh.
- Common mistake: Using stale or pre-ground coffee, leading to flat flavor. Avoid by grinding beans just before use.
2. Chop your chocolate: Break your chosen chocolate (chips, bar, or callets) into small, uniform pieces. This helps it melt evenly.
- Good looks like: Small, consistent pieces, about 1/2 inch or smaller.
- Common mistake: Using large chunks, which melt unevenly and can lead to scorching. Avoid by taking the time to chop thoroughly.
3. Set up for melting: Use a double boiler or a heat-proof bowl over a saucepan with simmering water. Ensure the bowl doesn’t touch the water.
- Good looks like: Gentle steam, water simmering, not boiling vigorously.
- Common mistake: Water boiling too hard or touching the bowl, causing chocolate to seize or scorch. Avoid by keeping heat low and bowl elevated.
4. Melt the chocolate: Place about two-thirds of your chopped chocolate into the bowl. Stir gently and constantly until mostly melted, reaching around 115-120°F for dark chocolate, 105-110°F for milk/white.
- Good looks like: Smooth, glossy, flowing chocolate with a few small unmelted pieces.
- Common mistake: Overheating the chocolate, which breaks down its structure. Avoid by using a thermometer and removing from heat early.
5. Temper the chocolate (seed method): Remove from heat. Add the remaining one-third of chopped chocolate (the “seed” chocolate) to the melted chocolate. Stir continuously until all seed chocolate is melted and the temperature drops to the working temperature (around 88-91°F for dark, 86-88°F for milk/white).
- Good looks like: Perfectly smooth, slightly thickened chocolate that holds its temperature.
- Common mistake: Not stirring enough or not reaching the correct working temperature, resulting in bloom (streaks) or soft bars. Avoid by stirring patiently and checking temperature.
6. Infuse or mix in coffee: If infusing, add your finely ground coffee to the tempered chocolate and stir well. Let it steep for 10-20 minutes, then strain through a fine-mesh sieve or cheesecloth to remove grounds. If mixing for texture, add your coarser grounds or nibs directly to the tempered chocolate and stir to combine.
- Good looks like: Chocolate evenly flavored with coffee, or with coffee pieces distributed throughout.
- Common mistake: Not straining infused chocolate, leading to a gritty texture. Or, adding too much coffee, making the chocolate too dry or bitter. Avoid by tasting as you go and straining diligently.
7. Prepare molds: Ensure your chocolate molds are perfectly clean and dry. A quick wipe with a paper towel can remove any dust.
- Good looks like: Shiny, spotless molds ready for pouring.
- Common mistake: Using molds with water residue or dust, which can cause imperfections on the bar surface. Avoid by cleaning thoroughly and drying completely.
8. Pour into molds: Carefully pour the coffee chocolate into your prepared molds. Tap the molds gently on your counter a few times to release any air bubbles.
- Good looks like: Evenly filled molds with a smooth, bubble-free surface.
- Common mistake: Pouring too quickly or not tapping, leading to trapped air bubbles and an uneven bar. Avoid by pouring slowly and tapping firmly.
9. Chill and set: Place the molds in a cool, dry place (like a pantry) or in the refrigerator for 20-60 minutes, depending on the chocolate type and ambient temperature. Do not freeze.
- Good looks like: Fully solidified, firm, and easily released bars.
- Common mistake: Rushing the chilling process or freezing, which can cause condensation and bloom. Avoid by allowing ample time and using the fridge only if necessary.
10. Unmold and store: Once fully set, carefully pop the coffee chocolate bars out of their molds. Store them in an airtight container at room temperature (ideally 65-70°F) away from direct sunlight.
- Good looks like: Shiny, crisp, and perfectly formed bars.
- Common mistake: Forcing bars out of molds before fully set, causing breakage. Or, improper storage leading to melting or bloom. Avoid by being patient and using airtight containers.
To get those perfect shapes, you’ll need some good quality chocolate molds. These flexible silicone molds make unmolding a breeze and come in various fun designs.
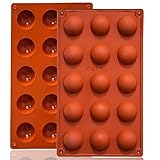
- 【 OVEN SAFE & FLEXIBLE SILICONE MOLD 】: Lerykin silicone molds are made of 100% Food Grade silicone, BPA free, Non-toxic, heat-resistant can withstand temperatures ranging from -40°F to +446°F (-40℃ to +230℃), it's safe for the oven, microwave oven, freezer, refrigerator & dishwasher.
- 【 QUICK RELEASE & NON-STICK 】: These flexible and durable semicircle silicone molds can be easily Released, after cooling , they JUST POP OUT with pressed finger. The reusable Lerykin silicone mold has a non-stick surface, and the chocolate can be easily removed from the mold completely without worrying about cracking or the recipe sticking to it.
- 【 EASY TO USE & DURABLE 】: Lerykin Flexible and durable Semi-circular silicone molds are easy to fill, Just fill your favorite recipe into the mold, and wait untill they are cooled completely, then turn it upside down, pop right out with a little push from the bottom, it is very easy to use and time saving. Besides these durable silicone molds are not easily deformed or torn.
- 【 MULTI-FUNCTIONAL USE 】 : Our food-grade silicone molds can be used for making cakes such as mousse, chocolate bombe, raindrop cake, ice cream cake, chiffon cake, muffin & dessert for example gumdrop, yogurt drop, gelatin drop, jelly, pudding, Bread, prepared food, even handmade soap, wax, resin dome and bath bomb.
- Lerykin focuses on kitchenware research and development. We are confident that we provide our customers with Healthy, Eco-friendly kitchenware & Best service last forever. You can rest assured that we sell the best silicone kitchenware on the market.
Common mistakes when you how to make coffee chocolate bar (and what happens if you ignore them)
| Mistake | What it causes | Fix |
|---|---|---|
| Using stale coffee beans | Flat, dull, or bitter coffee flavor in the chocolate. | Always use freshly roasted and freshly ground coffee beans. |
| Not grinding coffee finely enough for infusion | Gritty texture in the finished chocolate bar. | Use a burr grinder set to its finest setting, or a spice grinder for a powder. |
| Overheating chocolate during melting | Scorched, grainy, or seized chocolate that’s unusable. | Use a double boiler with gentle heat; monitor temperature with a thermometer. |
| Not tempering the chocolate | Dull, soft, streaky bars that melt easily and don’t snap. | Follow tempering instructions carefully, using a thermometer and seed chocolate. |
| Getting water into melted chocolate | Chocolate “seizes” (becomes a thick, clumpy mass). | Ensure all equipment is bone dry; prevent steam from condensing into the chocolate. |
| Adding too much coffee grounds/liquid | Dry, crumbly chocolate or a weak, diluted flavor. | Start with a conservative amount and adjust to taste; for liquid, reduce to a concentrate. |
| Not tapping molds after pouring | Trapped air bubbles, leading to an uneven, porous bar. | Gently tap molds on the counter several times to release air. |
| Rushing the setting process | Bars that break easily, don’t release cleanly, or have a poor texture. | Allow adequate time for chocolate to set in a cool, dry place or fridge. |
| Improper storage of finished bars | Bloom (white streaks), melting, or absorption of other odors. | Store in an airtight container at cool room temperature (65-70°F), away from light. |
| Using low-quality chocolate | Poor flavor, texture, and melting characteristics. | Invest in good quality couverture or baking chocolate (around 60-75% cocoa for dark). |
| Not straining infused coffee | Unpleasant grittiness in the mouthfeel of the chocolate. | Use a very fine mesh sieve or cheesecloth to remove all coffee particles after infusion. |
| Uneven coffee distribution | Some parts of the bar have intense coffee flavor, others have little. | Stir thoroughly after adding coffee to ensure even mixing before pouring. |
Decision rules (simple if/then)
- If your melted chocolate looks grainy or clumpy then it has likely seized because water got into it.
- If your finished coffee chocolate bar has white streaks or spots then it likely wasn’t properly tempered or was stored incorrectly because of fat or sugar bloom.
- If your coffee chocolate bar tastes weak then you need to use more coffee or a stronger coffee concentrate next time because the coffee-to-chocolate ratio is off.
- If your coffee chocolate bar tastes too bitter then you might be using too dark of a roast or too much coffee because bitterness can overwhelm other flavors.
- If your chocolate is difficult to remove from the mold then it’s not fully set or the mold wasn’t clean because proper setting and clean molds aid release.
- If your coffee chocolate bar is too soft at room temperature then your chocolate was likely not tempered correctly or is a lower-quality chocolate because tempering provides stability.
- If you want a smooth coffee flavor without any texture then you must infuse finely ground coffee into the chocolate and then strain it because this extracts flavor into the fat.
- If you want a noticeable crunch or chew from the coffee then you should add medium-coarse grounds or roasted coffee nibs directly into the chocolate because these provide textural contrast.
- If your chocolate starts to thicken too much while working with it then gently re-warm it slightly over the double boiler or with a heat gun because tempered chocolate needs to stay within a specific temperature range.
- If you’re unsure about the right coffee-to-chocolate ratio then start with a small batch and taste as you go because personal preference varies greatly.
- If your molds are not releasing the bars easily then try chilling them for a little longer because chocolate contracts as it cools.
- If your chocolate seems dull after setting then it might not have been tempered properly or your molds weren’t polished because shine comes from proper crystallization and a smooth surface.
FAQ
Q: Can I use instant coffee to make coffee chocolate bars?
A: While technically possible, instant coffee often lacks the complex flavor of freshly ground beans and can result in a less nuanced or even artificial taste in your chocolate. For the best results, stick with high-quality roasted coffee beans.
Q: What kind of chocolate is best for making these bars?
A: Use a good quality baking chocolate or couverture chocolate. Dark chocolate (60-75% cocoa) pairs wonderfully with coffee, but milk or even white chocolate can also be used depending on your preference. Avoid chocolate chips as they contain stabilizers that affect melting and tempering.
Q: Do I have to temper the chocolate?
A: Tempering is highly recommended if you want shiny, snappy bars that don’t melt easily at room temperature and resist “bloom” (white streaks). If you’re just making a quick treat for immediate consumption and don’t mind a softer texture, you can skip tempering, but the final product won’t be as professional.
Q: How do I store homemade coffee chocolate bars?
A: Store your bars in an airtight container at cool room temperature, ideally between 65-70°F (18-21°C), away from direct sunlight or strong odors. Storing them in the refrigerator can cause condensation and bloom, so it’s generally not recommended unless your home is very warm.
Q: What’s the difference between infusing coffee and mixing in grounds?
A: Infusing involves steeping finely ground coffee in melted chocolate and then straining it out, resulting in a smooth chocolate with coffee flavor. Mixing in grounds or nibs leaves the coffee particles in the chocolate, providing both flavor and a textural crunch. Choose based on your desired texture.
Q: Can I add other ingredients to my coffee chocolate bars?
A: Absolutely! Once you’ve mastered the basic technique, feel free to experiment. You could add a pinch of sea salt, a dash of cinnamon, or even some crushed nuts for extra flavor and texture. Just be mindful of how additional ingredients might affect the chocolate’s setting.
Q: Why did my chocolate seize when melting?
A: Chocolate seizes when it comes into contact with even a tiny amount of water or steam. Ensure all your equipment is completely dry, and when using a double boiler, make sure the bottom of your chocolate bowl doesn’t touch the simmering water, and no steam escapes into the chocolate.
Q: How long do homemade coffee chocolate bars last?
A: When stored properly in an airtight container, homemade coffee chocolate bars can last for several weeks, though the coffee flavor will be most vibrant in the first week or two.
What this page does NOT cover (and where to go next)
- Advanced chocolate tempering techniques beyond the seed method.
- Detailed chemistry of chocolate crystallization.
- Specific brand recommendations for chocolate or coffee.
- Commercial-scale chocolate production.
- Recipes for other coffee-flavored desserts.
- The history of chocolate or coffee.