Preparing Coffee Cake Ahead: Tips for Freshness
Quick answer
- Yes, you can make coffee cake ahead of time, but the freshness depends on how you store it.
- For best results, bake and cool the cake completely before storing.
- Wrap unfrosted cake tightly in plastic wrap, then in foil for up to 2-3 days at room temperature.
- Frosted cakes are best stored in an airtight container at room temperature for 1-2 days, or refrigerated for up to 4 days.
- Freezing is an option for longer storage; wrap well and freeze for up to 3 months.
- Thaw frozen cake at room temperature or in the refrigerator.
Who this is for
- Home bakers who want to get ahead on dessert preparations for parties or busy mornings.
- Anyone looking for ways to ensure their coffee cake remains moist and flavorful when baked in advance.
- Individuals who need to transport a coffee cake and want to maintain its quality during transit.
What to check first
Brewer type and filter type
While this article focuses on coffee cake, the principle of freshness applies broadly. If you’re making coffee for your cake, ensure your coffee maker is clean and using the correct filters. For drip coffee makers, paper or permanent filters should be free of old grounds and oils. For espresso machines, clean the portafilter and group head. Using fresh, clean equipment ensures the best flavor for any coffee component in your recipe.
Water quality and temperature
The quality of water used in your coffee can impact its flavor. If your tap water has a strong taste, consider using filtered water. For brewing coffee that might be incorporated into your cake batter or glaze, aim for water temperatures typically between 195-205°F (90-96°C) for optimal extraction, as recommended by many coffee brewing guides.
Grind size and coffee freshness
The grind size of your coffee beans is crucial for flavor. For drip coffee, a medium grind is usually best. If your recipe calls for brewed coffee, using freshly ground beans will yield the most vibrant flavor. Coffee is best when brewed shortly after grinding, as its aromatic compounds begin to dissipate quickly.
Coffee-to-water ratio
For brewed coffee, a common starting point for a balanced flavor is a ratio of about 1:15 to 1:18 (coffee to water by weight). For example, 2 tablespoons of coffee grounds for every 6 oz of water. Adjust this ratio based on your personal preference for strength. Too little coffee can result in a weak brew, while too much can lead to bitterness.
Cleanliness/descale status
Maintaining a clean coffee maker is essential for good flavor, whether you’re brewing coffee for drinking or for use in baking. Coffee oils can build up and turn rancid, imparting off-flavors. Regularly clean your coffee maker according to the manufacturer’s instructions, including descaling if you have hard water. This prevents mineral buildup and ensures a cleaner taste in your final product.
Step-by-step (brew workflow)
1. Gather your ingredients: Ensure you have all the necessary dry and wet ingredients for your coffee cake recipe, including any coffee you plan to use.
- What “good” looks like: All ingredients are measured and ready to go.
- Common mistake: Forgetting a key ingredient.
- How to avoid it: Read through the recipe entirely before starting and set out all ingredients.
When preparing your coffee cake, having all your baking supplies organized and ready is key. A good set of baking essentials can make the process smoother, especially when you’re getting ahead on preparations.
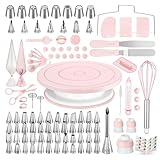
- All-in-One Cake Decorating Supplies Kit: Total 158pcs baking accessories, includes everything you need to start decorating your cakes: a revolving cake stand, 3 scrapers, angled & straight spatulas, 49 standard-size piping tips, 8 Russian tips, 7 Korean nozzles, tips cleaning brush, 3 couplers, 50 disposable pastry bags, 2 reusable piping bags, 2 bag ties, 2 flower nails, flower lifter, cake pen and 3 cake pen top, cake leveler, 14 fondant molds, smoother, 5 measuring spoons, egg separator, and whisk.
- 360° Spinning Cake Turntable: This essential baking supplies tool features a cake stand with an 11-inch diameter in a macaron color that spins smoothly on a hidden ball bearing, allowing you to achieve stunningly consistent patterns and gorgeous designs. With 360° clockwise and counterclockwise rotation, you can decorate like a PRO. The light color design makes you enjoy your cake decorating projects.
- Piping Bags and Tips Set: 49 standard-sized, 8 Russian, and 7 Korean numbered piping tips, 50 disposable piping bags, 2 pink reusable pastry bags, 3 couplers, and 2 bag ties. With this frosting set, you can design different patterns for your cakes. Don’t worry, we have a pattern chart to help you eliminate guesswork by providing outcomes for each tip. Besides, a tips cleaning brush for easy cleaning of the nozzles after use.
- Angled and Straight Icing Spatulas: Made from high-quality stainless steel, these exceptional frosting spatulas simplify the process of achieving evenly frosted layers and working on layered cakes. With a 12.5-inch angled spatula and a 10.6-inch straight spatula, you can effortlessly create smooth surfaces and crumb-free layers.
- E-Book Guide to Use: Come with a pattern chart that serves as a guide for the numbered icing tips. Furthermore, a detailed and professional E-Book is available, providing advanced guidance on using Kootek baking tools and creating exquisite cakes or cupcakes. This valuable resource is ideal for beginners as well as for professionals, making our set the perfect choice for those seeking to improve their baking skills. Also a thoughtful gift for Mother's Day, a wedding, or a party.
2. Preheat your oven: Set your oven to the temperature specified in your recipe.
- What “good” looks like: The oven is at the correct, stable temperature.
- Common mistake: Not preheating sufficiently, leading to uneven baking.
- How to avoid it: Allow at least 15-20 minutes for the oven to reach temperature.
3. Prepare your coffee (if using): Brew a strong cup of coffee according to your recipe’s instructions. Let it cool slightly if it’s to be added to batter.
- What “good” looks like: Coffee is brewed to desired strength and is at a usable temperature.
- Common mistake: Using hot coffee in batter, which can affect the eggs and texture.
- How to avoid it: Let the brewed coffee cool for a few minutes, or brew it ahead of time.
4. Prepare your cake pan: Grease and flour your cake pan, or line it with parchment paper.
- What “good” looks like: The pan is evenly coated, preventing sticking.
- Common mistake: Incomplete greasing, leading to cake sticking.
- How to avoid it: Ensure you get into all corners and crevices of the pan.
To ensure your coffee cake releases perfectly, especially when making it ahead, consider using a high-quality coffee cake pan. This one is designed for even baking and easy removal.

- HEALTHY - E-far layer cake pans are made of pure stainless steel without toxic materials, No harmful chemicals leaching into food, Unlike aluminum and Teflon coating pans, Healthy for your daily baking use
- DURABLE - Tier cake pans are constructed by premium-grade and heavy gauge stainless steel to avoid deformation, Rust resistant and sturdy for a long-lasting service life, Prevent leaking, Not as the springform, Easy to clean up and dishwasher safe & pot safe
- CRAFTED - Mirror finished surface for an easy and clean release, Straight-sided design for making stacked cakes easily, Rolled edge helps with comfortable holding, Evenly heated stainless steel provides your baked goods with a perfect browning
- MULTI-PURPOSE - This small cake pan set is great for baking cake, quiche, deep dish pizza, fruit cobblers, flan and gelatin molded desserts, Perfect for making a layered smash cake for your kid’s first birthday, Also great to steam food, store snacks
- SET OF 3 - Inner size: 6 x 2”, Outer size: 6½” x 2”, These round baking pans are handy and versatile to meet most of your baking needs, Ideal gift for Christmas, Thanksgiving Day, housewarming and other special occasions
5. Combine dry ingredients: Whisk together flour, sugar, leavening agents, salt, and any spices.
- What “good” looks like: Ingredients are evenly distributed, with no clumps.
- Common mistake: Not whisking thoroughly, resulting in uneven leavening.
- How to avoid it: Whisk for at least 30 seconds to ensure aeration and distribution.
6. Combine wet ingredients: Cream butter and sugar, then beat in eggs one at a time, followed by any liquid ingredients like milk or cooled coffee.
- What “good” looks like: A smooth, emulsified mixture.
- Common mistake: Overmixing, which can develop gluten and make the cake tough.
- How to avoid it: Mix until just combined, especially after adding flour.
7. Add dry to wet ingredients: Gradually add the dry ingredients to the wet ingredients, mixing until just combined.
- What “good” looks like: A cohesive batter with no dry streaks.
- Common mistake: Overmixing the batter.
- How to avoid it: Stop mixing as soon as no dry flour is visible.
8. Prepare the streusel topping (if applicable): Combine flour, sugar, butter, and spices for the topping.
- What “good” looks like: A crumbly mixture that holds together when squeezed.
- Common mistake: Overworking the streusel, making it pasty.
- How to avoid it: Use your fingertips or a pastry blender to cut the butter into the dry ingredients until crumbly.
9. Assemble the cake: Pour half the batter into the prepared pan, sprinkle with streusel (if using), add the remaining batter, and top with more streusel.
- What “good” looks like: Even layers and distribution of topping.
- Common mistake: Overfilling the pan, causing overflow.
- How to avoid it: Ensure your batter doesn’t exceed two-thirds of the pan’s capacity.
10. Bake the cake: Bake for the time specified in the recipe, or until a toothpick inserted into the center comes out clean.
- What “good” looks like: The cake is golden brown and springs back when lightly touched.
- Common mistake: Opening the oven door too early, causing the cake to sink.
- How to avoid it: Resist the urge to check on the cake until the last 10-15 minutes of baking time.
11. Cool the cake: Let the cake cool in the pan for 10-15 minutes before inverting it onto a wire rack to cool completely.
- What “good” looks like: The cake releases easily from the pan and cools evenly.
- Common mistake: Trying to remove the cake while it’s too hot, causing it to break.
- How to avoid it: Allow adequate cooling time in the pan.
12. Store the cake: Once completely cool, store the cake according to your preference for making ahead.
- What “good” looks like: The cake is properly wrapped or contained to maintain freshness.
- Common mistake: Storing a warm cake, leading to condensation and sogginess.
- How to avoid it: Always ensure the cake is fully cooled before wrapping or covering.
Common mistakes (and what happens if you ignore them)
| Mistake | What it causes | Fix |
|---|---|---|
| Using stale coffee grounds or beans | Weak, flat, or bitter coffee flavor in the cake. | Use freshly roasted and ground coffee. |
| Incorrect coffee-to-water ratio | Coffee flavor is too strong or too weak, unbalancing the cake’s taste. | Measure coffee and water accurately; adjust to your preference. |
| Using hot brewed coffee in batter | Can cook eggs, affect leavening, and alter cake texture. | Let coffee cool to room temperature or slightly warm before adding. |
| Overmixing the batter | Tough, dense cake with a chewy texture. | Mix dry and wet ingredients until just combined; stop as soon as flour streaks disappear. |
| Improperly prepared cake pan | Cake sticks to the pan, tearing and damaging its appearance. | Grease and flour thoroughly, or use parchment paper. |
| Opening oven door too early | Cake can sink in the center due to sudden temperature change. | Wait until the cake is mostly baked before checking. |
| Storing cake while still warm | Condensation forms, making the cake soggy and potentially moldy. | Allow the cake to cool completely on a wire rack before storing. |
| Inadequate wrapping for storage | Cake dries out, loses flavor, or absorbs odors from the refrigerator. | Wrap tightly in plastic wrap, then foil, or use an airtight container. |
| Freezing cake without proper wrapping | Freezer burn, ice crystals, and off-flavors develop. | Wrap tightly in multiple layers of plastic wrap and then in heavy-duty foil or a freezer bag. |
| Thawing frozen cake too quickly | Can lead to condensation and a slightly soggy texture. | Thaw gradually at room temperature or in the refrigerator. |
| Using old or expired leavening agents | Cake does not rise properly, resulting in a dense, flat texture. | Check expiration dates on baking soda and baking powder; test if unsure by adding to hot water (should bubble). |
| Incorrect oven temperature | Uneven baking, leading to burnt edges and an undercooked center, or vice versa. | Use an oven thermometer to verify your oven’s accuracy. |
Decision rules (simple if/then)
- If you are making coffee cake for a party the next day, then bake it today and store it at room temperature, unfrosted, for optimal freshness.
- If your coffee cake recipe includes a glaze or frosting that needs to set, then apply it after the cake has cooled completely and store it in an airtight container.
- If you need to store the coffee cake for more than 3 days, then consider freezing it for longer preservation.
- If you are using brewed coffee in your cake batter, then ensure it is cooled to avoid cooking the eggs.
- If your coffee cake has a streusel topping, then it’s generally best to add it just before baking for the crispiest result.
- If you are transporting a coffee cake, then ensure it is well-wrapped or in a sturdy container to prevent damage and maintain moisture.
- If you notice your cake is slightly dry after baking, then a simple syrup soak or a light glaze can help rehydrate it before storing.
- If you plan to rewarm the coffee cake, then a few seconds in the microwave or a brief time in a low oven can help.
- If your coffee cake has a cream cheese frosting, then it must be refrigerated.
- If you are unsure about how long a specific coffee cake recipe will keep, then err on the side of caution and plan to consume it within 2-3 days.
- If you are incorporating instant coffee or coffee extract, then follow the recipe’s instructions precisely as they are concentrated flavorings.
- If you want to ensure a moist cake, then avoid overbaking it; check for doneness a few minutes before the recipe suggests.
FAQ
Can I make coffee cake the day before serving?
Yes, coffee cake is an excellent candidate for making ahead. Baking it the day before ensures it has cooled completely, and you can store it properly to maintain its freshness for serving.
How should I store unfrosted coffee cake made ahead?
Once completely cooled, wrap the unfrosted coffee cake tightly in plastic wrap, then in aluminum foil. Store it at room temperature for up to 2-3 days. This method helps retain moisture and prevent it from drying out.
What if my coffee cake has a glaze or frosting?
For frosted or glazed coffee cakes, it’s best to store them in an airtight container at room temperature for 1-2 days. If the frosting is perishable (like cream cheese frosting), refrigerate the cake, but allow it to come closer to room temperature before serving for better texture.
Can coffee cake be frozen?
Absolutely. For longer storage, wrap the completely cooled coffee cake (frosted or unfrosted) tightly in plastic wrap, followed by a layer of aluminum foil or a freezer bag. It can be frozen for up to 3 months.
How do I thaw a frozen coffee cake?
To thaw a frozen coffee cake, remove it from the freezer and unwrap it. Let it thaw at room temperature for a few hours, or place it in the refrigerator overnight for a slower, more even thaw. Avoid thawing in the microwave, as this can make the cake soggy.
Will coffee cake lose its flavor if made ahead?
While it’s best when freshly baked, coffee cake generally holds its flavor well for a few days. Using fresh coffee ingredients and proper storage techniques will help preserve the flavor. For very long storage, freezing is the best option.
Is it better to store coffee cake with or without frosting when making ahead?
Unfrosted coffee cake generally stores better at room temperature for a few days because the frosting can sometimes affect the cake’s texture or absorb refrigerator odors. However, if your recipe includes a frosting that requires refrigeration, you must refrigerate the entire cake.
What is the best way to reheat coffee cake?
If your coffee cake seems a bit dry or you prefer it warm, you can gently reheat it. A few seconds in the microwave (about 10-15 seconds per slice) or a few minutes in a low oven (around 300°F or 150°C) can revive its warmth and texture.
What this page does NOT cover (and where to go next)
- Specific coffee cake recipes and ingredient variations.
- Next: Explore recipes for different types of coffee cakes, such as those with fruit, nuts, or various spice blends.
- Detailed instructions on making specific types of frosting or glazes.
- Next: Look for guides on creating various cake toppings, from simple glazes to rich buttercream.
- Advanced baking techniques for achieving specific cake textures (e.g., extremely light and airy crumb).
- Next: Research articles on the science of baking, gluten development, and leavening agents for deeper understanding.
- The history or cultural significance of coffee cake.
- Next: Explore articles or books on the origins of baked goods and their evolution.