How To Turn On Your Ninja Coffee Maker
Quick answer
- Most Ninja coffee makers power on by plugging them in.
- Look for a power button or a “Start” button.
- Some models require a water reservoir fill before powering up.
- Check the digital display for signs of life.
- Ensure the brew basket is properly seated.
- If it doesn’t turn on, check your outlet.
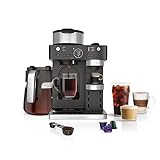
If you’re looking for a versatile Ninja coffee maker that can brew single cups or full carafes, the Ninja coffee bar is a great option to consider.
- BARISTA PLUS TECHNOLOGY: The 19-bar pressure system delivers ultra-flavorful espresso with a silky-smooth crema by brewing at the optimal temperature and pressure.
- COFFEEHOUSE DRINKS AT HOME: The built-in, fold-away frother allows you to create espresso-based cappuccinos, lattes, flat whites, and more.
- BREW SINGLE-SERVE ESPRESSO: Choose your favorite espresso capsule and brew up to 3 styles: Espresso (1.35 oz), Lungo (3.75 oz), and Over Ice (1 oz).
- BREW THROUGH COFFEE GROUNDS: Make a Classic, Rich, or Over Ice brew. Select 9 different sizes ranging from cup, to travel mug, to a full 12-cup carafe.
- VERSATILITY TO ENTERTAIN: Treat your guests to an espresso-based coffeehouse drink or brew a 12-cup carafe for the crowd.
Who this is for
- You just unboxed your new Ninja coffee maker.
- You’re trying to figure out the basic startup sequence.
- You’re not sure if there’s a specific “on” switch.
What to check first
Brewer type and filter type
Your Ninja coffee maker likely came with a reusable mesh filter or is designed for paper filters. Know which one you have. This affects how you prepare the brew basket. A paper filter needs to be placed correctly in the basket. The mesh filter just sits there, ready to go.
Water quality and temperature
Always start with fresh, cold water. Tap water is usually fine, but if yours is hard or has a strong taste, filtered water is a good move. This is an easy win for better coffee. Cold water is what the machine heats up; don’t put hot water in the reservoir.
Grind size and coffee freshness
For most Ninja models, a medium grind is your go-to. Think about the texture of sand. Freshly ground beans make a huge difference. If you’re using pre-ground, try to get it as soon as possible after it’s ground. Stale coffee is just sad.
Coffee-to-water ratio
This is key. A good starting point is one heaping tablespoon of ground coffee for every 6 oz of water. Most Ninja machines have markings on the carafe and reservoir. Use those. You can always adjust later based on taste.
Cleanliness/descale status
Is your machine clean? If it’s brand new, it should be. If it’s been used, make sure it’s free of old grounds or residue. Some models have a descaling indicator. If it’s lit, it’s time to run a cleaning cycle before brewing. A clean machine makes better coffee.
Step-by-step (brew workflow)
1. Plug it in: Find the power cord and plug it into a working electrical outlet.
- What “good” looks like: The display screen should light up, or an indicator light should turn on.
- Common mistake: Plugging into an outlet that isn’t working.
- Avoid it by: Testing the outlet with another small appliance first.
2. Fill the water reservoir: Open the reservoir lid and pour in fresh, cold water up to the desired brew level mark.
- What “good” looks like: The water level is clearly visible and within the marked range. No spills around the reservoir.
- Common mistake: Overfilling or underfilling the reservoir.
- Avoid it by: Watching the markings carefully and stopping at the line.
3. Add coffee grounds: Place your filter (paper or mesh) into the brew basket. Add your ground coffee to the filter.
- What “good” looks like: Grounds are evenly distributed in the filter. The filter is seated correctly in the basket.
- Common mistake: Forgetting to put the filter in, or not seating the brew basket properly.
- Avoid it by: Double-checking that the basket clicks into place and the filter is secure.
4. Close the brew basket/lid: Ensure the brew basket assembly is fully closed or locked into place according to your model’s design.
- What “good” looks like: The basket is flush and secure, with no gaps.
- Common mistake: Leaving the brew basket slightly ajar.
- Avoid it by: Giving it a gentle push or ensuring it latches audibly.
5. Place the carafe/mug: Position the carafe or your mug directly under the brew spout.
- What “good” looks like: It’s centered and stable.
- Common mistake: Not placing the vessel correctly, leading to spills.
- Avoid it by: Making sure it’s firmly on the warming plate or drip tray.
6. Select brew size (if applicable): If your Ninja has size options (like single cup, half carafe, full carafe), choose the one that matches your water level.
- What “good” looks like: Your selection is clearly indicated on the display or via buttons.
- Common mistake: Selecting a size that doesn’t match the water in the reservoir.
- Avoid it by: Matching your brew size selection to the water you added.
7. Select brew strength (if applicable): Many Ninjas offer strength settings (like Classic, Rich, Over Ice). Choose your preference.
- What “good” looks like: Your chosen strength is highlighted.
- Common mistake: Not selecting a strength if you want something specific.
- Avoid it by: Pressing the desired strength button until it’s active.
8. Press the “Brew” or “Start” button: This is usually a prominent button.
- What “good” looks like: The machine makes a sound, the display shows brewing in progress, and coffee starts dripping.
- Common mistake: Pressing the wrong button or not pressing it firmly enough.
- Avoid it by: Looking for the button clearly labeled “Brew” or “Start.”
9. Wait for brewing to complete: The machine will heat the water and brew the coffee. This can take several minutes.
- What “good” looks like: The dripping slows to a stop, and the machine might beep or indicate completion.
- Common mistake: Trying to remove the carafe too early, causing a mess.
- Avoid it by: Waiting until the brewing cycle is clearly finished.
10. Serve and enjoy: Carefully remove the carafe or mug and pour your fresh coffee.
- What “good” looks like: Hot, delicious coffee.
- Common mistake: Leaving the carafe on the warming plate too long, making coffee taste burnt.
- Avoid it by: Turning off the warming plate after serving or transferring coffee to a thermal carafe.
Common mistakes (and what happens if you ignore them)
| Mistake | What it causes | Fix |
|---|---|---|
| Not plugging it in | Nothing happens. No power, no coffee. | Plug it into a working outlet. |
| Using stale or old coffee grounds | Weak, bitter, or flat-tasting coffee. | Use fresh beans and grind them just before brewing. |
| Incorrect grind size (too fine/coarse) | Too fine: bitter, over-extracted coffee. Too coarse: weak, under-extracted coffee. | Use a medium grind, like sand. Check your grinder settings. |
| Wrong coffee-to-water ratio | Too weak or too strong coffee. | Start with 1 heaping tbsp per 6 oz water; adjust to taste. |
| Using dirty water or a dirty machine | Off-flavors, potential clogs, reduced lifespan. | Use filtered water and descale regularly. Clean brew basket. |
| Forgetting the filter | Coffee grounds in your cup. | Always ensure a filter (paper or mesh) is in the brew basket. |
| Not seating the brew basket properly | Water bypasses grounds, weak coffee, or leaks. | Ensure the basket clicks or locks securely into place. |
| Removing carafe too early | Coffee spills onto the warming plate or counter. | Wait for the brew cycle to finish completely. |
| Using tap water with high mineral content | Scale buildup, affects taste, can damage machine. | Use filtered or bottled water if your tap water is hard. |
| Leaving the warming plate on too long | Coffee gets burnt and bitter. | Turn off the warming plate after serving or use a thermal carafe. |
Decision rules (simple if/then)
- If the display is blank after plugging it in, then check the power outlet because it might not be working.
- If your coffee tastes weak, then try using more coffee grounds or a finer grind because it might be under-extracted.
- If your coffee tastes bitter, then try using less coffee grounds or a coarser grind because it might be over-extracted.
- If you see grounds in your coffee, then check that your filter is properly seated and that the brew basket is locked because it might be bypassing the grounds.
- If the machine is making strange noises, then check the water level because it might be too low.
- If you are brewing a full carafe, then ensure you have filled the reservoir to the full carafe line because underfilling will result in a weak brew.
- If your coffee tastes off, then run a cleaning cycle because the machine might need descaling or a good scrub.
- If you want a stronger brew, then select the “Rich” or “Over Ice” setting if available, because these cycles are designed for a more concentrated result.
- If you are using paper filters, then make sure they are the correct size and shape for your brew basket because an ill-fitting filter can cause issues.
- If you are brewing for one, then select the single-serve option (if available) because it optimizes water usage and brew time.
FAQ
How do I know if my Ninja coffee maker is on?
Look for the digital display to light up or for indicator lights to turn on. Some models will make a brief sound when plugged in or when the power button is pressed.
Do I need to press a power button?
Many Ninja models don’t have a dedicated “power” button in the traditional sense. Plugging it in usually activates the standby mode, and then you select your brew options and press “Brew” or “Start.” Check your specific model’s manual if you’re unsure.
What if my Ninja coffee maker doesn’t turn on at all?
First, ensure it’s plugged into a working outlet. If the outlet is fine, try a different outlet. If it still won’t power on, there might be an internal issue, and you should consult your manual or contact Ninja customer support.
Can I use any kind of coffee grounds?
Ninja coffee makers generally work best with medium grinds. Too fine a grind can lead to over-extraction and bitterness, while too coarse a grind can result in weak coffee.
How much water should I put in?
Always fill the water reservoir to the desired brew size mark (e.g., single cup, half carafe, full carafe). Don’t overfill or underfill, as this can affect brew quality and potentially cause leaks.
What does the “Clean” or “Descale” light mean?
This light indicates that mineral buildup (scale) has accumulated inside your coffee maker, which can affect performance and taste. You’ll need to run a descaling cycle according to your manual’s instructions.
Is it safe to leave the carafe on the warming plate?
Most Ninja coffee makers have a warming plate that keeps coffee hot for a set period (often 1-2 hours). Leaving it on longer can make the coffee taste burnt. It’s best to turn it off once you’re done serving or transfer coffee to a thermal carafe.
My coffee is weak, what’s wrong?
This is usually an issue with your coffee-to-water ratio or grind size. Try using more grounds, a finer grind, or ensure you’ve selected the correct brew strength if your model has that option.
What this page does NOT cover (and where to go next)
- Detailed descaling procedures for specific Ninja models. (Check your user manual for exact steps.)
- Troubleshooting complex error codes or malfunctions. (Contact Ninja customer support or consult advanced guides.)
- Advanced brewing techniques like bloom phases or specific water pouring methods for pour-over style. (Explore specialty coffee brewing resources.)
- Recipes for coffee-based drinks using the machine. (Look for coffee recipe blogs or forums.)
- Comparisons between Ninja models and other coffee maker brands. (Read reviews and comparison articles.)