How to Make a Mocha Using Your Ninja Coffee Bar
Quick Answer
- Yes, you can make a mocha with your Ninja Coffee Bar by brewing strong coffee and combining it with chocolate syrup or powder.
- For a rich mocha, brew a concentrated coffee setting or use a smaller water amount for your desired coffee volume.
- Use high-quality chocolate syrup or cocoa powder for the best flavor.
- Adjust the sweetness and chocolate intensity to your personal preference.
- Consider adding frothed milk for a creamy texture, similar to a coffee shop mocha.
- Ensure your Ninja Coffee Bar is clean for optimal flavor extraction from your coffee.
Making a mocha with your Ninja Coffee Bar is straightforward. By brewing a strong coffee base and combining it with your favorite chocolate, you can easily create this classic drink at home.
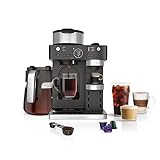
- BARISTA PLUS TECHNOLOGY: The 19-bar pressure system delivers ultra-flavorful espresso with a silky-smooth crema by brewing at the optimal temperature and pressure.
- COFFEEHOUSE DRINKS AT HOME: The built-in, fold-away frother allows you to create espresso-based cappuccinos, lattes, flat whites, and more.
- BREW SINGLE-SERVE ESPRESSO: Choose your favorite espresso capsule and brew up to 3 styles: Espresso (1.35 oz), Lungo (3.75 oz), and Over Ice (1 oz).
- BREW THROUGH COFFEE GROUNDS: Make a Classic, Rich, or Over Ice brew. Select 9 different sizes ranging from cup, to travel mug, to a full 12-cup carafe.
- VERSATILITY TO ENTERTAIN: Treat your guests to an espresso-based coffeehouse drink or brew a 12-cup carafe for the crowd.
Who This Is For
- Coffee drinkers who own a Ninja Coffee Bar and want to expand their drink repertoire.
- Home baristas looking for simple ways to create café-style beverages like mochas without specialized equipment.
- Anyone who enjoys the combination of coffee and chocolate and wants to make it at home with their existing brewer.
What to Check First
Brewer Type and Filter Type
Your Ninja Coffee Bar is designed for drip coffee, typically using a permanent mesh filter or accepting paper filters. Understanding which filter you have is key, as it can affect the clarity and body of your coffee. A mesh filter allows more coffee oils and fine grounds through, potentially adding richness but also requiring more thorough cleaning. Paper filters offer a cleaner cup.
Water Quality and Temperature
The water you use significantly impacts the final taste of your mocha. Filtered water is recommended to avoid off-flavors from tap water impurities. Your Ninja Coffee Bar heats water to an optimal brewing temperature, usually between 195°F and 205°F, which is ideal for extracting the best coffee flavors. Ensure the water reservoir is filled with fresh, cold water before each brew.
Grind Size and Coffee Freshness
For drip coffee makers like the Ninja Coffee Bar, a medium grind is generally recommended. It should resemble granulated sugar. Too fine a grind can lead to over-extraction and bitterness, while too coarse can result in weak, watery coffee. Always use freshly roasted coffee beans and grind them just before brewing for the most vibrant flavor.
Coffee-to-Water Ratio
The standard ratio for drip coffee is around 1:15 to 1:18 (coffee grounds to water by weight). For a stronger coffee base for your mocha, you might lean towards the lower end of this range, or use the “Rich” or “Over Ice” settings if your Ninja Coffee Bar has them. Experiment to find what works best for your taste.
Cleanliness/Descale Status
A clean coffee maker is crucial for a good-tasting mocha. Coffee oils and mineral buildup can impart stale or bitter flavors. Regularly clean your Ninja Coffee Bar according to the manufacturer’s instructions. Descaling, typically done every 1-3 months depending on water hardness, removes mineral deposits that can affect performance and taste. Check your manual for specific descaling procedures.
Step-by-Step: Brewing a Mocha Base with Your Ninja Coffee Bar
1. Gather Ingredients and Equipment:
- What to do: Collect your Ninja Coffee Bar, coffee beans, chocolate syrup (or cocoa powder and sugar), milk (optional), and your favorite mug.
- What “good” looks like: Everything is ready and within reach, minimizing interruptions during the brewing process.
- Common mistake: Forgetting to have the chocolate syrup or cocoa powder ready.
- How to avoid it: Measure out your chocolate and sugar (if using powder) before you start brewing the coffee.
For a rich mocha, consider using a high-quality cocoa powder for a deep chocolate flavor. Ensure you have your cocoa powder and sugar measured out before you begin brewing.

- REACH YOUR RICHEST CHOCOLATE FLAVOR: Experience this cocoa powder's fabulous high fat content of 22-24% that'll give you the freedom to create rich, fudgy creations with chocolate depth and intensity like never before. Whether it's a decadent dessert or a dreamy drink, this Dutch processed cocoa powder will bestow bold and beautiful chocolate flavor.
- DUTCHED FOR DELICIOUSNESS: Drift into a Dutch processed dreamland where bitterness is banished and blissful baking begins. Our cocoa powder is Dutch processed, which helps to remove bitterness and create smooth, chocolatey flavor.
- MEET YOUR NEW GO-TO COCOA COMPANION: No cocoa connoisseur's collection is complete without a pouch of our culinary grade Dutch processed cocoa powder. With its unmatched versatility, it’s the cocoa powder companion for righteously rich brownies, marvelously moist cakes, and sensationally silky frostings that’ll have you saying ‘fudge yeah’ with every bite.
- NON-GMO, FAIR TRADE, UNSWEETENED, DUTCH PROCESSED COCOA POWDER: We sourced the globe to find the highest quality, all-natural, non-GMO cocoa beans for use in our 22-24% fat culinary grade cocoa powder. Our Dutch Cocoa is fair-trade certified by Fair Trade USA, enabling you to feel confident in the sustainable, supportive supply chain that brings cocoa from us to you. Savor the satisfaction of starting with premium, wholesome ingredients for all of your chocolate baking needs.
- BAKE A DIFFERENCE WITH US: When you purchase Modern Mountain products, your great baking helps to give back to people and our planet. Our Rise Up Baking Scholarship supports aspiring bakers with a bit of dough for their first year of a Baking & Pastry Arts program. Additionally, our partnership with 1% for the Planet means that a portion of every purchase is donated to environmental causes that help to heal and support our Earth.
2. Add Chocolate to Mug:
- What to do: Add your desired amount of chocolate syrup or cocoa powder and sugar to the bottom of your mug. A good starting point is 1-2 tablespoons of syrup or 1 tablespoon of cocoa powder with 1-2 teaspoons of sugar.
- What “good” looks like: The chocolate is at the bottom of the mug, ready to be mixed with hot coffee.
- Common mistake: Adding chocolate after the hot coffee, which can make it harder to dissolve smoothly.
- How to avoid it: Always put the chocolate in the mug before brewing the coffee.
3. Add Fresh Water to Reservoir:
- What to do: Fill the Ninja Coffee Bar’s water reservoir with fresh, filtered cold water. Use the water level markings on the reservoir to measure for the amount of coffee you want to brew.
- What “good” looks like: The water level matches the desired coffee volume for your mug.
- Common mistake: Using stale or hot water, which can affect brew temperature and taste.
- How to avoid it: Always use cold, filtered water and fill the reservoir right before brewing.
4. Add Coffee Grounds to Filter Basket:
- What to do: Place the appropriate filter (permanent or paper) into the brew basket. Add your freshly ground coffee. For a stronger mocha base, use slightly more coffee than you normally would for that volume of water, or select the “Rich” brew setting if available.
- What “good” looks like: The coffee grounds are evenly distributed in the filter.
- Common mistake: Overfilling the brew basket, which can cause grounds to escape into the carafe.
- How to avoid it: Refer to your Ninja Coffee Bar manual for the maximum capacity of the brew basket.
5. Select Brew Size and Strength:
- What to do: Choose the brew size that matches your mug. Select your desired brew strength. For a mocha, a “Rich” or “Bold” setting is often preferred to create a stronger coffee flavor that stands up to the chocolate.
- What “good” looks like: The correct brew size and strength are selected on the machine’s display.
- Common mistake: Brewing a standard strength coffee, which can be easily overpowered by the chocolate.
- How to avoid it: Opt for a stronger brew setting to ensure a robust coffee flavor in your mocha.
6. Place Mug on Warming Plate:
- What to do: Position your mug containing the chocolate directly under the brew spout.
- What “good” looks like: The mug is centered and stable on the warming plate (if applicable) or directly under the spout.
- Common mistake: Not ensuring the mug is properly placed, leading to spills.
- How to avoid it: Double-check that the mug is securely in position before starting the brew cycle.
7. Start Brewing:
- What to do: Press the start button to begin the brewing cycle.
- What “good” looks like: Hot coffee begins to flow into your mug.
- Common mistake: Forgetting to press start after setting up the machine.
- How to avoid it: Ensure the start button is illuminated or the machine indicates it’s brewing.
8. Stir Thoroughly:
- What to do: Once brewing is complete, use a spoon to stir the hot coffee and chocolate mixture vigorously until the chocolate is fully dissolved and combined.
- What “good” looks like: A smooth, homogenous mocha liquid with no streaks of undissolved chocolate.
- Common mistake: Not stirring enough, leaving clumps of chocolate or sugar at the bottom.
- How to avoid it: Stir for at least 30 seconds, ensuring you scrape the bottom and sides of the mug.
9. Add Milk or Cream (Optional):
- What to do: If desired, add cold milk, frothed milk, or cream to your mocha to taste.
- What “good” looks like: The milk is integrated into the mocha, creating your desired consistency and flavor profile.
- Common mistake: Adding too much milk, diluting the mocha flavor.
- How to avoid it: Start with a small amount of milk and add more gradually until you reach your preferred taste.
10. Add Toppings (Optional):
- What to do: Top with whipped cream, chocolate shavings, or a drizzle of chocolate syrup if you’re feeling fancy.
- What “good” looks like: A beautifully presented mocha ready to be enjoyed.
- Common mistake: Overdoing toppings, which can detract from the mocha’s core flavor.
- How to avoid it: Keep toppings simple and complementary to the coffee and chocolate.
Common Mistakes (and What Happens If You Ignore Them)
| Mistake | What It Causes | Fix |
|---|---|---|
| Using stale coffee beans | Weak, bitter, or flat coffee flavor that won’t support the chocolate. | Use freshly roasted beans and grind them just before brewing. |
| Incorrect grind size (too fine) | Over-extraction, leading to a bitter and muddy mocha. | Use a medium grind, similar to granulated sugar. |
| Incorrect grind size (too coarse) | Under-extraction, resulting in a weak, watery mocha that tastes like chocolate water. | Use a medium grind, similar to granulated sugar. |
| Not enough coffee for the water volume | The coffee flavor is easily overpowered by the chocolate. | Use the “Rich” setting or increase coffee grounds slightly for a stronger base. |
| Using tap water with strong mineral content | Off-flavors in the coffee, affecting the overall mocha taste. | Use filtered or bottled water. |
| Not cleaning the coffee maker regularly | Stale coffee oils can make the mocha taste bitter or rancid. | Clean your Ninja Coffee Bar according to the manufacturer’s instructions after each use. |
| Not stirring the chocolate thoroughly | Chocolate clumps at the bottom, uneven sweetness, and a gritty texture. | Stir vigorously until fully dissolved, scraping the bottom of the mug. |
| Adding chocolate after hot coffee | Chocolate may not dissolve completely, leading to lumps and an inconsistent taste. | Always add chocolate to the mug <em>before</em> brewing the coffee. |
| Brewing a standard strength coffee | The chocolate flavor dominates, masking the coffee notes. | Select a “Rich” or “Bold” brew setting for a more robust coffee foundation. |
| Overfilling the brew basket | Grounds can spill into the carafe, creating a gritty drink and a messy machine. | Adhere to the maximum fill line indicated in your Ninja Coffee Bar’s manual. |
Decision Rules
- If your coffee tastes bitter, then you likely used too fine a grind or the coffee brewed too long, so try a coarser grind or a shorter brew cycle for your next mocha.
- If your mocha tastes weak and watery, then you may have used too coarse a grind or not enough coffee grounds, so adjust to a medium grind and consider using slightly more coffee.
- If you notice sediment in your mocha, then your grind might be too fine, or your filter isn’t sufficient, so try a coarser grind or ensure your permanent filter is clean and intact.
- If the chocolate doesn’t dissolve well, then it’s likely you didn’t stir enough after brewing, so stir more vigorously for a smoother mocha.
- If your mocha tastes like stale coffee, then your Ninja Coffee Bar needs cleaning, so run a cleaning cycle and descale if necessary.
- If you want a stronger coffee flavor to balance the sweetness, then use the “Rich” or “Bold” brew setting on your Ninja Coffee Bar.
- If you prefer a less sweet mocha, then reduce the amount of chocolate syrup or sugar you add to your mug.
- If you want a creamier mocha, then add frothed milk or a splash of half-and-half after brewing the coffee.
- If your mocha tastes “off” or has an unusual flavor, then check your water quality and consider using filtered water.
- If you’re using cocoa powder and want it sweeter, then add sugar to the cocoa powder in the mug before brewing.
- If you want to experiment with different chocolate flavors, then try dark chocolate syrup or a premium cocoa powder.
FAQ
Can I use hot chocolate mix instead of syrup or cocoa powder?
Yes, you can use hot chocolate mix. Be aware that most mixes already contain sugar, so you may want to adjust or omit added sugar depending on your sweetness preference.
How do I make an iced mocha with my Ninja Coffee Bar?
Use the “Over Ice” setting if your Ninja Coffee Bar has one, or brew a stronger, more concentrated coffee over ice in your mug. Then, stir in your chocolate and cold milk.
Is it better to use chocolate syrup or cocoa powder for a mocha?
Both work, but syrup generally dissolves more easily. Cocoa powder can create a richer, more intense chocolate flavor but may require more stirring to fully incorporate.
How much coffee should I use for a mocha?
A good starting point is to use the amount recommended for your brew size, plus an extra tablespoon or two, or use the “Rich” setting. This ensures the coffee flavor isn’t lost.
Can I add espresso to my Ninja Coffee Bar mocha?
Your Ninja Coffee Bar is designed for drip coffee, not espresso. For an espresso-based mocha, you would need an espresso machine. You can, however, brew a very strong, concentrated coffee to mimic some of the intensity.
What kind of coffee beans are best for a mocha?
Medium to dark roast beans often pair well with chocolate, as their richer, sometimes nutty or chocolatey notes complement the mocha flavor. However, experiment with your favorite roasts.
How can I make my mocha dairy-free?
Use dairy-free chocolate syrup or cocoa powder and unsweetened plant-based milk (like almond, soy, or oat milk) for your mocha.
What’s the difference between a mocha and a chocolate latte?
A mocha traditionally includes chocolate in the drink, while a latte is primarily espresso and steamed milk. Your Ninja Coffee Bar makes drip coffee, so you’re essentially making a chocolate coffee drink, which is the essence of a mocha.
What This Page Does NOT Cover (and Where to Go Next)
- Espresso-based mochas: This guide focuses on using your Ninja Coffee Bar’s drip coffee function. For true espresso mochas, you’ll need an espresso machine.
- Advanced latte art: Techniques for creating intricate designs on top of milk foam are beyond the scope of this guide.
- Specific brand recommendations: This article provides general guidance applicable to most Ninja Coffee Bar models and coffee brewing principles.
- Commercial coffee shop recipes: While this guide creates a delicious home mocha, professional recipes may involve specific syrups, tempering chocolate, or different brewing methods.