Craft A Coffee-Themed Sock For Fun
Quick answer
- Grab some plain socks and fabric markers.
- Sketch out your coffee design ideas first.
- Use a piece of cardboard inside the sock to prevent bleed-through.
- Apply the fabric marker colors evenly.
- Let the ink dry completely before handling.
- Heat-set the design according to marker instructions.
- Rock your custom coffee socks with pride.
Who this is for
- Coffee lovers who appreciate quirky accessories.
- DIY enthusiasts looking for a fun, low-stakes craft project.
- Anyone wanting to add a personal touch to their wardrobe.
What to check first
Your Socks
Make sure you have a good pair of plain socks. White or light-colored socks work best for vibrant designs. Cotton blends are usually a good bet for taking fabric markers well. Avoid anything too fuzzy or textured; it makes drawing a pain.
Your Design
Have a clear idea of what you want to draw. Simple coffee cups, beans, or even a latte art pattern can look great. Sketching it out on paper first can save you headaches later. Think about how the design will wrap around your ankle and foot.
Your Tools
Fabric markers are key here. Make sure they are designed for fabric and are permanent. You’ll also need that cardboard insert I mentioned. It’s a game-changer for keeping your lines clean.
Fabric markers are key here, and for vibrant, long-lasting designs, consider a quality set like these.
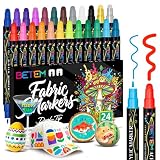
- 【Dual Tip Acrylic Paint Pens】Each acrylic marker come with a 1-5mm round nib and a 1mm fine nib. Dual tip design meets different coloring needs. The fine tip is suitable for outlining, fine line work; The round tip works well for large areas of coloring, detailing.
- 【Upgraded Cotton Nibs Version】Different from ordinary push-type acrylic pens, our acrylic markers are cotton nibs, they can be used directly and dry faster. ---Note:Please tighten the cap and put pens horizontally if you don't use them.
- 【24 Bright and Vibrant Colors】Rich color range means more mixability and fun. A perfect choice to design your scrapbook, bullet journal, planner, Christmas card, birthday gifts, greeting card, or any DIY crafts projects.
- 【Work Well on Diverse Surface】Betem acrylic markers provides smooth inking for a variety of surfaces such as paper, cardstock, metal, rock painting, wood, plastic, canvas, fabrics, ceramics, and more. High-quality opaque water-based ink with odorless and acid-free. Keep your artwork colors alive for a long time. Just express your imagination!
- 【Ideal Gift】Betem Acrylic Paint Pens will be a useful gift for your sister, brother, daughter, granddaughter, son, kids, wife, painted rock lovers for birthdays, Easter Day, Halloween, Christmas Day, Valentine's Day, Thanksgiving Day, New Year or special holidays gift. DIY unique gift, bring color into your life and create decorative products!
For your tools, consider a quality set of fabric markers like these to ensure your designs are vibrant and long-lasting.
No products found.
Step-by-step (brew workflow)
1. Gather your supplies. Get your plain socks, fabric markers, and cardboard ready.
- What “good” looks like: Everything is laid out and easily accessible.
- Common mistake: Realizing you’re missing a color halfway through. Avoid this by doing a quick inventory check.
2. Prepare the sock. Slide the cardboard inside the sock. Smooth out the fabric over the cardboard.
- What “good” looks like: The sock is taut and flat, with no wrinkles.
- Common mistake: Leaving wrinkles. This leads to uneven lines and splotchy color. Make sure it’s drum-tight.
3. Sketch your design. Lightly draw your coffee-themed design onto the sock with a pencil or a light-colored fabric marker.
- What “good” looks like: A clear, faint outline of your intended design.
- Common mistake: Drawing too dark. This can be hard to cover with color and might show through. Keep it light.
4. Start coloring. Begin filling in your design with the fabric markers. Work in small sections.
- What “good” looks like: Smooth, consistent color application.
- Common mistake: Pressing too hard or scribbling. This can fray the fabric or create uneven patches. Use gentle, even strokes.
5. Layer colors (if needed). If you’re using multiple colors, let the first layer dry slightly before adding another.
- What “good” looks like: Colors blend nicely or sit distinctly as intended.
- Common mistake: Mixing wet colors. This can create muddy, unintended shades. Patience is key here.
6. Add details. Use a fine-tip marker for outlines, small coffee beans, or latte art swirls.
- What “good” looks like: Sharp, defined details that pop.
- Common mistake: Rushing the details. This can lead to shaky lines. Take your time and steady your hand.
7. Let it dry. Allow the fabric marker ink to dry completely. This usually takes a few hours, but check your marker’s instructions.
- What “good” looks like: The ink is no longer wet to the touch and doesn’t smudge.
- Common mistake: Touching the design before it’s dry. This will smudge your hard work. Resist the urge.
8. Heat-set the design. This is crucial for making the design permanent and washable. Follow the instructions on your fabric markers. Usually, this involves ironing the design or putting the sock in a hot dryer.
- What “good” looks like: The design is set and feels like part of the fabric.
- Common mistake: Skipping this step. The design will wash out. Don’t let that happen.
9. Repeat for the other sock. Make its partner match or give it a complementary design.
- What “good” looks like: A cool pair of matching or coordinating coffee socks.
- Common mistake: Making one sock significantly better than the other. Try to keep the quality consistent.
10. Wear your creation! Show off your awesome, handmade coffee socks.
- What “good” looks like: You feeling stylish and unique.
- Common mistake: Not wearing them because you’re afraid of ruining them. They’re made to be worn!
Common mistakes (and what happens if you ignore them)
| Mistake | What it causes | Fix |
|---|---|---|
| Using the wrong markers | Design fades, washes out, or bleeds uncontrollably. | Use permanent fabric markers specifically designed for textiles. |
| Not using cardboard insert | Ink bleeds through to the other side of the sock. | Always insert cardboard to create a barrier. |
| Drawing on a wrinkled sock | Uneven lines, splotchy color, distorted design. | Smooth the fabric completely over the cardboard before drawing. |
| Pressing too hard with markers | Frayed fabric, uneven ink saturation. | Use light, consistent strokes. Let the marker do the work. |
| Applying wet-on-wet colors | Colors blend into a muddy mess. | Allow layers to dry slightly before adding new colors. |
| Skipping the heat-setting step | Design washes out with the first laundry cycle. | Follow marker instructions for heat-setting (ironing or dryer). |
| Not letting ink dry fully | Smudged designs, ruined artwork. | Be patient and let the ink dry completely before touching or moving. |
| Over-complicating the design | Difficult to execute, looks messy. | Start with simpler shapes and build up. Less is often more. |
| Forgetting to clean markers | Dried-out tips, unusable markers for next time. | Cap markers tightly after each use. |
| Using socks with heavy texture | Difficulty drawing clean lines, uneven color. | Opt for smoother sock materials like cotton or cotton blends. |
Decision rules (simple if/then)
- If your socks are dark, then use lighter colored fabric markers or consider a white fabric paint base first because dark fabric can mute bright colors.
- If you want very fine details, then use a marker with a brush tip or a fine-point tip because thicker tips won’t allow for precision.
- If you’re new to fabric markers, then start with a simple design like coffee beans or a single cup because complex patterns can be challenging for beginners.
- If you’re worried about smudging, then work from top to bottom on the sock because gravity will help prevent accidental smears.
- If the marker ink seems to be soaking into the fabric too much, then try a lighter application pressure because you might be pushing too hard.
- If you accidentally draw a line where you don’t want it, then try to incorporate it into the design or use a white fabric marker to cover it carefully because mistakes can sometimes be fixed.
- If you’re doing a multi-color design, then plan your color order from lightest to darkest because it’s easier to layer dark colors over light than vice-versa.
- If you want the design to last longer, then hand wash the socks gently in cold water because machine washing and hot water can degrade the ink faster.
- If you’re using a very saturated color, then be extra careful with the cardboard placement because there’s a higher chance of bleed-through.
- If you’re unsure about how the marker will look on your specific sock material, then test it on an inconspicuous area or a scrap piece of similar fabric first because different materials react differently.
FAQ
How long will my coffee socks last?
With proper care, like gentle washing and air drying, your custom coffee socks can last for quite a while. Heat-setting the design is the most important step for longevity.
Can I use regular markers on socks?
No, you really shouldn’t. Regular markers aren’t designed for fabric and will likely fade quickly, wash out, or bleed unevenly, ruining your sock. Always use fabric-specific markers.
What if I mess up a line?
Don’t panic! Sometimes you can carefully cover a small mistake with a bit of white fabric marker or try to creatively incorporate it into your design. For bigger oopsies, you might need to start over on a new sock.
How do I make the colors really pop?
Using a white or light-colored sock as your base is key. Also, ensure your fabric markers are good quality and apply them in even, solid coats. Sometimes a second layer after the first dries can deepen the color.
Can I wash my coffee socks in the washing machine?
Yes, but it’s best to do so on a gentle cycle with cold water. Avoid harsh detergents or bleach. Air drying is generally recommended over machine drying to preserve the design.
What kind of socks are best for this project?
Smooth, light-colored socks made from natural fibers like cotton or a cotton blend work best. Avoid fuzzy, heavily textured, or very dark socks, as they can make drawing difficult and the colors won’t show up as well.
How do I prevent the ink from bleeding through to the other side?
This is where the cardboard insert comes in. Make sure it’s thick enough and fits snugly inside the sock, pulling the fabric taut to prevent any ink seepage.
What this page does NOT cover (and where to go next)
- Advanced fabric painting techniques (like using stencils or airbrushing).
- Specific brand recommendations for fabric markers.
- Creating intricate, multi-layered designs that mimic complex artwork.
- Dyeing techniques for creating a colored sock base.
- Using your coffee socks for practical purposes beyond fashion.