Building Your Own Coffee Bean Roaster
Quick answer
- Building your own roaster is doable, but requires careful planning and safety.
- Start with a basic design like a popcorn popper or a modified oven.
- Always prioritize ventilation and fire safety.
- Use a reliable thermometer for temperature control.
- Small batches are key when you’re starting out.
- Don’t expect perfection on your first try. It’s a learning process.
Who this is for
- The tinkerer who loves coffee and wants to dive deep into the bean.
- Someone looking for a hands-on project that saves money over high-end roasters.
- The adventurous home barista ready to experiment with flavor profiles.
For those who prefer a ready-made solution, consider investing in a dedicated coffee bean roaster to kickstart your journey.
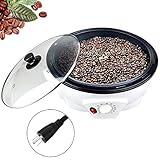
- 【Premium Quality】Operating at 110V and 800W, this electric coffee bean roaster features a non-stick chassis for easy cleaning. Equipped with a stirring rod, it ensures even roasting by continuously agitating the beans during the process. The professional thermostat provides automatic, constant temperature heating, and allows for adjustable temperature settings, enabling you to roast a variety of cereals to perfection.
- 【Honeycomb Non-Stick Bottom】The roasting chamber features a honeycomb-shaped design with a black food-grade Teflon coating. This ensures safe, easy cleaning and provides even, uniform heating for consistently perfect roasts.
- 【Professionally designed】The roaster features a heat-resistant, durable transparent cover with a four-hole ventilation system. This allows you to monitor the roasting process and observe changes in the coffee beans effortlessly while maintaining optimal ventilation.
- 【Large Capacity】Featuring an 800g tank, this roaster can accommodate a substantial amount of coffee beans, allowing you to roast in larger batches quickly and conveniently. For optimal results, we recommend roasting between 300g and 500g of beans at a time.
- 【Multifunction Use】This versatile machine is not only perfect for roasting coffee beans but also for baking a variety of other items, including beans, peanuts, chestnuts, barley, dried fruit, and popcorn. Ideal for home use, coffee shops, or restaurants, it allows you to craft and customize your unique coffee flavors to your preference.
What to check first
Brewer type and filter type
This isn’t about your brewing setup, but your roasting setup. Are you using a convection oven, a modified popcorn popper, or something more elaborate? Each has different needs for airflow and heat distribution. If you’re using a popcorn popper, make sure it’s a hot air one. For ovens, you’ll need to think about how to suspend the beans.
Water quality and temperature
Again, this is about roasting. While water isn’t directly involved in roasting, the environment matters. High humidity can affect how heat transfers. Your roaster needs to operate in a well-ventilated area, so ambient temperature and airflow around the roaster are important.
Grind size and coffee freshness
This applies after you roast. The beans will be whole, so grind size will be determined by your chosen brewing method later. Freshness is the goal here – roasting your own beans means you control that. Make sure your green beans are stored properly before you start.
Coffee-to-water ratio
For roasting, this translates to the batch size. Don’t overload your roaster. Overfilling leads to uneven roasting and can be a safety hazard. Start small, maybe 4-6 oz of green beans, and scale up as you get a feel for your machine.
Cleanliness/descale status
This is HUGE for roasting. Old coffee oils and chaff can build up and create fire hazards. Make sure your roaster components are clean before every roast. This includes the roasting chamber, any chaff collectors, and exhaust vents.
Step-by-step (how to make a coffee bean roaster)
This is a general workflow for a DIY roaster, often adapted from common home methods like popcorn poppers or oven modifications. Always consult specific plans for your chosen build.
1. Gather your materials.
- What to do: Collect all the parts for your chosen roaster design. This might include a metal bowl, a drill, a motor, a thermometer, and ventilation components.
- What “good” looks like: All necessary parts are present and accounted for. No missing pieces.
- Common mistake: Forgetting a crucial component like a reliable thermometer or heat-resistant gloves. Double-check your list.
If you’re looking for a comprehensive kit to build your own, a DIY coffee roaster kit can provide a great starting point.

- Fresh and Flavorful Coffee Guaranteed: Commercially roasted whole bean coffee starts to lose flavor in just three days but green (un-roasted) beans stay fresh for about 2 years. Our Fresh Roast coffee roasting products provide the freshest roast on earth by allowing you to roast at home
- Versatile Roasting Capacity: Roast any kind of coffee including espresso up to 8oz / 226 Grams (Wet Processed). Features precise real-time temperature display and nine level power settings for precise coffee roasting control. Roast exotic green coffee beans from decaffeinated, organic, fair trade varieties from around the world
- Easy to Use with Full Adjustability: Suitable for the novice and fully adjustable for experienced roasters. Roast 14-28 cups of coffee in less than 10 minutes. Speed roast fluid motion system ensures fast even roasting. Unlock your coffee's hidden flavor with convection fan control and variable heat settings in our easy to use speed roast system
- Custom Coffee Blending: Beans are roasted to your liking, combine different bean varieties and roasting styles to create special blends for yourself, family and friends. Custom coffee blends make thoughtful gifts. Making fresh roasted coffee has never been easier or more affordable to do at home
- USA Family Owned Company: Fresh Roast Home Roasting Supplies LLC is a USA based family owned and operated company that believes that life is too short to have sub par coffee. We offer high quality products for serious coffee connoisseurs and communicate closely with our customers to provide a top level experience and service
2. Prepare your roasting chamber.
- What to do: If modifying a popcorn popper, ensure it’s clean. If building from scratch, assemble your primary roasting vessel.
- What “good” looks like: A clean, sturdy chamber that can withstand heat and agitation.
- Common mistake: Using plastic components that can melt or warp under heat. Stick to metal.
3. Incorporate agitation (if applicable).
- What to do: For oven or drum roasters, set up a mechanism to tumble the beans. This could be a rotisserie motor or a modified mixer.
- What “good” looks like: Smooth, consistent tumbling of beans for even heat exposure.
- Common mistake: Underestimating the power needed or the difficulty of consistent agitation. A weak motor won’t cut it.
4. Install a reliable thermometer.
- What to do: Place a thermometer probe where it accurately reads the bean temperature. This is critical for control.
- What “good” looks like: A clear, easy-to-read temperature display.
- Common mistake: Relying on guesswork or a cheap, inaccurate thermometer. Temperature is king in roasting.
5. Ensure proper ventilation.
- What to do: Set up a system to exhaust chaff and smoke away from your workspace. This might involve a fan and ducting.
- What “good” looks like: Smoke and chaff are safely directed outdoors or into a collection system.
- Common mistake: Roasting indoors without adequate ventilation. You’ll fill your house with smoke and it’s a fire risk. Seriously, do this right.
6. Test the heating element.
- What to do: Briefly run your roaster’s heat source to check for consistent output and any potential issues.
- What “good” looks like: The heat source comes on reliably and maintains a stable temperature.
- Common mistake: Not testing the heat before adding beans. You don’t want to discover a faulty element mid-roast.
7. Perform a “dry run” with no beans.
- What to do: Operate the roaster with all components running for 5-10 minutes to check for vibrations, noises, or heat leaks.
- What “good” looks like: Everything runs smoothly, no alarming sounds or smells.
- Common mistake: Skipping this step and only discovering problems once expensive green beans are loaded.
8. Load your green beans.
- What to do: Add a small batch of green coffee beans to the preheated roaster.
- What “good” looks like: Beans are loaded evenly and don’t overflow the chamber.
- Common mistake: Overloading the roaster. This leads to poor airflow and uneven roasting.
9. Begin the roast, monitoring temperature.
- What to do: Start the heating and agitation. Watch the thermometer closely, aiming for your target temperature curve.
- What “good” looks like: The temperature rises steadily, and you can hear the beans cracking.
- Common mistake: Panicking and turning the heat off too soon or too high. Patience is a virtue here.
10. Listen for first crack.
- What to do: Pay attention to the sound. First crack is when the beans expand and make a popping noise, like popcorn.
- What “good” looks like: A distinct popping sound that’s audible and consistent.
- Common mistake: Mistaking other noises for first crack, or not hearing it over other sounds.
11. Manage the roast through development.
- What to do: After first crack, adjust heat to control the speed of the roast and achieve your desired flavor profile.
- What “good” looks like: The roast progresses at a controlled pace, with beans developing color.
- Common mistake: Letting the roast run too long after first crack, leading to burnt flavors.
12. Cool the beans rapidly.
- What to do: Once you reach your target roast level, immediately remove the beans from the heat and cool them quickly using a colander and fan.
- What “good” looks like: Beans cool down within a couple of minutes, stopping the roasting process.
- Common mistake: Letting hot beans sit in the roaster or a closed container. They’ll continue to roast and can even combust.
Common mistakes (and what happens if you ignore them)
| Mistake | What it causes | Fix |
|---|---|---|
| Inadequate ventilation | Smoke-filled room, fire hazard, choking fumes | Ensure a robust exhaust system, ideally venting outdoors. Use a fan. |
| Overloading the roaster | Uneven roasting, poor airflow, potential overheating | Roast in smaller batches. Check your roaster’s capacity and stick to it. |
| Inaccurate temperature monitoring | Under-roasted or burnt coffee, inconsistent results | Invest in a reliable, calibrated thermometer. Place the probe correctly. |
| Insufficient agitation | Scorched spots, uneven color, off-flavors | Ensure your agitation system is effective and consistent. Test it thoroughly. |
| Using flammable materials in construction | Fire, toxic fumes, roaster failure | Stick to metal and heat-resistant materials. Avoid plastics, wood, and anything that melts easily. |
| Not cleaning chaff and oil buildup | Fire hazard, burnt smells, off-flavors | Clean your roaster thoroughly after every few roasts, or as needed. |
| Rushing the cooling process | Over-roasting, uneven flavor development | Use a colander and a strong fan to cool beans rapidly until they are cool to the touch. |
| Ignoring the “first crack” | Roasting too dark or too light, missing cues | Learn to recognize the sound and timing of first crack for your roaster. |
| Using old or poorly stored green beans | Flat flavors, unpredictable roasting behavior | Start with fresh, well-stored green beans. Keep them in a cool, dry, dark place. |
| Not understanding heat control | Burnt exterior, raw interior, or vice-versa | Learn how to manage heat input and airflow throughout the roast cycle. |
Decision rules (simple if/then)
- If smoke is excessive and uncontrolled, then stop the roast immediately and check ventilation because smoke indicates incomplete combustion and potential fire risk.
- If beans are not tumbling evenly, then stop the roast and adjust the agitation mechanism because uneven tumbling leads to scorching and underdeveloped beans.
- If the temperature is rising too rapidly past first crack, then reduce heat input and increase airflow because this prevents the roast from going too dark too quickly.
- If you hear a consistent, loud “popping” sound, then you are likely in first crack, so prepare to manage the development phase because this is a critical point for flavor.
- If the beans have a dark, oily sheen too early in the roast, then reduce heat because this indicates the sugars are caramelizing too fast, potentially leading to burnt flavors.
- If the roaster smells like burning plastic, then stop the roast immediately and inspect for melting components because this is a serious safety hazard.
- If you are unsure about the roast level, then err on the side of caution and stop the roast slightly earlier because it’s better to have a slightly underdeveloped roast than a burnt one.
- If the chaff collector is overflowing, then stop the roast and empty it carefully because a full collector can be a fire hazard.
- If your roaster is making unusual grinding or squeaking noises, then stop and investigate the mechanical components because a failing part can cause problems during the roast.
- If the ambient temperature is very high, then consider roasting smaller batches because the external heat can affect your roaster’s performance and make temperature control harder.
FAQ
Is building a coffee bean roaster safe?
It can be, but safety is paramount. You’re dealing with heat, smoke, and potential fire. Always build with fire-resistant materials and ensure excellent ventilation. Research specific designs thoroughly and follow instructions.
What kind of green beans should I start with?
For DIY roasting, it’s best to start with beans that are known to roast well and are forgiving. Single-origin beans from Ethiopia or Colombia are often good choices for beginners. Avoid very dense or very light beans initially.
How much coffee can I roast at once?
This depends entirely on your roaster’s design and capacity. For most DIY setups, especially popcorn popper mods, start with very small batches, like 4-6 oz of green beans. Overloading is a common mistake.
How do I know when the roast is done?
You’ll learn to judge by sight, sound, and smell. The key milestones are “first crack” (a popping sound) and “second crack” (a more rapid, quieter crackle). The color will change from green to yellow, then light brown, and finally to dark brown or black depending on your desired roast level.
What is “first crack”?
First crack is when the bean rapidly expands and makes a popping noise, similar to popcorn. This signifies the release of moisture and gases, and the beginning of significant flavor development. It’s a critical point to monitor.
How long does a roast take?
A typical roast cycle, from loading green beans to cooling, can take anywhere from 8 to 20 minutes, depending on your roaster, batch size, and desired roast level. It’s not a race; focus on control.
What do I do with the chaff?
Chaff is the papery skin that comes off the bean during roasting. Most DIY roasters have a way to collect it. It’s flammable, so dispose of it safely once it cools down. Don’t let it build up.
Can I roast coffee in my kitchen oven?
Yes, you can adapt a kitchen oven, often by suspending a perforated pan or tray inside and using a rotisserie mechanism for agitation. However, ventilation is still critical, and it can be messy.
What’s the difference between light, medium, and dark roasts?
Light roasts are roasted to just after first crack, retaining more origin flavors and acidity. Medium roasts go a bit further, developing more body and sweetness. Dark roasts are roasted past second crack, with oils appearing on the surface, resulting in bolder, sometimes smoky or bitter flavors.
What this page does NOT cover (and where to go next)
- Specific blueprints for building roasters (research detailed plans online).
- Advanced roasting profiles and specific temperature curves for different bean origins.
- Troubleshooting specific mechanical failures of DIY roasters.
- Detailed information on the chemical reactions occurring during the roasting process.
- Commercial-grade roasting equipment and techniques.