Roasting Coffee Beans in a Popcorn Maker: A Creative Method
Quick answer
- Use an air popper, not oil-based.
- Start with green coffee beans.
- Agitate constantly for even roasting.
- Listen for the “cracks.”
- Stop roasting before it gets too dark.
- Cool beans quickly after roasting.
- Expect a learning curve.
- It’s a fun experiment, but not for perfectionists.
Who this is for
- The adventurous home brewer who wants to try something different.
- Someone curious about the roasting process without investing in expensive gear.
- Campers or folks who like DIY projects with everyday items.
For those curious about the roasting process without investing in expensive gear, this method is a great starting point. If you’re looking for a dedicated home coffee bean roaster, consider exploring options like the coffee bean roaster.
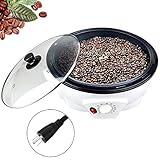
- 【Premium Quality】Operating at 110V and 800W, this electric coffee bean roaster features a non-stick chassis for easy cleaning. Equipped with a stirring rod, it ensures even roasting by continuously agitating the beans during the process. The professional thermostat provides automatic, constant temperature heating, and allows for adjustable temperature settings, enabling you to roast a variety of cereals to perfection.
- 【Honeycomb Non-Stick Bottom】The roasting chamber features a honeycomb-shaped design with a black food-grade Teflon coating. This ensures safe, easy cleaning and provides even, uniform heating for consistently perfect roasts.
- 【Professionally designed】The roaster features a heat-resistant, durable transparent cover with a four-hole ventilation system. This allows you to monitor the roasting process and observe changes in the coffee beans effortlessly while maintaining optimal ventilation.
- 【Large Capacity】Featuring an 800g tank, this roaster can accommodate a substantial amount of coffee beans, allowing you to roast in larger batches quickly and conveniently. For optimal results, we recommend roasting between 300g and 500g of beans at a time.
- 【Multifunction Use】This versatile machine is not only perfect for roasting coffee beans but also for baking a variety of other items, including beans, peanuts, chestnuts, barley, dried fruit, and popcorn. Ideal for home use, coffee shops, or restaurants, it allows you to craft and customize your unique coffee flavors to your preference.
What to check first
Air Popper Type
Make sure your popcorn maker is the hot air convection type. These heat the beans by circulating hot air. Oil or butter poppers won’t work and could create a mess or fire hazard. Stick to the simple, fan-driven models.
Ventilation
This is crucial. Roasting coffee produces chaff and smoke. You need a well-ventilated area, preferably outdoors or near an open window with a fan. Don’t do this in your cozy kitchen without good airflow. Seriously, the smoke alarm is not your friend here.
Green Coffee Beans
You can’t roast pre-roasted beans. You need raw, green coffee beans. These are available from specialty coffee suppliers online. They look like small, pale green pebbles.
You’ll need raw, green coffee beans for this process. If you’re interested in learning more about the broader topic of home coffee roasting, there are many excellent resources available, such as the book ‘home coffee roasting‘.
- Davids, Kenneth (Author)
- English (Publication Language)
- 256 Pages - 11/20/2003 (Publication Date) - St. Martin's Griffin (Publisher)
Your Expectations
This method is more about the experience and learning than producing a competition-grade roast. It’s quirky. Embrace the fun, and don’t expect perfection on the first try. It’s a creative approach, not a precise science.
Step-by-step: How to Roast Coffee Beans in a Popcorn Maker
1. Gather your gear. You’ll need a hot air popcorn maker, green coffee beans, a heat-resistant bowl or tray for cooling, and a timer. I like to have a fan going in the background, just in case.
- Good looks like: Everything is ready to go, no last-minute scrambling.
- Common mistake: Forgetting to have your cooling setup ready. Beans will keep roasting if you don’t cool them fast.
2. Preheat the popper. Turn on your air popcorn maker for a minute or two to get it good and hot. This ensures a consistent starting temperature for your beans.
- Good looks like: The air coming out is noticeably hot.
- Common mistake: Not preheating. This can lead to uneven roasting and a longer roast time.
3. Add the beans. Pour about 1/4 to 1/3 cup of green coffee beans into the popcorn maker’s chamber. Don’t overfill it; the beans need room to move and circulate.
- Good looks like: Beans fill the chamber without being packed in.
- Common mistake: Overfilling the popper. This restricts airflow and leads to uneven roasting.
4. Start the roast. Turn on the popcorn maker. The hot air will begin circulating, agitating the beans.
- Good looks like: Beans are tumbling and moving freely.
- Common mistake: Not agitating. If the beans aren’t moving, they’re not roasting evenly.
5. Listen for the first crack. After a few minutes, you’ll hear a popping or cracking sound, similar to popcorn. This is the “first crack,” indicating the beans are expanding and releasing moisture.
- Good looks like: A distinct, audible crackling sound.
- Common mistake: Ignoring the first crack. This is a key indicator of roast development.
6. Agitate and observe. Keep the popper running, and watch the beans. They’ll start to change color from green to yellow, then tan, and eventually brown.
- Good looks like: A steady stream of beans tumbling and changing color.
- Common mistake: Not watching closely. You can go from perfect to burnt in seconds.
7. Listen for the second crack (optional). For a darker roast, you might hear a second, more rapid crackling sound. This is the “second crack,” where the beans are developing oils and sugars. Be very careful here; it’s easy to go too far.
- Good looks like: A more intense, rapid crackling.
- Common mistake: Going past the second crack without stopping. This leads to burnt coffee.
8. Stop the roast. Once you reach your desired roast level (usually between first and second crack, depending on preference), immediately turn off the popcorn maker.
- Good looks like: You’ve stopped the machine at the right moment.
- Common mistake: Hesitating. The beans will continue to roast from residual heat.
9. Cool the beans. Quickly dump the hot beans into your heat-resistant bowl or tray. Agitate them or spread them out to cool them down as fast as possible. You can even use a colander and a fan to speed this up.
- Good looks like: Beans are cooling rapidly, not steaming excessively.
- Common mistake: Not cooling fast enough. This causes the beans to over-roast.
10. Let them degas. Freshly roasted coffee needs to “degas” for 12-24 hours (or more) before brewing. Store them in a container with a one-way valve or loosely covered.
- Good looks like: Beans are stored properly, allowing gases to escape.
- Common mistake: Brewing immediately after roasting. The coffee will taste harsh and underdeveloped.
Common mistakes (and what happens if you ignore them)
| Mistake | What it causes | Fix |
|---|---|---|
| Using an oil/butter popcorn maker | Fire hazard, uneven roasting, burnt oil taste | Use only hot air convection poppers. |
| Not preheating the popper | Uneven roasting, longer roast times | Run the popper for 1-2 minutes before adding beans. |
| Overfilling the popper | Poor airflow, uneven roasting, beans get stuck | Stick to 1/4 to 1/3 cup of green beans per batch. |
| Not agitating beans | Uneven roasting, scorching, pale spots | Ensure beans are tumbling freely throughout the roast. |
| Roasting in a poorly ventilated area | Smoke-filled room, strong odors, potential alarms | Roast outdoors or by an open window with a fan. |
| Not listening for the first crack | Missing key roast development cues | Pay attention to the sounds; it’s a critical indicator. |
| Going too long past the second crack | Burnt, bitter, acrid coffee | Stop roasting immediately once you hit your desired darkness. |
| Not cooling beans quickly enough | Over-roasting from residual heat | Dump into a cooling tray and agitate or use a fan. |
| Brewing coffee immediately after roasting | Harsh, underdeveloped, “gassy” flavor | Let beans degas for at least 12-24 hours before grinding and brewing. |
| Roasting too large a batch | Inconsistent results, potential popper damage | Start with small batches to master the technique. |
| Not cleaning the popper between batches | Chaff buildup, potential for scorching, off-flavors | Brush out chaff and any stuck-on bits after each batch. |
Decision rules (simple if/then)
- If you hear the first crack, then start paying closer attention to color and smell because this is a major roast indicator.
- If the beans look mostly pale yellow, then keep roasting because they are still in the early stages.
- If the beans are turning a light brown, then listen carefully for the first crack, which should be imminent.
- If you hear a rapid, intense crackling (second crack), then be ready to stop roasting within 30-60 seconds to avoid burning.
- If the beans are dark brown with visible oil, then stop roasting immediately, as they are likely at or past a dark roast.
- If the beans are black and shiny, then you’ve gone too far; they are burnt.
- If the popper starts smoking excessively, then turn it off and remove the beans immediately because it’s getting too hot or there’s too much chaff.
- If the beans are unevenly roasted (some light, some dark), then your agitation or airflow might be insufficient for your next batch.
- If you want a lighter roast, then stop shortly after the first crack.
- If you want a darker roast, then continue roasting a bit longer, but watch very closely after the first crack.
- If you smell a burnt toast or sulfurous odor, then stop roasting because you’re likely burning the beans.
FAQ
Can I use any popcorn maker?
No, you absolutely need a hot air popcorn maker. Oil or butter-based poppers are not suitable and can be dangerous. Stick to the simple, fan-driven models.
How many beans can I roast at once?
It’s best to start small. A typical air popper works well with about 1/4 to 1/3 cup of green beans. Overfilling leads to poor results.
What is the “first crack”?
The first crack is when the beans start to pop and expand due to internal pressure and moisture release. It’s a key audible cue that roasting is underway and development is happening.
What if my beans don’t crack?
This could mean your beans are too old, your popper isn’t hot enough, or you’re not using enough beans to create sufficient pressure. Try fresher beans or ensure your popper is fully preheated.
How long does the roasting process take?
It varies, but typically ranges from 3 to 8 minutes after the beans start moving. This depends on the popper, the bean type, and your desired roast level.
What do I do with the chaff?
Chaff is the papery skin that sheds from the beans during roasting. It will blow out with the hot air. You’ll want to clean your popper afterward to remove any accumulated chaff.
Can I roast dark roasts this way?
Yes, but it’s tricky. You can go up to the beginning of the second crack. Going much beyond that with an air popper is very difficult to control and often results in burnt coffee.
How should I store my roasted beans?
Store them in an airtight container, preferably with a one-way valve, or loosely covered, for about 12-24 hours to degas. After that, seal them up. Avoid the fridge or freezer.
What this page does NOT cover (and where to go next)
- Specific roast profiles for different bean origins.
- Advanced roasting techniques like fluid-bed roasters or drum roasters.
- Detailed chemical changes during the roasting process.
- Troubleshooting specific flavor defects beyond general mistakes.
If you’re looking to dive deeper, explore resources on coffee science, detailed roasting guides, and comparative reviews of professional coffee roasting equipment.