Build Your Own Coffee Roaster At Home
Quick Answer
- DIY roasting is totally doable. You can get creative with common kitchen gear.
- Focus on airflow and even heat. That’s the name of the game.
- Start with a simple setup. Think popcorn popper or oven.
- Understand the roast stages. They’re your roadmap.
- Patience is key. Don’t rush the process.
- Experiment with beans. Find what you dig.
Before you start roasting, make sure you have a good coffee bean grinder to get the freshest possible flavor from your home-roasted beans.
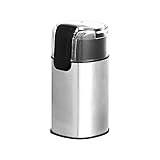
- Electric coffee bean grinder appliance for home use
- Can grind 30 grams/1 ounce of beans for drip coffee brewing in 10 seconds
- Grind coffee beans, herbs, spices, grains, nuts, and more
- Clear safety lid allows you to easily see the results in progress
- Heavy-duty stainless steel grind blade
Who This Is For
- The curious home brewer who wants to go deeper. You’re not just drinking coffee; you’re crafting it.
- The tinkerer who likes a project. Building something cool is half the fun.
- The budget-conscious enthusiast. Roasting your own beans can save a buck.
What to Check First
Before you even think about building, let’s get a few things straight.
Your Goals for Home Roasting
What kind of coffee are you aiming for? Light, medium, dark roast? This impacts the equipment you’ll need and the process. Think about the flavor profiles you enjoy.
Available Space and Ventilation
Roasting produces smoke. A lot of it, sometimes. You need a well-ventilated area, ideally outdoors or with a strong exhaust fan. Kitchen hoods can work, but be prepared for a bit of a smoky kitchen.
Basic Safety Gear
Gloves are a must. You’ll be dealing with heat. Eye protection is smart too, especially when dealing with chaff.
Step-by-Step: Building and Using Your First DIY Coffee Roaster
Let’s dive into a couple of popular DIY methods. We’ll use the humble popcorn popper as our example. It’s a classic for a reason.
Method 1: The Popcorn Popper Roaster
This is where a lot of folks start. It’s fast, simple, and requires minimal modification.
1. Gather Your Gear: You’ll need a hot air popcorn popper (the kind with the heating element at the bottom), a metal bowl to catch the chaff, and green coffee beans.
- What “good” looks like: You have a clean, functional popcorn popper ready to go.
- Common mistake: Using a butter-flavored popper. Stick to plain. You don’t want your coffee tasting like movie theater snacks.
2. Prepare the Popper: Ensure the popper is clean and dry.
- What “good” looks like: No residual popcorn or oil.
- Common mistake: Not cleaning it. Old oil can make your first roast taste funky.
3. Add the Beans: Measure about 1/4 to 1/3 cup of green coffee beans. Don’t overfill.
- What “good” looks like: Beans fill the bottom of the popper but don’t go past the heating element.
- Common mistake: Overfilling. The beans need room to tumble and get even heat. Too many beans and they’ll just steam.
4. Position the Catch Bowl: Place a metal bowl or tray underneath the popper’s spout. This will catch the chaff that flies off during roasting.
- What “good” looks like: The bowl is securely positioned to catch all the ejected chaff.
- Common mistake: Not using a catch bowl. Chaff is flammable and messy. You don’t want it all over your counter.
5. Start the Roast: Plug in the popcorn popper and let it heat up for a minute. Then, add the beans.
- What “good” looks like: The beans start tumbling and you hear the distinct popping sound.
- Common mistake: Adding beans too soon. Give the popper a moment to get hot.
6. Listen and Watch: The roasting process is auditory and visual. You’ll hear “cracks” as the beans roast.
- What “good” looks like: The beans start to change color, from green to yellow, then light brown, and eventually darker. You’ll hear a distinct first crack, like popcorn popping.
- Common mistake: Not listening. The sounds are your primary indicators of roast development.
7. The First Crack: This usually starts around 4-6 minutes. It’s a series of pops.
- What “good” looks like: A steady stream of popping sounds.
- Common mistake: Panicking and stopping too early. The first crack is normal.
8. Develop to Your Roast Level: For a medium roast, you’ll typically stop shortly after the first crack subsides, maybe 30 seconds to a minute later. For darker roasts, you’ll go further, listening for a second crack (quieter, more like Rice Krispies).
- What “good” looks like: Beans reach your desired color and aroma.
- Common mistake: Going too dark too fast. Over-roasting burns the beans, making them bitter.
9. Stop the Roast and Cool: Immediately pour the roasted beans into your catch bowl or a colander to cool. Shake them vigorously to remove chaff.
- What “good” looks like: Beans are rapidly cooling, and chaff is being shed.
- Common mistake: Leaving beans in the hot popper. They’ll continue to roast and can even catch fire.
10. Cooling is Crucial: Spread the beans on a baking sheet to cool completely. This stops the roasting process.
- What “good” looks like: Beans are cool to the touch and no longer steaming.
- Common mistake: Not cooling them fast enough. This leads to baked-on flavors.
11. Degassing: Let your freshly roasted beans rest for at least 12-24 hours, ideally 2-3 days, before brewing. They release CO2.
- What “good” looks like: Beans are stored in a breathable container (like a valve bag) and have rested.
- Common mistake: Brewing immediately. The coffee will taste flat and gassy.
Method 2: The Oven Roaster
This method is slower but allows for larger batches and more control.
1. Gather Your Gear: You’ll need a baking sheet, green coffee beans, and an oven. A metal colander can be helpful for cooling.
- What “good” looks like: You have a clean baking sheet and your oven is ready.
- Common mistake: Using a non-stick pan. Some coatings aren’t meant for high heat.
2. Preheat the Oven: Set your oven to around 450-500°F (230-260°C).
- What “good” looks like: The oven has reached its target temperature.
- Common mistake: Not preheating. You need consistent, high heat for roasting.
3. Spread the Beans: Place a single layer of green coffee beans on the baking sheet. Don’t let them overlap much.
- What “good” looks like: An even, single layer of beans.
- Common mistake: Piling them up. This causes uneven roasting.
4. Roast and Stir: Place the baking sheet in the preheated oven. Stir the beans every 2-3 minutes.
- What “good” looks like: Beans are tumbling and changing color evenly.
- Common mistake: Forgetting to stir. This leads to scorching on one side.
5. Listen for Cracks: Similar to the popper, you’ll hear the first crack. This usually happens around 10-15 minutes in the oven.
- What “good” looks like: You hear the popping sounds indicating development.
- Common mistake: Ignoring the sounds. They are crucial cues.
6. Monitor Color and Time: Develop the roast to your preference. This might take 15-25 minutes depending on your oven and desired roast level.
- What “good” looks like: Beans have reached your desired color and aroma.
- Common mistake: Getting distracted. Oven roasting requires attention.
7. Cool Quickly: Once done, immediately pour the beans into a metal colander and shake them to remove chaff and cool them down.
- What “good” looks like: Beans are cooling rapidly and chaff is being separated.
- Common mistake: Slow cooling. This continues the roasting process.
8. Final Cooling: Spread beans on a baking sheet to cool completely.
- What “good” looks like: Beans are cool to the touch.
- Common mistake: Storing hot beans. This can create off-flavors.
9. Degas: Let beans rest for 12-24 hours before brewing.
- What “good” looks like: Beans have had time to degas.
- Common mistake: Brewing too soon.
Common Mistakes (and What Happens If You Ignore Them)
| Mistake | What it Causes | Fix |
|---|---|---|
| Overfilling the roaster | Uneven roasting, steaming, poor airflow | Measure beans; allow room for tumbling. |
| Not enough ventilation | Smoke-filled room, fire hazard | Roast outdoors or use a powerful exhaust fan. |
| Not cooling beans quickly enough | Over-roasting, baked flavors | Use a colander and vigorous shaking, then spread on a baking sheet. |
| Roasting too many beans at once | Uneven roasting, longer roast times | Stick to recommended batch sizes for your chosen method. |
| Ignoring the “cracks” | Missing key roast development stages | Listen for the first and second crack; they tell you where you are. |
| Brewing immediately after roasting | Gassy, flat, or harsh flavors | Let beans degas for at least 12-24 hours. |
| Using dirty equipment | Off-flavors, potential fire hazard (chaff buildup) | Clean your roaster and cooling tools thoroughly after each session. |
| Not stirring beans in an oven roast | Scorched beans on one side, underdeveloped on other | Stir frequently (every 2-3 minutes) to ensure even heat exposure. |
| Roasting at too low a temperature | Slow, uneven roast; “baked” flavors | Ensure your roaster or oven is preheated to the correct, high temperature. |
| Using beans with inconsistent moisture | Uneven roasting, unpredictable results | Start with good quality green beans from a reputable supplier. |
Decision Rules for Your Home Roaster Build
Here are some simple rules to guide you.
- If you’re short on space and want fast results, then use a hot air popcorn popper because it’s compact and quick.
- If you want to roast larger batches and have more control, then an oven method might be better because it allows for more beans and a slower, more deliberate roast.
- If you notice a lot of smoke, then check your ventilation because you need to ensure it’s adequate for safety and comfort.
- If your beans are coming out unevenly roasted (some light, some dark), then check your stirring or tumbling action because they aren’t getting consistent heat.
- If you hear a distinct “first crack” that sounds like popcorn, then you are entering the medium roast zone and should start monitoring closely.
- If you hear a quieter, more rapid “second crack,” then you are heading into darker roasts and should be ready to stop the roast very soon.
- If your coffee tastes bitter and burnt, then you likely over-roasted, so aim for a shorter roast time next time.
- If your coffee tastes sour or underdeveloped, then you likely under-roasted, so extend your roast time slightly or increase the heat.
- If you’re getting a lot of chaff flying everywhere, then ensure your chaff collector or catch bowl is positioned correctly and effectively.
- If you’re unsure about the exact roast time, then rely more on sight and sound than a timer because bean density and moisture content vary.
FAQ
Q: Is it safe to build a coffee roaster at home?
A: Yes, with proper precautions. Always use heat-resistant gloves and ensure good ventilation. Never leave a roaster unattended.
Q: How much green coffee can I roast at once?
A: It depends on your method. Popcorn poppers are usually limited to about 1/4 to 1/3 cup. Oven methods can handle more, but start small to get the hang of it.
Q: What are “cracks” in coffee roasting?
A: They are audible sounds the beans make as moisture escapes and the bean structure changes. The first crack is like popcorn popping; the second is quieter, like Rice Krispies.
Q: How do I know when my coffee is done roasting?
A: It’s a combination of color, aroma, and sound. Listen for the first and second cracks, observe the bean color, and smell the developing aromas.
Q: Why does my roasted coffee taste bitter?
A: Likely over-roasted. You probably went too far past the first crack or even into the second crack for too long. Try stopping the roast sooner next time.
Q: Why does my roasted coffee taste sour?
A: This usually means it’s under-roasted. The beans haven’t developed enough flavor. Try roasting for a bit longer or ensuring your heat is consistent.
Q: How should I store my freshly roasted beans?
A: In an airtight container with a one-way valve, or in a bag that allows CO2 to escape. Avoid storing them in the fridge or freezer.
Q: Can I use a regular kitchen oven?
A: Absolutely. It’s a common and effective method for home roasting, though it takes longer than a popcorn popper.
Q: What is “chaff”?
A: Chaff is the papery outer skin of the coffee bean that peels off during roasting. It’s flammable and messy, so you need a way to collect it.
What This Page Does NOT Cover (And Where to Go Next)
- Advanced roasting profiles and complex thermal dynamics.
- Building high-capacity, commercial-grade roasters.
- Specific modifications for different types of popcorn poppers or ovens.
If you want to dive deeper, look into resources on:
- Understanding roast levels and their impact on flavor.
- Exploring different green coffee bean origins and varietals.
- Experimenting with cooling techniques and storage methods.
- Considering more advanced home roasting equipment like fluid-bed roasters or drum roasters.