Build Your Own Outdoor Coffee Table
Quick answer
- Decide on your table’s size and style first.
- Choose weather-resistant wood like cedar, redwood, or treated pine.
- Gather your tools: saw, drill, screws, measuring tape, and safety gear.
- Cut your lumber precisely according to your plan.
- Assemble the frame, ensuring it’s square and sturdy.
- Attach the tabletop securely.
- Finish with a protective sealant or stain.
- Enjoy your new outdoor hangout spot.
Who this is for
- DIYers looking to add a functional centerpiece to their patio or deck.
- Homeowners who want a custom-sized table that fits their specific outdoor space.
- Anyone ready to tackle a rewarding woodworking project and save some cash.
What to check first
Design and Dimensions
Before you even grab a saw, nail down your design. Think about how much space you have. Measure your seating area. Do you want a large table for entertaining, or something smaller for a cozy corner? Sketch it out. This saves a lot of headaches later.
Wood Selection
This is key for an outdoor table. You need wood that can handle sun, rain, and maybe even snow. Cedar and redwood are naturally rot-resistant and look great. Treated pine is a budget-friendly option, but make sure it’s rated for ground contact if it’s going to be near the earth. Avoid softwoods like pine unless you’re planning on a very good sealant.
Tools and Materials
Do you have a decent saw? A drill? The right screws? Outdoor-rated screws are important – they won’t rust and stain your wood. You’ll also need a measuring tape, pencil, safety glasses, and maybe some clamps. Double-check you have everything before you start cutting.
When gathering your materials, make sure you have outdoor-rated screws; they won’t rust and stain your wood, ensuring a cleaner finish.
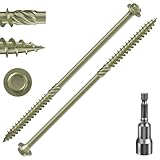
- 【Rolling flower stem and self attacking design】:The rolling handle and self tapping design can reduce the rotational resistance during installation. The deep thread profile and notch tip enable the screw to penetrate wooden materials with minimal pre drilling. Easy to firmly fix in hardwood, cork, and laminated boards. Exquisite craftsmanship ensures that our hexagonal washer heads are non slip, fast, not easily broken, have high strength, are not easily deformed, and are not eccentric.
- 【 High quality material 】: The wooden screws are made of carbon steel and coated with a rust proof layer to prevent corrosion and extend their service life. Ideal external wood screws for wood connections, decks, fences, and other wooden structures, designed specifically for outdoor and humid environments, capable of withstanding harsh outdoor weather conditions.
- 【Unique Design】:This self tapping screw features a unique self tapping design that does not require pre drilling. The serrated line provides a stable grip and secure connection, preventing the wooden board from cracking. Hexagonal head design improves transmission performance.
- 【Easy to install】: This screw adopts hexagonal transmission and is equipped with a deep thread profile and a notch tip. The screw head is fuller, with maximum torque, stronger grip, and less likely to slide. It has better grip than traditional cross head screws, ensuring safe and durable fixation.
- 【Widely used】:These screws are suitable for various materials, including wooden furniture, beds, tables, cabinets and chairs, particleboard, cork and hardwood. These wooden screws have been validated in various projects, from deck retrofitting to scaffold construction, and are also suitable for general woodworking tasks such as frame, fence, deck construction, workbench and countertop installation. Can be used for indoor and outdoor wooden structures that require durable fasteners.
Step-by-step (build workflow)
1. Finalize Your Plan
What to do: Draw out your table’s dimensions, including leg placement and tabletop size. Consider the height. A standard coffee table is usually 16-18 inches high.
What “good” looks like: A clear drawing with all measurements labeled. You can visualize the finished product.
Common mistake: Not measuring your space or existing furniture. This can lead to a table that’s too big or too small. Avoid this by measuring twice, cutting once.
2. Purchase Your Lumber
What to do: Based on your plan, create a lumber cut list. Head to the lumberyard and pick out your boards. Look for straight, knot-free pieces where possible.
What “good” looks like: All the wood you need, free from major defects.
Common mistake: Buying warped or wet lumber. This will cause problems during assembly and with the finished table. Inspect each board carefully.
3. Cut Your Pieces
What to do: Carefully measure and mark your lumber according to your cut list. Use a miter saw or circular saw for clean, straight cuts. Always wear safety glasses.
What “good” looks like: Perfectly cut pieces that match your plan.
Common mistake: Inaccurate cuts. This leads to wobbly legs and a crooked tabletop. Use a speed square to ensure 90-degree angles.
4. Assemble the Base Frame
What to do: Build the frame that will support your tabletop. This usually involves four legs and connecting stretchers. Pre-drill pilot holes to prevent splitting. Use outdoor-rated screws.
What “good” looks like: A solid, square frame. It should stand on its own without wobbling.
Common mistake: Not checking for squareness. Use a framing square to ensure all corners are 90 degrees.
5. Attach the Legs
What to do: Securely attach the legs to the base frame. For extra strength, you can use pocket hole joinery or add corner braces.
What “good” looks like: Legs that are firmly attached and plumb (straight up and down).
Common mistake: Not reinforcing the leg attachment. This can lead to a weak table that shifts. Consider using lag screws for a really solid connection.
6. Construct the Tabletop
What to do: Lay out your tabletop boards. You can edge-glue them together for a solid surface or leave small gaps for a slatted look. If gluing, use a strong wood glue and clamp them tight.
What “good” looks like: A flat, seamless (or intentionally gapped) tabletop surface.
Common mistake: Not using enough clamps when gluing. This results in uneven joints. Let the glue cure completely.
7. Attach the Tabletop to the Base
What to do: Center the tabletop on the base frame and secure it from underneath using screws through the frame into the tabletop.
What “good” looks like: A tabletop that is centered and firmly attached to the base.
Common mistake: Screwing directly from the top. This leaves visible screw heads. Pre-drilling and screwing from below is cleaner.
8. Sand Everything Smooth
What to do: Go over the entire table with sandpaper. Start with a coarser grit (like 80 or 100) and move to finer grits (150-220) for a smooth finish.
What “good” looks like: A smooth, splinter-free surface that feels good to the touch.
Common mistake: Skipping the sanding step. This leaves a rough surface that’s prone to splinters and won’t take stain well.
9. Apply a Protective Finish
What to do: Apply a good quality exterior-grade sealant, stain, or paint. Follow the manufacturer’s instructions for application and drying times. Apply multiple coats for best protection.
What “good” looks like: An even, protective coating that enhances the wood’s natural beauty and repels water.
Common mistake: Not applying enough coats or using an interior product. This will lead to premature wear and tear.
10. Let it Cure
What to do: Allow the finish to fully cure before placing furniture or items on the table. This can take a few days depending on the product and weather.
What “good” looks like: A hardened finish that is no longer tacky.
Common mistake: Rushing this step. Placing items on a not-fully-cured finish can damage the coating. Patience is a virtue here.
Common mistakes (and what happens if you ignore them)
| Mistake | What it causes | Fix |
|---|---|---|
| Using interior wood for outdoor projects | Rot, warping, and insect damage | Use cedar, redwood, or pressure-treated lumber. |
| Not pre-drilling screw holes | Wood splitting, especially near edges | Always pre-drill pilot holes. |
| Using standard screws | Rust stains and weakened joints | Use galvanized or stainless steel exterior screws. |
| Not checking for squareness during assembly | A wobbly, uneven table | Use a framing square religiously. |
| Inadequate sanding | Splinters, rough finish, poor stain adhesion | Sand thoroughly with progressively finer grits. |
| Skipping the sealant/stain | Water damage, UV fading, premature decay | Apply multiple coats of exterior-grade finish. |
| Not letting the finish cure properly | Damaged finish, sticky surfaces | Allow adequate drying and curing time. |
| Cutting wood inaccurately | Gaps, misaligned joints, unstable structure | Measure twice, cut once. Use a guide for saws. |
| Poorly reinforced joints | Weak spots, potential for collapse | Use pocket holes, corner braces, or lag screws where needed. |
Decision rules (simple if/then)
- If you want a rustic look, then consider leaving slight gaps between tabletop boards because it adds character and allows water to drain.
- If you live in a very wet climate, then opt for cedar or redwood because they have natural resistance to rot and decay.
- If budget is a major concern, then pressure-treated pine is a good choice because it’s more affordable than cedar or redwood.
- If you want a smooth, painted finish, then use a finer grit sandpaper (220+) and a high-quality exterior primer and paint because it will look much better.
- If you’re assembling on a soft surface like grass, then consider adding small feet or risers to the legs because it will prevent them from sinking.
- If you’re new to woodworking, then choose a simpler design with fewer complex cuts because it will be more forgiving.
- If you plan to place heavy items on the table, then reinforce the base and tabletop connections with extra screws or bracing because it will increase its weight capacity.
- If you want to protect the wood from UV rays, then choose a stain or sealant with UV inhibitors because it will prevent fading.
- If you notice any splintering during assembly, then stop and sand the area smooth because continuing will make it worse.
- If your wood feels rough after the first coat of finish, then do a light sanding with a fine-grit paper before the next coat because it will create a smoother final surface.
FAQ
What kind of wood is best for an outdoor coffee table?
Cedar and redwood are top choices due to their natural resistance to rot and insects. Pressure-treated pine is a more budget-friendly alternative.
How do I make sure my table is stable?
Ensure all your cuts are precise, pre-drill your screw holes, and use a framing square to check for 90-degree angles during assembly. Reinforce key joints with extra screws or bracing.
Can I use regular wood glue?
For outdoor projects, it’s best to use an exterior-grade wood glue. It’s formulated to withstand moisture and temperature changes better than standard interior glues.
How often should I reapply the finish?
This depends on your climate and the type of finish used. Typically, you’ll want to inspect and reapply a protective coat every 1-3 years.
What if my wood has knots?
Knots can add character, but large or loose knots can be weak points. If a knot is loose, you might need to fill it with epoxy or a wood filler before finishing.
Should I leave gaps between the tabletop boards?
It’s up to your aesthetic. Gaps allow for water drainage, which can help prevent rot. If you prefer a solid surface, ensure the boards are tightly joined and the finish is excellent.
How do I protect my table from the elements?
A good quality exterior sealant or stain is crucial. It acts as a barrier against moisture, UV rays, and temperature fluctuations.
What tools are essential for this project?
You’ll definitely need a saw (circular or miter), a drill, a measuring tape, safety glasses, and a good set of exterior-grade screws.
What this page does NOT cover (and where to go next)
- Specific joinery techniques like mortise and tenon or dovetails. (Look into advanced woodworking guides.)
- Advanced finishing techniques like using epoxy resin for a waterproof top coat. (Search for “epoxy table finishing”.)
- Building complex outdoor furniture sets. (Explore patio furniture design principles.)
- Detailed electrical safety for outdoor lighting integration. (Consult an electrician or specialized outdoor lighting resources.)