Understanding Appliance Electrical Resistance
Quick answer
- Electrical resistance in appliances like a coffee maker or toaster is measured in ohms (Ω).
- Higher resistance means less current flows for a given voltage, often resulting in less heat.
- Lower resistance allows more current to flow, typically generating more heat.
- For example, a coffee maker with 14 ohms and a toaster with 19 ohms will draw different amounts of current.
- Understanding these values helps explain why some appliances heat up faster or hotter than others.
- Always consult your appliance’s manual for specific electrical specifications.
Understanding appliance electrical resistance is key to knowing how your devices work. For a deeper dive into the principles, exploring resources on appliance electrical resistance can be very insightful.
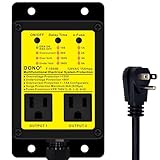
- F-1054B Multifunctional electrical system protection device, this product has the following main functions: Undervoltage protection, less than 90V AC. Overvoltage protection, more than 135V AC. e-Fuse Overcurrent protection, 1 to 15 Amp configurable. Surge protection, maximum 8k Amp(8/20µS). Pulse protection, VPR 700V (L-N, L-G, N-G).
- It is suitable for home appliances, laboratory testing instruments, office electrical equipment, computer systems, etc. Double output outlets, can protect two appliances at the same time. Of course, you can also use power strip extensions, as long as the total power is less than 1800 watts. The product is easy to use and does not require cumbersome settings, all status can be seen at a glance by its LEDs.
- Undervoltage (< 90V) and Overvoltage (> 135V) protection: When the mains voltage is less than 90V or more than 135V, the outlet power output 1 and 2 will be cut off. When the mains voltage returns to normal range, outlet power output will be restored after 10 to 360 seconds (delay time is selectable by button, can select 10, 60, 180, 360 seconds or disable the voltage protection function
- e-Fuse Overcurrent protection function, the e-Fuse function can be disabled and enabled by the button, enable status can set e-Fuse current from 1 Amp to 15 Amps (per step increase 1 Amp), when the load current exceeds the set value, outlet power output 1 and 2 will be cut off within 1 to 3 seconds.
- Surge protection, maximum 8k Amp(8/20µS). Pulse protection, VPR 700V (L-N, L-G, N-G). Live to Neutral, Live to Protective-Earth and Neutral to Protective-Earth, all are equipped with protective components.
Who this is for
- Homeowners curious about how their kitchen appliances work.
- Individuals trying to understand basic electrical principles related to common household devices.
- Anyone who has noticed differences in heating performance between similar appliances and wants to know why.
What to check first
Brewer type and filter type
The type of coffee maker (drip, pour-over, espresso) and its filter (paper, metal, cloth) don’t directly relate to electrical resistance of the heating element. However, they critically impact the brewing process and the final cup. A paper filter, for instance, absorbs more oils than a metal filter, affecting taste.
Water quality and temperature
The mineral content of your water can affect how efficiently a coffee maker heats water. Hard water can lead to scale buildup, which acts as an insulator and reduces heating efficiency over time. While not directly related to the appliance’s inherent electrical resistance, water quality is crucial for optimal performance and longevity. For brewing, water temperature is paramount; ideally, it should be between 195°F and 205°F for most coffee makers.
Grind size and coffee freshness
Grind size and coffee freshness are fundamental to taste but do not influence the electrical resistance of the heating element within your coffee maker or toaster. A fine grind might be suitable for espresso, while a coarser grind is better for a French press. Freshly roasted beans, ground just before brewing, will yield a superior flavor profile compared to stale, pre-ground coffee.
Coffee-to-water ratio
The ratio of coffee grounds to water is a key variable in achieving the desired coffee strength and flavor. This ratio is determined by user preference and brewing method, and it has no bearing on the electrical resistance of the appliance itself. A common starting point for drip coffee is a ratio of 1:15 to 1:18 (coffee to water by weight).
Cleanliness/descale status
A clean appliance is essential for both performance and safety. Scale buildup in a coffee maker can impede water flow and heating efficiency, indirectly affecting brewing time and temperature. Similarly, crumbs in a toaster can lead to uneven toasting and potential fire hazards. Regular cleaning and descaling, as recommended by the manufacturer, are vital for maintaining your appliance’s intended electrical function and lifespan.
Step-by-step (brew workflow)
This section will focus on a typical drip coffee maker workflow, as electrical resistance is most directly relevant to the heating element.
1. Prepare the brewer: Place a clean filter (paper or reusable) into the brew basket.
- What “good” looks like: The filter sits snugly in the basket without gaps.
- Common mistake: Using a creased or improperly seated filter. This can cause water to bypass the grounds, leading to weak coffee. Ensure the filter is fully opened and fits the basket shape.
2. Add coffee grounds: Measure your desired amount of coffee grounds and add them to the filter.
- What “good” looks like: Grounds are evenly distributed in the filter basket.
- Common mistake: Adding too much or too little coffee. Too much can lead to over-extraction and bitterness; too little results in weak, watery coffee. Use a scale for accuracy if possible.
3. Add water: Fill the water reservoir with fresh, cold water to your desired level.
- What “good” looks like: The water level corresponds to the number of cups you intend to brew, as indicated on the reservoir.
- Common mistake: Using hot water or water that has been sitting in the reservoir for a long time. Always use fresh, cold water for the best taste and to prevent mineral buildup.
4. Position the carafe: Ensure the carafe is correctly placed on the warming plate or under the brew basket.
- What “good” looks like: The carafe is fully seated and aligned, ready to catch the brewed coffee.
- Common mistake: Not placing the carafe correctly. This can prevent the brew cycle from starting or cause coffee to spill onto the warming plate.
5. Turn on the brewer: Press the power button or flip the switch to begin the brewing cycle.
- What “good” looks like: The heating element activates, and you’ll hear water heating up.
- Common mistake: Forgetting to turn it on. This seems obvious, but in a morning rush, it can happen! Double-check that the power indicator light is on.
6. Water heats up: The appliance’s heating element, with its specific electrical resistance (e.g., 14 ohms for a coffee maker), converts electrical energy into heat to warm the water.
- What “good” looks like: You’ll hear the water begin to heat and possibly gurgle.
- Common mistake: The heating element not functioning correctly. If you don’t hear any heating sounds or see steam, there might be an issue with the element or power supply.
The appliance’s heating element, with its specific electrical resistance (e.g., 14 ohms for a coffee maker), converts electrical energy into heat to warm the water. If you’re looking to understand this component better, a replacement coffee maker heating element can be a good reference point.

- Genuine Oem Replacement Part
- Bunn Offers Profitable, Reliable Beverage Equipment And Outstanding Post-Purchase Support Wherever Customers Are Served
- Use Genuine Oem Parts For Safety Reliability And Performance
- From The Brand Name: Bunn
7. Water saturates grounds: Hot water flows from the reservoir, through the heating element, and drips onto the coffee grounds.
- What “good” looks like: Water evenly saturates all the coffee grounds in the filter.
- Common mistake: Uneven saturation, often caused by a clogged showerhead or an improperly seated filter. This leads to “channeling,” where water finds easy paths, leaving some grounds under-extracted.
8. Brewing process: The hot water extracts flavor compounds from the coffee grounds as it passes through.
- What “good” looks like: Coffee drips steadily into the carafe.
- Common mistake: Brewing too fast or too slow. A typical drip brew cycle takes 4-8 minutes. If it’s significantly faster or slower, it could indicate issues with grind size, water flow, or the heating element’s performance.
9. Completion: The brewing cycle finishes, and the coffee is ready.
- What “good” looks like: All the water from the reservoir has passed through the grounds into the carafe.
- Common mistake: Stopping the brew cycle prematurely. This results in weak coffee. Some machines have a “pause and serve” feature, but it’s best to let the full cycle complete.
10. Serve: Carefully pour the brewed coffee from the carafe into your mug.
- What “good” looks like: Hot, aromatic coffee.
- Common mistake: Leaving coffee on the warming plate for too long. This can “cook” the coffee, making it bitter and burnt-tasting.
Common mistakes (and what happens if you ignore them)
| Mistake | What it causes | Fix |
|---|---|---|
| Using stale coffee grounds | Weak flavor, lack of aroma, dull taste. | Use freshly roasted beans and grind them just before brewing. Store beans in an airtight container away from light and heat. |
| Incorrect grind size | Over-extraction (bitter) with fine grinds, under-extraction (sour) with coarse. | Match grind size to your brewing method. Drip coffee typically needs a medium grind. Experiment to find what tastes best. |
| Using tap water with high mineral content | Scale buildup, reduced heating efficiency, off-flavors in coffee. | Use filtered or bottled water. Descale your coffee maker regularly according to manufacturer instructions. |
| Not cleaning the coffee maker regularly | Bitter residue, clogged parts, potential mold growth, poor taste. | Rinse the brew basket and carafe after each use. Descale monthly or as recommended by the manufacturer. |
| Incorrect coffee-to-water ratio | Coffee too weak or too strong/bitter. | Use a scale to measure coffee and water by weight for consistency. A common starting point is 1:15 to 1:18 (coffee:water). |
| Using old or dirty filters | Off-flavors, poor filtration, potential paper taste. | Use fresh filters for each brew. If using a reusable filter, clean it thoroughly after each use. |
| Overfilling the water reservoir | Spills, potential damage to the appliance, weak brew. | Fill the reservoir to the desired cup line indicated on the machine. |
| Leaving coffee on the warming plate too long | Burnt, bitter, and stale-tasting coffee. | Transfer brewed coffee to a thermal carafe or drink it promptly. Turn off the warming plate after the brew cycle is complete. |
| Ignoring unusual noises or smells | Potential electrical issues, overheating, or component failure. | Unplug the appliance immediately and consult the manual or manufacturer. |
| Using the wrong type of coffee for the brewer | Poor extraction, inconsistent results. | Research recommended coffee types and grinds for your specific brewing method. |
Decision rules (simple if/then)
- If your coffee tastes weak, then increase the amount of coffee grounds because more coffee solids are needed to extract flavor.
- If your coffee tastes bitter, then try a coarser grind or use less coffee because over-extraction can occur with fine grinds or too much coffee.
- If your coffee maker is heating water slowly, then descale the appliance because mineral buildup acts as an insulator, reducing heating efficiency.
- If you notice coffee grounds in your cup, then check your filter and grind size because fine grounds can pass through paper filters, or a filter may not be seated correctly.
- If your toaster is browning unevenly, then ensure the bread is centered and consider cleaning crumb trays because uneven heat distribution or burnt crumbs can cause this.
- If an appliance seems to be drawing excessive power (tripping breakers), then check its wattage and consider other appliances on the same circuit because overloading a circuit can cause safety issues.
- If your coffee maker is not heating water at all, then check the power supply and ensure the appliance is plugged in securely because a lack of power will prevent the heating element from functioning.
- If your coffee tastes sour, then try a finer grind or longer brew time because under-extraction, often caused by a too-coarse grind, leads to sourness.
- If your toaster is taking an unusually long time to toast, then check for excessive crumb buildup or potential issues with the heating elements because debris can insulate elements, and faulty elements won’t heat properly.
- If you are unsure about an appliance’s electrical specifications, then consult the user manual because it provides vital information on wattage, voltage, and intended use.
FAQ
What does electrical resistance (ohms) mean for my coffee maker?
Electrical resistance, measured in ohms (Ω), indicates how much a component opposes the flow of electrical current. For a coffee maker’s heating element, a specific resistance value (like 14 ohms) determines how much heat it generates when electricity passes through it. Lower resistance generally means more current and more heat, while higher resistance means less current and less heat.
How does resistance affect how hot my toaster gets?
Similar to a coffee maker, a toaster’s heating elements have electrical resistance (e.g., 19 ohms). This resistance dictates how much electrical energy is converted into heat. A toaster with elements designed for a certain resistance will heat up to toast bread. Differences in resistance between toasters can explain why some toast faster or darker than others, assuming similar voltage.
Is it normal for my coffee maker to make noise when heating water?
Yes, it’s normal for a coffee maker to make sounds as it heats water. You might hear gurgling, hissing, or bubbling noises. These sounds indicate the heating element is working and water is transitioning from cold to hot, often through a process involving steam.
Can I use any type of water in my coffee maker?
It’s best to use filtered or bottled water. Tap water, especially if it’s hard, contains minerals that can build up inside your coffee maker over time, forming scale. This scale can reduce heating efficiency, clog parts, and affect the taste of your coffee.
How often should I descale my coffee maker?
You should descale your coffee maker roughly once a month, or more frequently if you have very hard water. Check your appliance’s manual for specific recommendations. Descaling removes mineral buildup that can impact performance and taste.
What is the ideal water temperature for brewing coffee?
The ideal water temperature for brewing most types of coffee is between 195°F and 205°F. Water that is too cool will result in under-extraction and sour coffee, while water that is too hot can scald the grounds and lead to a bitter taste.
My toaster seems to toast slower than it used to. What could be the problem?
A slower toasting time could be due to several factors. Excessive crumb buildup in the toaster can insulate the heating elements, reducing their effectiveness. There might also be an issue with the heating elements themselves or the appliance’s internal electrical components.
Is it safe to leave my coffee maker on all day?
It’s generally not recommended to leave most standard drip coffee makers on all day. The warming plate can overheat the coffee, making it taste burnt, and it can also pose a fire risk if left unattended for extended periods. Many modern coffee makers have automatic shut-off features for safety.
What this page does NOT cover (and where to go next)
- Specific electrical schematics or repair guides for individual appliance models. (Refer to your appliance’s service manual or contact the manufacturer.)
- Detailed calculations of current draw (amperage) based on resistance and voltage. (Consult basic electrical principles or an electrician.)
- Troubleshooting complex electrical faults that require specialized tools or knowledge. (Contact a qualified appliance repair technician.)