Troubleshooting Keurig Coffee Maker: What To Do When It Loses Coffee
Quick answer
- Your Keurig might be losing coffee due to a clogged needle, a blocked water reservoir, or a dirty brew basket.
- First, try descaling the machine and cleaning the brew head.
- Ensure the water reservoir is seated correctly and free of debris.
- Check that the K-Cup pod is properly inserted and not punctured prematurely.
- If the problem persists, a more thorough cleaning of the needles may be required.
- Always refer to your specific Keurig model’s manual for detailed instructions.
What this problem usually is (and is not)
- This issue typically means your Keurig isn’t dispensing the full volume of coffee you expect, or the coffee is weak and watery, rather than no coffee at all.
- It’s usually not a sign of a major internal component failure, but rather a blockage or a setup issue.
- This guide focuses on common brewing problems, not electrical malfunctions or complete machine failure.
- We will not provide instructions for disassembling the entire unit, as this can void warranties and is generally unnecessary for common brewing issues.
- Always ensure your machine is unplugged before attempting any cleaning or maintenance beyond basic rinsing.
- This guide is for troubleshooting when your Keurig loses coffee volume or strength, not when it fails to turn on.
Likely causes (triage list)
Water Flow Issues:
- Clogged Water Reservoir: Debris or mineral buildup in the reservoir can restrict water flow to the pump. Check the reservoir for any visible obstructions and rinse thoroughly.
- Blocked Water Line: The tubing that carries water from the reservoir to the brew head can become clogged with scale or coffee grounds. Descaling is the primary method to address this.
- Faulty Water Pump: Less common, but the pump itself might be failing, not moving enough water. You might hear unusual noises or no noise at all if this is the case.
Grind and Coffee Issues:
- Incorrect Pod Insertion: A K-Cup pod that isn’t fully seated or is positioned incorrectly can prevent proper water penetration. Ensure the pod is pushed down firmly.
- Punctured Pod: If the pod is punctured before brewing begins, coffee grounds can escape and clog the system. Make sure the lid is fully closed before brewing.
- Stale Coffee Grounds: While less likely to cause volume loss, very fine grounds in some reusable pods can lead to over-extraction and a weak brew.
Filter and Basket Issues:
- Clogged Brew Head Needles: The needles that pierce the K-Cup pod can become clogged with coffee grounds or scale, restricting water flow. This is a very common culprit.
- Dirty Brew Basket: Coffee grounds or residue in the brew basket can impede drainage and affect brew quality. Remove and clean the brew basket regularly.
If your Keurig is struggling to dispense coffee, the needles that pierce the K-Cup can often be the culprit. You can find replacement Keurig needles to ensure proper water flow.
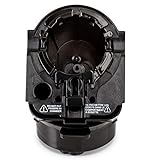
Replacement Pod Holder Needle Assembly For All Keurig 2.0 Models (Full Assembly)
- Designed for all Keurig 2.0 models such as K200, K225, K250, K300, K325, K350, K400, K425, K450, K500, K525, K550, K600, K650, K675. Perfectly compatible with keurig 2.0 model coffee machine.
- Made from high quality materials, 100% BPA free plastic, Helping produce the best brews you ever had!
- Part 1, 2 and 3 for all Keurig 2.0 Models (Full Assembly)
- Remove side sticker and insert full assembly into Brewing Chamber
- We provide a 1-year warranty, Feel free to contact us if there are any problems with the item, we will replace at no charge to you
Machine Setup and Cleaning:
- Machine Needs Descaling: Mineral deposits from water can build up over time, restricting water flow throughout the machine. Regular descaling is crucial.
- Improper Machine Assembly: If parts like the drip tray or water reservoir haven’t been reassembled correctly after cleaning, it can affect water flow. Double-check all components are securely in place.
Fix it step-by-step (brew workflow)
1. Unplug the Keurig:
- What to do: Always disconnect the power cord from the outlet before starting any cleaning or maintenance.
- What “good” looks like: The machine is completely powered off and safe to handle.
- Common mistake: Forgetting to unplug the machine, which can lead to electric shock. Always make safety your first step.
2. Remove and Rinse the Water Reservoir:
- What to do: Detach the water reservoir from the Keurig. Empty any remaining water and rinse it thoroughly with warm, soapy water.
- What “good” looks like: The reservoir is free of visible debris and smells fresh.
- Common mistake: Just topping off the reservoir without rinsing; this doesn’t remove potential buildup or sediment.
3. Clean the Brew Basket:
- What to do: Remove the brew basket assembly (the part where you place the K-Cup). Disassemble it if possible and rinse all parts under warm running water. Use a soft brush if needed to remove stubborn grounds.
- What “good” looks like: The brew basket and its components are free of coffee grounds and residue.
- Common mistake: Not removing the brew basket assembly; the K-Cup holder itself can trap grounds that affect brewing.
4. Clean the Keurig Needles:
- What to do: Locate the top and bottom needles. Use a straightened paperclip or a specialized Keurig descaling tool to gently poke into the needle openings and dislodge any clogs. Be careful not to bend or break the needles.
- What “good” looks like: The needles are clear, and you can see through the openings.
- Common mistake: Forcing the paperclip too hard, which can damage the needles and create a worse problem. Gentle probing is key.
5. Run a Water-Only Brew Cycle:
- What to do: Reassemble the Keurig, ensuring the reservoir is securely in place. Fill the reservoir with fresh water (no coffee pod). Place a mug under the brew spout and run a full brew cycle.
- What “good” looks like: A steady stream of hot water dispenses into the mug.
- Common mistake: Forgetting to remove the K-Cup if you were testing with one in; this can lead to grounds being forced through the system.
6. Repeat Water-Only Brew Cycles (if needed):
- What to do: If the water flow seems weak or intermittent, repeat step 5. You may need to run 2-3 cycles to flush out any remaining blockages.
- What “good” looks like: The water flow becomes stronger and more consistent with each cycle.
- Common mistake: Stopping after one cycle even if the flow is still poor; persistent clogs require multiple flushes.
7. Perform a Descale Cycle (if problem persists):
- What to do: If the above steps don’t resolve the issue, it’s time to descale. Follow your Keurig model’s specific descaling instructions, usually involving a descaling solution or a vinegar/water mixture. This process typically involves running the solution through the machine, letting it sit, and then rinsing thoroughly with fresh water.
- What “good” looks like: After descaling and rinsing, water flows freely and your next coffee brew is strong and full-bodied.
- Common mistake: Not rinsing thoroughly after descaling; residual descaling solution can affect the taste of your coffee.
8. Reassemble and Brew Coffee:
- What to do: Once you’re confident the machine is clear, reassemble all parts. Insert a fresh K-Cup pod, close the lid firmly, and brew your coffee as usual.
- What “good” looks like: Your coffee brews at the expected volume and strength.
- Common mistake: Not ensuring the K-Cup is fully seated; this can lead to weak brews or grounds escaping into the machine.
Prevent it next time
- Descale Regularly: Aim to descale your Keurig every 3-6 months, or more often if you have hard water. Check your manual for specific recommendations.
- Use Filtered Water: Using filtered or bottled water can significantly reduce mineral buildup, extending the life of your machine and improving coffee taste.
- Store Water Properly: Keep the water reservoir clean and don’t leave water sitting in it for extended periods. Rinse it out between uses if possible.
- Clean Brew Head Weekly: Dedicate time each week to rinse the brew basket and check/clean the needles.
- Use Fresh K-Cups: Ensure K-Cup pods are not expired or damaged before use.
- Check Pod Seating: Always ensure the K-Cup is firmly seated before closing the lid.
- Don’t Overfill Reusable Pods: If using a reusable K-Cup filter, don’t pack the grounds too tightly, as this can restrict water flow.
- Regular Exterior Cleaning: Wipe down the exterior of your Keurig regularly to prevent dust and grime buildup.
Common mistakes (and what happens if you ignore them)
| Mistake | What it causes | Fix