Simple Coffee Filter Flowers Craft for Young Children
Quick answer
- Gather washable markers, coffee filters, and water.
- Color patterns onto dry coffee filters.
- Gently spray or dab water onto the colored filters.
- Watch the colors bleed and blend together.
- Let the filters dry completely.
- Shape the dried filters into flower petals.
- Use pipe cleaners or craft sticks for stems.
Who this is for
- Parents and caregivers looking for easy, creative activities for young children.
- Educators seeking simple craft projects for preschoolers and early elementary students.
- Anyone wanting to repurpose common household items into fun, decorative crafts.
What to check first
- Materials: Ensure you have clean, unused coffee filters (basket or cone style will work), washable markers in various colors, and a spray bottle or small cup for water.
- What good looks like: A good supply of colorful markers means more vibrant flower options. Clean filters prevent any unwanted coffee residue from affecting the craft.
- Common mistake: Using permanent markers can lead to less predictable color blending and may not be ideal for young children.
- Workspace: Prepare a protected surface for coloring and drying. This could be a craft mat, newspaper, or a large tray.
- What good looks like: A protected workspace allows children to color freely without worrying about making a mess.
- Common mistake: Not protecting the surface can result in stained tables or floors, leading to cleanup stress.
- Drying area: Have a designated spot where the wet coffee filters can dry without being disturbed. A drying rack or a clean, flat surface works well.
- What good looks like: Ample space for drying prevents the filters from sticking together or getting misshapen.
- Common mistake: Trying to rush the drying process can result in damp, fragile filters that tear easily.
Ensure you have a good supply of colorful, washable markers for vibrant flower options. These are essential for the blending effect.
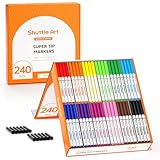
- LARGE VALUABLE SET: Shuttle Art 240 pack washable marker set comes in a box, containing 20 each of 12 different colors including red, orange, pink, yellow, grass green, green, sky blue, sapphire blue, purple, brown, plum, black.
- VERSATILE CONICAL TIP: Premium super tip markers with special conical tips allow you to draw 1mm fine lines with the point and 3mm broad strokes with the side. Excellent for coloring, drawing and writing, perfect for students and teachers as classroom supplies.
- BONUS 12 CAPS: If the original caps were missing, you can use the bonus to protect your markers from drying! These broad line markers are long-lasting suit for students & adults drawing, art projects, homework assignments, and crafts.
- NON-TOXIC & ACID-FREE:These washable marker pens are completely safe for kids and toddlers. We use non-toxic and acid-free ink which is safe on the skin, also conforming to ASTM-D4236.
- SERVICE GUARANTEE: Your satisfaction is our top priority, please rest assured to purchase our products. If you are not satisfied with our products or have any questions, please feel free to contact us at any time.
Step-by-step (brew workflow)
1. Gather Your Supplies: Collect your coffee filters, washable markers, a spray bottle filled with water (or a small cup of water), and pipe cleaners or craft sticks for stems.
- What good looks like: All materials are within easy reach, making the process smooth.
- Common mistake: Forgetting a key item, like water, can interrupt the flow and frustrate young children.
2. Prepare the Coffee Filters: Lay one coffee filter flat on your protected surface.
- What good looks like: The filter is smooth and ready for coloring.
- Common mistake: Trying to color a filter that’s still creased or folded can lead to uneven designs.
3. Color the Filters: Use washable markers to draw patterns, lines, dots, or scribbles on the coffee filter. Encourage children to use a variety of colors.
- What good looks like: The filter is covered in vibrant marker designs, showing the child’s creativity.
- Common mistake: Pressing too hard with the markers can tear the delicate filter material.
4. Add Water: Gently spray the colored filter with water from the spray bottle, or dab it with a damp sponge or brush. Don’t saturate it completely; just enough to make the colors start to run.
- What good looks like: The water causes the marker colors to bleed and blend into beautiful, watercolor-like effects.
- Common mistake: Using too much water can cause the filter to disintegrate or the colors to become muddy and indistinct.
5. Watch the Colors Blend: Allow the water to work its magic, watching the colors spread and merge.
- What good looks like: A beautiful, organic diffusion of colors across the filter.
- Common mistake: Forgetting to let the colors blend can lead to a less impressive watercolor effect.
6. Dry the Filters: Carefully move the wet, colored filters to your designated drying area. Let them dry completely. This can take an hour or more, depending on humidity.
- What good looks like: The filters are completely dry and stiff, holding their new color patterns.
- Common mistake: Handling the filters while they are still damp can cause them to tear or lose their shape.
7. Shape the Petals: Once dry, gently scrunch the center of the coffee filter upwards to create a petal-like effect. You can pinch and twist the bottom slightly.
- What good looks like: The filter now resembles the basic shape of a flower with ruffled edges.
- Common mistake: Scrunching too aggressively can tear the dried filter.
8. Add the Stem: Take a pipe cleaner or craft stick. For a pipe cleaner, thread it through the pinched bottom of the filter and twist it to secure. For a craft stick, you can use a dab of glue or tape to attach the filter to the top.
- What good looks like: The filter is securely attached to the stem, ready to be arranged.
- Common mistake: Not securing the filter well can cause it to fall off the stem.
9. Create More Flowers: Repeat the process to make a bouquet of colorful coffee filter flowers.
- What good looks like: A collection of unique, vibrant coffee filter flowers.
- Common mistake: Making only one or two flowers limits the visual impact and creative expression.
10. Arrange Your Flowers: Place your finished flowers in a small vase, jar, or even a decorated can. They make lovely decorations or gifts.
- What good looks like: A charming display of homemade flowers that brightens up a space.
- Common mistake: Not having a suitable container can leave the flowers looking unfinished.
Common mistakes (and what happens if you ignore them)
| Mistake | What it causes | Fix |
|---|---|---|
| Using permanent markers | Colors won’t blend well, can be too harsh | Use washable markers designed for fabric or paper. |
| Saturating the filter with too much water | Filter may disintegrate, colors become muddy | Use a light spray or dab with a damp sponge; less is more. |
| Handling wet filters | Filters tear easily, shapes become distorted | Let filters dry completely before shaping and handling. |
| Not protecting the workspace | Stained tables, countertops, or floors | Lay down newspaper, a craft mat, or a plastic tablecloth. |
| Using too much pressure with markers | Tears in the coffee filter material | Encourage gentle coloring strokes. |
| Not letting colors blend sufficiently | Less dramatic watercolor effect, colors remain separate | Allow a few moments for the water to spread the ink before drying. |
| Not securing the stem properly | Flower may detach from the stem | Twist pipe cleaners firmly or use a strong craft glue for craft sticks. |
| Making only a few flowers | Lacks visual impact, looks sparse | Make a variety of colors and sizes to create a fuller bouquet. |
| Not allowing filters to dry completely | Filters remain fragile, may stick together | Ensure filters are bone dry before proceeding to the shaping stage. |
| Using colored paper filters | Colors may not show up or blend as vibrantly | Use plain white or off-white paper coffee filters for best results. |
Decision rules (simple if/then)
- If the child is very young (toddler age), then use fewer colors and simpler patterns because they may have less fine motor control.
- If you want a more vibrant, saturated look, then use slightly more water and let the colors blend for a longer time because this encourages more ink diffusion.
- If the filters are drying slowly due to high humidity, then consider using a fan on a low setting to speed up the process because airflow helps evaporation.
- If the goal is to create a specific flower shape (like a rose), then experiment with different ways of scrunching and folding the dried filter because technique matters for form.
- If you don’t have a spray bottle, then use a damp sponge or paintbrush to apply water because alternative methods work just as well for blending colors.
- If the marker colors seem dull after drying, then try using darker or more saturated colors next time because the filter material can sometimes lighten the ink.
- If you want to add embellishments like glitter, then apply it while the filter is still slightly damp so the glitter adheres better because dry surfaces are less adhesive.
- If you are making flowers for a classroom, then ensure all materials are non-toxic and washable because safety and ease of cleanup are paramount.
- If the pipe cleaner is too long for a stem, then twist the excess part around the bottom or trim it carefully because a manageable stem is important for display.
- If you want to create a more layered flower effect, then use multiple colored filters stacked together before adding water because this creates depth and complexity.
- If the craft is for a special occasion, then consider using metallic or glitter markers for a festive touch because these can make the flowers extra special.
FAQ
What kind of markers should I use?
Use washable markers. They are safer for children and will blend beautifully with water. Avoid permanent markers, as they won’t blend as effectively and can be difficult to clean up.
Can I use colored coffee filters?
While you can technically use colored filters, white or off-white paper coffee filters work best. They provide a neutral base for the marker colors to show up vibrantly and blend predictably.
How much water is too much?
You want the colors to bleed and blend, but not so much that the filter becomes saturated and starts to fall apart. A light misting or a gentle dab with a damp sponge is usually sufficient.
How long does it take for the filters to dry?
Drying time can vary greatly depending on humidity and how much water you used. It can take anywhere from 30 minutes to a couple of hours. It’s best to let them dry completely before shaping them.
Can I reuse coffee filters for this craft?
It’s best to use clean, unused coffee filters. Used filters may have coffee residue that could affect the color blending or introduce unwanted smells.
What if my child is having trouble scrunching the filters?
Gently help them by pinching the center yourself, or show them how to softly squeeze the filter from the bottom. The goal is to create a ruffled effect, not to flatten it.
Can I make different types of flowers?
Yes! Experiment with different coloring patterns, amounts of water, and ways of scrunching the dried filters to create a variety of flower shapes and sizes.
What can I do with the finished flowers?
These coffee filter flowers can be used to decorate cards, create a bouquet in a small vase, adorn gift wrapping, or even be attached to a wreath.
What this page does NOT cover (and where to go next)
- Advanced floral arrangement techniques.
- Using coffee filters for other types of crafts beyond flowers.
- Permanent dyeing methods for coffee filters.
For more ideas, explore general craft resources for children or look for tutorials on creating more complex floral designs using different materials.