Repairing Coffee Maker Water Lines: When Super Glue Is Not The Answer
Quick answer
- A cracked or leaking coffee maker water line is a common issue that can lead to messes and potential damage.
- Super glue is generally not a suitable or safe repair material for coffee maker water lines due to heat, pressure, and food safety concerns.
- The best approach is to identify the specific component that is leaking and replace it.
- For minor, external leaks on non-critical tubing, temporary fixes might be possible, but professional repair or replacement is always recommended.
- Always unplug your coffee maker before attempting any inspection or repair.
- If the leak is significant or you’re unsure, it’s safer to contact the manufacturer or a qualified appliance repair service.
What this problem usually is (and is not)
- This problem typically refers to visible water leaks originating from the coffee maker’s internal tubing or external connections.
- It is not usually a sign of a fundamental electrical issue, though water and electricity are a dangerous combination.
- It does not mean the entire coffee maker needs to be discarded, as many parts are replaceable.
- This is not a problem that typically requires advanced technical skills to diagnose, but it does require caution.
- It is not a problem that can be safely or permanently fixed with common household adhesives like super glue, especially on parts that handle hot water or are under pressure.
- This is not a problem that should be ignored, as persistent leaks can damage countertops or lead to mold growth.
Likely causes (triage list)
Water Line Tubing Issues:
- Cracked or brittle tubing: Over time, plastic tubing can degrade. Look for visible cracks, kinks, or sections that feel overly stiff or brittle.
- Loose connection: Tubing may simply have slipped off a fitting or clamp. Gently tug on connections to see if they budge.
- Punctured tubing: Accidental damage during cleaning or maintenance can cause a small hole. Inspect all accessible tubing for nicks or punctures.
Reservoir or Tank Leaks:
- Cracked water reservoir: The plastic tank itself might have a hairline fracture, especially near the base or fill spout. Check the entire exterior of the reservoir for damage.
- Faulty reservoir seal or gasket: The seal where the reservoir connects to the machine might be worn or dislodged. Inspect the rubber gasket for tears or debris.
Internal Component Leaks:
- Leaking pump: The water pump is a common point of failure, and a seal can fail. This is harder to diagnose without disassembly and often requires professional attention.
- Faulty valve: Some machines have internal valves that can malfunction and leak. These are typically not user-serviceable.
Machine Setup and External Factors:
- Overfilling the reservoir: Filling the water tank beyond the maximum line can cause water to spill out. Ensure you are not overfilling.
- Improperly seated components: If parts like the brew basket or carafe aren’t seated correctly, water might overflow or be misdirected. Check that all removable parts are in their proper place.
Fix it step-by-step (brew workflow)
1. Unplug the coffee maker:
- What to do: Disconnect the power cord from the electrical outlet.
- What “good” looks like: The machine is completely de-energized and cool.
- Common mistake: Attempting repairs while the machine is plugged in, posing a serious electrical shock hazard. Always ensure it’s unplugged and has cooled down.
2. Allow the machine to cool:
- What to do: Wait at least 15-30 minutes after unplugging, especially if it was recently used.
- What “good” looks like: All components are cool to the touch.
- Common mistake: Rushing the cooling process, leading to burns from hot internal parts. Patience is key for safety.
3. Identify the leak source:
- What to do: Place dry paper towels or a shallow tray under the machine. Observe carefully where water is appearing during a simulated brew cycle (without power, or by carefully running a small amount of water through if the leak is obvious and external).
- What “good” looks like: You can pinpoint the origin of the water, whether it’s from a specific tube, connection, or component.
- Common mistake: Assuming the leak source is obvious when it might be traveling from another point. Look for the first sign of wetness.
4. Access the affected area:
- What to do: Depending on the machine, you may need to remove the water reservoir, drip tray, or even outer panels. Consult your coffee maker’s manual for disassembly instructions.
- What “good” looks like: You have clear, safe access to the suspected leaking part without forcing anything.
- Common mistake: Forcing panels or components, which can cause further damage or break plastic clips. Use appropriate tools and gentle pressure.
5. Inspect the water line tubing:
- What to do: Examine all visible lengths of tubing for cracks, kinks, or signs of wear. Check where they connect to fittings.
- What “good” looks like: The tubing is intact, flexible, and securely attached to all fittings.
- Common mistake: Only looking at the obvious bend or kink; small cracks can be hard to spot and can worsen over time.
6. Check connections:
- What to do: Gently try to wiggle each tube connection. If it feels loose, try to reseat it firmly.
- What “good” looks like: All tubes are snug on their respective fittings.
- Common mistake: Over-tightening or forcing a loose connection, which can split the fitting or tubing.
7. Address a loose connection:
- What to do: If a tube is loose and has a clamp, ensure the clamp is in place and secure. If there’s no clamp and it’s a push-fit connection, try to push the tubing further onto the fitting.
- What “good” looks like: The tubing is now firmly attached and doesn’t pull off easily.
- Common mistake: Believing a slight wiggle is normal; connections should be secure.
8. Replace damaged tubing:
- What to do: If tubing is cracked, brittle, or punctured, it needs replacement. Cut out the damaged section and replace it with food-grade, high-temperature tubing of the same diameter. You may need to purchase a specific repair kit or generic tubing from an appliance parts store.
- What “good” looks like: The new tubing is the correct size, securely fitted, and shows no signs of leaks after reassembly.
- Common mistake: Using the wrong type of tubing (e.g., garden hose material) that isn’t rated for hot water or food contact. Always use specified materials.
Always use specified materials when replacing damaged sections; food-grade, high-temperature coffee maker tubing is essential for safety and longevity.

- Pre-cut flexible silicone tubing. High quality, flexible silicone compound in compliance with FDA and 3A Sanitary Standards. USDA approved for meat and poultry plants.
- This extremely flexible, food grade silicone is suited for general low pressure industrial applications for the conveyance of chemicals, liquids, gases, and solids of suitable granular size, such as factory air lines automation machinery and pneumatic lines.
- Its many suitable uses include pumps, shiphons, filters, AC and HVAC tubing, drain valve connections, filters, plumbing, drip irrigation, ponds and gardens, beer brewing, wine making, and more.
- Lightweight, flexible, and crystal-clear, tubing provides excellent solvents, alkalis, and acids. Smooth inner surface for easy flow and easy cleaning.
- Because of its versatility and the ability to be used in a wide range of applications, it is a great value for your money. For your industrial, chemical, and agricultural supplies. Also available in 3 feet 10 feet 26 feet.
If tubing is cracked, brittle, or punctured, it needs replacement. You can find a suitable coffee maker water line replacement online to get your machine back in working order.
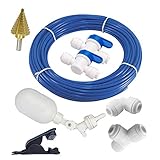
- ★WATER&FOOD USE: NSF Certified CCK 1/4 ro tubing , Food grade Plastic 1/4 Quick connect fittings and Valve , which are widely used in water purification,food/beverage system.
- ★COMPABILITY: Works with non-commercial single serve Keurig's exisiting reservoir, it can be used for refilling kuerig coffee maker single cup water reservoir ,coffee maker with k cup, Keurig Duo coffee maker, Keurig elite , Breville BES870XL, Ninja CP301, Nespresso Evoluo machinesm, JuraS8 Cuisinart coffee maker, even aquarium reservoir.
- ★QUICK AND EASY INSTALLATION: Our Coffee maker DIY Kit provides quick and convenient assembly-saving time&expense. New generation Non-Locking Clip technology offer an easy DIY installation without tools required. No need for a professional plumber.
- ★FUNCTION&QUALITY: Provides Filtered water from your RO system or water filtration system to your coffee makers, and refills water into coffee maker water reservoir automatically whenever the water level is low.Refill will stop automatically when the water reservoir is almost full. Our quality system ensures a superior level of product quality.
- ★COMPLETE COFFEE MAKER AUTO-REFILL KIT: a. 17 Foot 1/4" water line; b. One piece of push-in Float Valve; c. One piece of 90-degree 1/4" elbow adapter; d. One piece of 1/4"Tee fitting; e. Two Pieces of 1/4" shutoff ball valve; f. One piece of Tube cutter ; g. One piece of Stepper drill bit
9. Inspect and clean reservoir seals:
- What to do: Remove the water reservoir. Check its gasket or seal for cracks, tears, or debris. Clean both the gasket and the mating surface on the machine.
- What “good” looks like: The gasket is pliable, free of damage, and clean.
- Common mistake: Not cleaning the sealing surface thoroughly, which can prevent a good seal even with a healthy gasket.
10. Reassemble the coffee maker:
- What to do: Carefully reattach any panels or components you removed, following your manual’s instructions in reverse. Ensure all screws and clips are properly secured.
- What “good” looks like: The machine is fully assembled and appears as it did before disassembly.
- Common mistake: Leaving out screws or not properly snapping panels back into place, which can cause rattling or further issues.
11. Test for leaks:
- What to do: Fill the reservoir with water (no coffee grounds). Plug the machine in and run a short brew cycle (or just the water heating phase if possible).
- What “good” looks like: No water leaks are observed during or after the test cycle.
- Common mistake: Only testing with a small amount of water; a full brew cycle puts more pressure on the system.
12. Address persistent leaks:
- What to do: If leaks persist, the issue may be with a component like the pump or a valve, or there might be a hidden crack. Contact the manufacturer for support or a qualified appliance repair technician.
- What “good” looks like: You have a plan for resolution, either through professional repair or by considering a replacement if repair costs are prohibitive.
- Common mistake: Continuing to use a leaking machine, risking electrical hazards and damage to your surroundings.
Prevent it next time
- Clean Regularly: Wipe down the exterior and clean the brew basket and carafe after each use.
- Descale Periodically: Follow your manual’s recommendations (typically every 1-3 months) to remove mineral buildup, which can stress components.
- Use Filtered Water: This reduces mineral deposits, extending the life of internal parts and improving coffee taste.
- Store Water Properly: If you pre-filter water, store it in a clean, covered container in the refrigerator to prevent bacterial growth.
- Measure Coffee and Water Accurately: Avoid overfilling the reservoir or using too much coffee, which can lead to overflows.
- Inspect Tubing: Periodically check accessible water lines for signs of wear, cracks, or brittleness.
- Handle with Care: Avoid banging or dropping the coffee maker, as this can dislodge or damage internal components.
- Check Seals: Ensure the water reservoir seal is clean and properly seated before each use.
- Listen for Unusual Noises: A pump struggling or unusual gurgling might indicate a blockage or leak.
- Perform Visual Checks: After brewing, quickly glance under the machine for any unexpected drips.
Common mistakes (and what happens if you ignore them)
| Mistake | What it causes | Fix |
|---|---|---|
| Using super glue on water lines | Toxic fumes, material breakdown, leaks, potential health risks from contaminants | Remove glue immediately, clean thoroughly. Replace the affected tubing with food-grade, heat-resistant material. <strong>Do not use super glue.</strong> |
| Ignoring small drips | Water damage to countertops, cabinets, or electrical components; mold growth | Address the leak immediately. Even small leaks can cause significant long-term damage and create an unsafe environment. |
| Using tap water without filtering | Rapid mineral buildup (scale), reduced heating element efficiency, component failure | Use filtered or distilled water. Descale your machine regularly according to the manufacturer’s instructions. |
| Overfilling the water reservoir | Water spills, potential overflow into electrical components, messy countertop | Fill only to the “max” line indicated on the reservoir. Ensure the reservoir is seated correctly. |
| Forcing disassembly or reassembly | Broken plastic parts, stripped screws, damaged internal components | Consult the manual for proper disassembly. Use the correct tools and apply gentle, steady pressure. If something feels stuck, re-evaluate your approach. |
| Not unplugging the machine | Severe electrical shock hazard, damage to the machine | <strong>Always</strong> unplug the coffee maker before any inspection or repair. Ensure it has cooled down if recently used. |
| Using incorrect replacement parts | Leaks, poor fit, component failure, potential safety hazards | Obtain parts specifically designed for your coffee maker model or use certified universal parts. Ensure tubing is food-grade and rated for hot water. |
| Not cleaning reservoir seals | Leaks around the reservoir connection, water bypassing the brew cycle | Remove the reservoir and clean the gasket and the machine’s mating surface. Ensure the gasket is pliable and free of cracks. |
| Using harsh chemicals for cleaning | Damage to plastic components, degradation of seals, potential contamination | Use only cleaning solutions recommended by the manufacturer or mild dish soap and water for external parts. For descaling, use appropriate descaling solutions. |
| Not checking for leaks after repair | Continued water damage, potential electrical hazards, wasted effort | Always perform a test brew with plain water after any repair to confirm the fix and ensure no new leaks have developed. |
Decision rules (simple if/then)
- If water is leaking from the base of the coffee maker, then check the water reservoir seal and its connection to the machine because this is a common failure point.
- If you see a crack in a visible water line tube, then that tube is the source of the leak because plastic becomes brittle over time and can crack.
- If a water line tube feels loose on its fitting, then try to reseat it firmly because vibrations can cause connections to loosen over time.
- If the leak occurs only when the pump is running, then the issue is likely with the pump itself or a line under pressure.
- If the leak is a slow drip from under the brew head, then check the seals and pathways in that specific area.
- If you are unsure about the source of the leak after inspection, then it is safer to seek professional help or contact the manufacturer because internal components can be complex.
- If a component appears to be cracked (like the water reservoir), then it likely needs to be replaced because cracks are difficult to repair reliably.
- If you are considering using an adhesive, then check if it’s food-grade and rated for high temperatures; however, for water lines, replacement is almost always the better and safer option.
- If the leak is significant and causes water to pool around the electrical base, then immediately unplug the machine and do not use it until the leak is resolved due to extreme electrical hazard.
- If the coffee maker is old and the leak is extensive, then consider the cost of repair versus replacement because older machines may have multiple failing parts.
- If you notice mineral buildup (scale) around a leaking area, then descaling might be part of the solution, but it doesn’t fix a physical crack or loose connection.
If a component appears to be cracked, like the coffee maker water reservoir, it likely needs to be replaced because cracks are difficult to repair reliably.
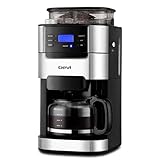
- 【𝟐-𝟏𝟎 𝐂𝐮𝐩 𝐅𝐥𝐞𝐱𝐢𝐛𝐥𝐞 𝐂𝐚𝐩𝐚𝐜𝐢𝐭𝐲】Our drip coffee maker with built-in grinder lets you brew anywhere from 2 to 10 cups. Simply use the “POWDER 2-10” button to adjust the ratio of coffee to water for your perfect strength.
- 【𝐂𝐮𝐬𝐭𝐨𝐦𝐢𝐳𝐚𝐛𝐥𝐞 𝐁𝐫𝐞𝐰 & 𝐆𝐫𝐢𝐧𝐝】This all-in-one machine with a burr grinder offers 3 grind strength levels and 8 adjustable settings. Grind fresh whole beans right before brewing for consistently smooth, flavorful coffee.
- 【𝐑𝐞𝐮𝐬𝐚𝐛𝐥𝐞 & 𝐄𝐚𝐬𝐲-𝐂𝐥𝐞𝐚𝐧 𝐅𝐢𝐥𝐭𝐞𝐫】The coffee maker includes a durable reusable filter that is easy to clean—just rinse with water for quick maintenance and less waste.
- 【𝐈𝐦𝐩𝐨𝐫𝐭𝐚𝐧𝐭 𝐍𝐨𝐭𝐞】Product dimensions: 12.36"D x 8.38"W x 16.93"H. Please measure your countertop and cabinet space beforehand to ensure proper fit.
- 【𝐏𝐫𝐞-𝐁𝐫𝐞𝐰 𝐄𝐱𝐭𝐫𝐚𝐜𝐭𝐢𝐨𝐧 𝐓𝐞𝐜𝐡𝐧𝐨𝐥𝐨𝐠𝐲】Featuring advanced pre-brew technology, this black & silver coffee maker evenly saturates coffee grounds through precise temperature control, unlocking richer flavor and aroma before full brewing.
FAQ
Can I use super glue to fix a cracked coffee maker water line?
No, it is strongly advised against. Super glue is not designed for food-grade applications, can break down under heat and pressure, and may release harmful chemicals into your coffee. Always use appropriate replacement parts.
What kind of tubing should I use if I need to replace a coffee maker water line?
You should use food-grade, high-temperature, flexible tubing. Silicone or specific PVC tubing rated for potable water and hot temperatures is typically recommended. Always check your coffee maker’s manual or contact the manufacturer for specific recommendations.
How do I know if the leak is from the water line or the reservoir?
Carefully observe where the water is appearing. If it’s coming from the base of the machine where the reservoir sits, it’s likely the reservoir seal. If it’s from the machine’s body or internal components, it’s more likely a water line issue.
My coffee maker leaks from the drip tray area. What could be the cause?
This could be a blockage in the brew basket or carafe overflow, or a leak in the internal tubing leading to the brew head. Ensure the carafe is properly seated and the brew basket isn’t clogged.
Is it safe to run my coffee maker if there’s a small leak?
It is generally not recommended. Even a small leak can cause damage to your countertop or the appliance itself over time, and if water gets near electrical components, it can create a safety hazard.
How often should I descale my coffee maker?
This depends on your water hardness and how often you use the machine. A general guideline is every 1-3 months. Check your coffee maker’s manual for specific recommendations.
What if I can’t find the source of the leak?
If you’ve inspected accessible parts and can’t pinpoint the leak, it may be an internal component failure (like the pump or a valve) that requires professional diagnosis and repair.
What this page does NOT cover (and where to go next)
- Electrical component repair: This guide focuses on water lines. For issues with heating elements, switches, or the power cord, consult a qualified technician or the manufacturer.
- Specific model disassembly: While general principles apply, each coffee maker model has unique construction. Refer to your coffee maker’s specific user manual for detailed disassembly and reassembly instructions.
- Troubleshooting brew quality issues: Problems like weak coffee or slow brewing can have causes unrelated to water line leaks, such as grind size, coffee-to-water ratio, or filter type.
- Major internal component replacement: Replacing parts like the water pump or internal valves often requires specialized tools and knowledge. If these components are suspected, professional service is recommended.
- Commercial coffee machine repair: This advice is for typical home coffee makers. Commercial units have different complexities and require specialized service.