Making Lattes with the Ninja Coffee Bar
Quick answer
- Yes, you can make lattes with a Ninja Coffee Bar, but it requires manual milk frothing and steaming.
- The machine brews coffee, but it doesn’t have a built-in frother or steam wand for milk.
- You’ll need a separate milk frother or a steaming pitcher and a way to heat milk.
- Focus on brewing a strong coffee concentrate for the best latte base.
- Experiment with milk types and frothing techniques to achieve your desired texture.
- The quality of your latte will depend heavily on your milk preparation.
While the Ninja Coffee Bar doesn’t have a built-in frother, it’s an excellent machine for brewing the strong coffee concentrate needed for lattes. You’ll just need a separate milk frother to complete the process.
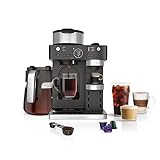
- BARISTA PLUS TECHNOLOGY: The 19-bar pressure system delivers ultra-flavorful espresso with a silky-smooth crema by brewing at the optimal temperature and pressure.
- COFFEEHOUSE DRINKS AT HOME: The built-in, fold-away frother allows you to create espresso-based cappuccinos, lattes, flat whites, and more.
- BREW SINGLE-SERVE ESPRESSO: Choose your favorite espresso capsule and brew up to 3 styles: Espresso (1.35 oz), Lungo (3.75 oz), and Over Ice (1 oz).
- BREW THROUGH COFFEE GROUNDS: Make a Classic, Rich, or Over Ice brew. Select 9 different sizes ranging from cup, to travel mug, to a full 12-cup carafe.
- VERSATILITY TO ENTERTAIN: Treat your guests to an espresso-based coffeehouse drink or brew a 12-cup carafe for the crowd.
Who this is for
- Home coffee enthusiasts who own a Ninja Coffee Bar and want to expand their drink repertoire.
- Individuals looking to recreate coffee shop lattes at home without investing in a dedicated espresso machine.
- Those who enjoy experimenting with different milk textures and flavors in their coffee.
What to check first
Brewer type and filter type
Your Ninja Coffee Bar likely uses a permanent mesh filter or is designed for paper filters. Ensure you have the correct filter type for your specific model. Using the wrong filter can lead to grounds in your coffee or improper extraction. Check your user manual if you’re unsure.
Water quality and temperature
Use fresh, filtered water. Tap water can contain minerals that affect coffee taste and can build up in your machine, requiring descaling. For lattes, the coffee temperature is crucial. Your Ninja Coffee Bar should heat water to an optimal brewing temperature, typically between 195°F and 205°F. If your coffee tastes weak or bitter, water temperature might be a factor, though this is usually determined by the machine’s design.
Grind size and coffee freshness
For a strong coffee base suitable for a latte, a medium-fine to fine grind is often recommended. Freshly roasted and ground beans will yield the best flavor. Pre-ground coffee can lose its aroma and taste quickly. If your coffee tastes flat, try using fresher beans and grinding them just before brewing.
Coffee-to-water ratio
To make a concentrated coffee base for a latte, you’ll need to adjust your coffee-to-water ratio. Instead of a standard brewing ratio, aim for a stronger brew. For example, if your machine has a “Specialty Brew” or “Concentrate” setting, use that. Otherwise, you might need to use more coffee grounds than usual for the amount of water, or brew a smaller batch with the “travel mug” or “half carafe” setting. Consult your Ninja Coffee Bar manual for specific recommendations on brewing stronger coffee.
Cleanliness/descale status
A clean machine is essential for good-tasting coffee. Regularly clean your brew basket, carafe, and any removable parts. If you notice any off-flavors or reduced brewing speed, it’s likely time to descale your Ninja Coffee Bar. Mineral buildup can significantly impact taste and machine performance. Follow the manufacturer’s instructions for descaling.
Step-by-step (brew workflow)
1. Prepare your Ninja Coffee Bar: Ensure it’s clean, descaled, and has fresh water in the reservoir.
- What “good” looks like: The machine is ready to brew, free of old grounds or residue.
- Common mistake: Brewing with a dirty machine or old water, leading to stale coffee taste. Avoid this by rinsing the brew basket and carafe after each use and descaling regularly.
2. Select your coffee and grind: Choose fresh, high-quality coffee beans. Grind them to a medium-fine or fine consistency.
- What “good” looks like: A consistent, even grind that smells fresh.
- Common mistake: Using pre-ground coffee or an inconsistent grind. This can result in weak, bitter, or sour coffee. Grind your beans immediately before brewing for the best flavor.
3. Add coffee grounds to the filter: Place the appropriate filter (permanent or paper) in the brew basket and add your coffee grounds. Use a stronger ratio than usual for a latte.
- What “good” looks like: The grounds are evenly distributed in the filter.
- Common mistake: Overfilling the filter or not using enough coffee for a concentrated brew. Refer to your manual for recommended coffee amounts, and err on the side of more coffee for a latte base.
4. Select brew size and strength: Choose a smaller brew size (e.g., “Travel Mug” or “Half Carafe”) and a stronger brew setting if available (“Specialty Brew” or “Concentrate”).
- What “good” looks like: The machine is set to produce a potent coffee shot.
- Common mistake: Brewing a full carafe on a regular setting. This will dilute the coffee too much for a satisfying latte.
5. Brew the coffee concentrate: Start the brewing cycle.
- What “good” looks like: A rich, dark stream of coffee filling your carafe or mug.
- Common mistake: Interrupting the brew cycle or using the wrong brew setting. Allow the machine to complete its cycle to ensure proper extraction.
6. Prepare your milk: While coffee brews, heat your milk in a separate saucepan or microwave. Do not overheat; aim for around 140-150°F.
- What “good” looks like: Warm milk, steaming gently but not boiling.
- Common mistake: Boiling the milk, which scalds it and ruins the flavor and frothing ability. Heat slowly and monitor the temperature.
7. Froth the milk: Pour the warm milk into a separate milk frother or use an immersion blender/whisk to create foam.
- What “good” looks like: A microfoam texture with small, consistent bubbles.
- Common mistake: Over-frothing, creating large, airy bubbles, or not frothing enough. Experiment with different techniques and frothing times to achieve the desired texture.
8. Combine coffee and milk: Pour your brewed coffee concentrate into your mug.
- What “good” looks like: A dark, aromatic coffee base.
- Common mistake: Using lukewarm or weak coffee. Ensure your coffee is brewed hot and strong enough to stand up to the milk.
9. Add frothed milk: Gently pour the frothed milk over the coffee, holding back the foam with a spoon initially.
- What “good” looks like: A smooth transition of milk into coffee, with a layer of foam on top.
- Common mistake: Dumping all the milk and foam at once, resulting in a less integrated drink. Pour the liquid milk first, then spoon or pour the foam on top.
10. Add sweeteners or flavorings (optional): Stir in sugar, syrup, or other flavorings to taste.
- What “good” looks like: Your latte is customized to your preference.
- Common mistake: Adding too much sweetener, overpowering the coffee and milk flavors. Start with a small amount and add more as needed.
Common mistakes (and what happens if you ignore them)
| Mistake | What it causes | Fix |
|---|---|---|
| Using stale or pre-ground coffee | Weak, bitter, or flat-tasting latte | Use freshly roasted, whole beans and grind them just before brewing. |
| Incorrect grind size | Over-extraction (bitter) or under-extraction (sour, weak) | Aim for a medium-fine to fine grind for a strong coffee base; adjust based on taste. |
| Brewing a full carafe on regular setting | Diluted coffee that lacks the intensity needed for a latte | Use the “Specialty Brew” or “Concentrate” setting, or a smaller brew size with more grounds. |
| Using tap water | Off-flavors in coffee, mineral buildup leading to machine damage | Always use fresh, filtered water. |
| Overheating or boiling milk | Scalded milk flavor, inability to froth properly | Heat milk to 140-150°F; steam until it’s warm and slightly bubbly, not boiling. |
| Poor milk frothing technique | Large, airy bubbles instead of smooth microfoam, or no foam at all | Experiment with different frothing tools and techniques; aim for small, consistent bubbles. |
| Not cleaning the machine regularly | Stale residue affecting coffee taste, potential for clogs and reduced lifespan | Rinse brew basket and carafe after each use; descale your machine as recommended by the manual. |
| Incorrect coffee-to-water ratio | Weak coffee base unable to support milk and foam, or overly bitter coffee | Use more coffee grounds per water than for regular drip coffee; consult your manual for guidance. |
| Adding milk before coffee | Inability to properly mix flavors and create latte art (if desired) | Brew coffee concentrate first, then add milk and foam. |
| Over-sweetening | Masking the natural coffee and milk flavors | Start with a small amount of sweetener and adjust to taste. |
Decision rules (simple if/then)
- If your coffee tastes weak, then increase the amount of coffee grounds you use for the same amount of water, because a latte needs a strong coffee base.
- If your milk has large, airy bubbles, then try frothing for a shorter time or with a different tool, because microfoam is ideal for lattes.
- If your coffee tastes bitter, then check your grind size and ensure it’s not too fine, or consider using slightly less coffee, because over-extraction causes bitterness.
- If your latte tastes bland, then ensure you brewed a concentrated coffee and that your milk was heated to the correct temperature, because both are key to flavor.
- If your Ninja Coffee Bar is brewing slowly or tasting off, then it’s time to descale, because mineral buildup affects performance and taste.
- If you want a richer flavor, then use whole milk for frothing, because it contains more fat which contributes to a creamier texture.
- If you’re using a paper filter and your coffee is too weak, then try using a finer grind setting, because this allows for more surface area for extraction.
- If you find your coffee is too acidic, then try using a slightly coarser grind or a darker roast coffee, because these factors can influence acidity.
- If your frothed milk separates quickly, then you may have overheated it, or the milk fat content might be too low; try heating it to a lower temperature or using a different milk.
- If you want to add syrup or sugar, then do so after combining the coffee and milk, because it allows you to adjust the sweetness more precisely.
FAQ
Can I use my Ninja Coffee Bar to make espresso for a latte?
No, the Ninja Coffee Bar is designed to brew drip coffee, not true espresso, which requires high pressure. You can brew a strong coffee concentrate that serves as a good base for a latte, but it won’t have the same crema as espresso.
How do I get good foam on my milk without a built-in frother?
You’ll need a separate milk frothing device. Options include a handheld electric frother, a French press (pump it vigorously with warm milk), or even a whisk or immersion blender used vigorously with warm milk. The goal is to create small, consistent bubbles for microfoam.
What kind of milk is best for frothing?
Whole milk generally froths the best due to its fat and protein content, creating a rich, stable foam. However, 2% milk can also work well. Dairy alternatives like oat milk and soy milk can also be frothed, but results may vary depending on the brand and specific formulation.
How much coffee should I use for a latte?
For a latte, you’ll want a stronger coffee base than you would for regular drip coffee. Consider using the “Specialty Brew” or “Concentrate” setting if your Ninja Coffee Bar has one. If not, use more coffee grounds than usual for the amount of water you’re brewing. A good starting point is to use about 1.5 to 2 times the amount of coffee you’d normally use for a standard cup.
My latte tastes watery. What did I do wrong?
This usually happens if the coffee base is not strong enough or if the milk wasn’t frothed correctly. Ensure you’re brewing a concentrated coffee using the appropriate settings and more grounds. For the milk, make sure you’re achieving a good microfoam rather than just airy bubbles.
Can I make a latte with cold brew from my Ninja Coffee Bar?
While you can brew cold brew concentrate with some Ninja Coffee Bar models, it’s not ideal for a traditional hot latte. Cold brew has a different flavor profile and is typically used for iced drinks. For a hot latte, a freshly brewed hot coffee concentrate is recommended.
How hot should my milk be before frothing?
Your milk should be warm, ideally between 140°F and 150°F. Avoid boiling it, as this can scald the milk and negatively affect its flavor and ability to froth. If you don’t have a thermometer, heat it until it’s steaming gently but not bubbling vigorously.
What is the difference between frothing and steaming milk?
Steaming milk involves heating and texturing the milk simultaneously using steam, creating a smooth, glossy microfoam. Frothing, in this context, refers to creating foam using a separate frothing device after the milk has been heated. The Ninja Coffee Bar doesn’t steam milk; you’ll be heating it separately and then frothing it.
What this page does NOT cover (and where to go next)
- True espresso extraction and crema creation (this requires an espresso machine).
- Advanced latte art techniques (focus on mastering the basic latte first).
- Specific troubleshooting for every Ninja Coffee Bar model (refer to your owner’s manual).
- Recipes for other espresso-based drinks like cappuccinos or macchiatos (though the principles are similar).
- Commercial-grade coffee brewing equipment.
