Making Cold Drip Coffee: A Step-by-Step Guide
Quick answer
- Cold drip coffee uses gravity and time, not heat, for a smooth, low-acid brew.
- Start with a cold drip tower or a DIY setup.
- Use coarse grounds and filtered water.
- Aim for a slow, consistent drip rate.
- Patience is key; brewing takes 4-12 hours.
- Chill your brew and enjoy the nuanced flavors.
Who this is for
- The coffee lover who wants a smoother, less acidic cup.
- Anyone looking to experiment with different brewing methods.
- Campers who want a sophisticated coffee experience without the heat. (I love a good camp coffee, but sometimes you just want that clean, cold brew taste.)
What to check first
Brewer type and filter type
Are you using a dedicated cold drip tower? Or a DIY setup with a pitcher and a filter? Make sure your setup is clean and ready to go. For towers, check that the drip valve is working smoothly. For DIY, ensure your filter (cloth, paper, or metal) fits snugly and won’t let grounds through.
For DIY setups, ensure your filter fits snugly and won’t let grounds through. A reliable cold brew coffee filter is essential for a clean brew.
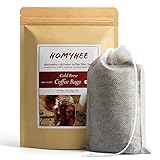
- Easy Use Cold Brew Coffee Filter Bags - over 1 cup capacity bags (4" x 6"), Recommended 100g grounds in 32oz mason jar. Use with your favorite cold brew coffee grounds, the cold brew bags filter well all kinds of coffee grounds, no matter coarse or fine
- Disposable, Use Without Mess - No need to rinse, wash another nylon mesh or cotton filter! This single use cold brew filter bags are as easy as: put the coffee grounds into this filter, brew with cool water and steeping in the fridge overnight (12-15 hours)
- Durable Material - Our cold brew coffee bags pack are made from natural commercially compostable fine fiber. Filter material is super-strong and resists tearing while filtering similar to paper. Great for use with: common cold brew system and most cold brew coffee maker
- Less Chunks - Each package contians 100 pcs of bags. Ultra fine mesh cold brew coffee bag means less sludge fines ending up in your coffee compared to plastic, cloth coffee sock or metal cold brew filters. The drawstring on each of our cold brew filter closes tight to retain all fine & coarse coffee grounds better than metal or plastic cold brew coffee makers.
Water quality and temperature
Use filtered or spring water. Tap water can have off-flavors that will really come through in a slow brew like this. You want the water cold from the start, so keep it in the fridge.
Grind size and coffee freshness
You need a coarse grind, like sea salt. Too fine, and it’ll clog the filter or over-extract, leading to bitterness. Freshly roasted beans are always best, but for cold drip, even a few weeks post-roast is fine. Grind right before you brew.
Coffee-to-water ratio
This is where personal preference shines, but a good starting point is 1:8 or 1:10 coffee to water by weight. For example, 100 grams of coffee to 800-1000 grams (or ml) of water. You can adjust this later.
Cleanliness/descale status
This is non-negotiable. Any old coffee oils will make your cold drip taste stale or bitter. Give your brewer, carafe, and any filters a thorough cleaning. If you use a tower, check the manual for descaling recommendations.
Step-by-step (brew workflow)
1. Measure and grind your coffee. Weigh out your whole beans. Grind them coarsely, aiming for a consistency similar to coarse sea salt.
- What “good” looks like: Uniform, coarse particles. No fine dust.
- Common mistake: Grinding too fine. This will choke your drip and over-extract. Grind coarser than you think.
2. Prepare the filter. Place your chosen filter (paper, cloth, or metal) into the brewer’s filter basket. If using a paper filter, rinse it with cold water to remove any papery taste and help it sit flush.
- What “good” looks like: The filter is securely in place, forming a good seal.
- Common mistake: Filter not seated properly. This allows water to bypass the coffee grounds.
3. Add coffee grounds. Carefully add your coarsely ground coffee to the prepared filter. Gently level the grounds, but don’t pack them down.
- What “good” looks like: An even bed of coffee grounds.
- Common mistake: Tamping the grounds. This restricts water flow. Just let them settle naturally.
4. Add ice and cold water to the top chamber. Fill the top reservoir of your cold drip tower with cold water and ice cubes. The ice helps keep the water temperature consistent and cold throughout the long brew.
- What “good” looks like: The chamber is filled with cold water and ice, ready to start dripping.
- Common mistake: Using warm water. This will speed up the drip and affect extraction.
5. Set the drip rate. This is crucial. Adjust the valve on your cold drip tower (or your DIY valve) to allow water to drip slowly and steadily onto the coffee grounds. Aim for 1-2 drips per second.
- What “good” looks like: A slow, consistent drip, not a stream.
- Common mistake: Drip too fast. This results in a weak, under-extracted coffee.
6. Start the drip. Open the valve to begin the flow of water. The water will slowly saturate the grounds and drip down into the collection carafe below.
- What “good” looks like: The first drips start appearing in the bottom carafe within a few minutes.
- Common mistake: Forgetting to open the valve. You’ll just have a soggy mess.
7. Wait patiently. Let the brew process complete. This can take anywhere from 4 to 12 hours, depending on your brewer, coffee, and drip rate.
- What “good” looks like: A steady drip for the entire duration, filling the carafe.
- Common mistake: Interrupting the process or giving up too soon. Cold drip needs time.
8. Monitor the drip. Keep an eye on the drip rate periodically. If it slows down too much or stops, you might need to adjust the valve or check for blockages (though this is rare with a coarse grind).
- What “good” looks like: Consistent drips throughout the brew.
- Common mistake: Ignoring a stopped drip. You’ll end up with under-extracted coffee.
9. Finish the brew. Once the water has completely dripped through, close the valve. You should have a concentrated coffee liquid in your carafe.
- What “good” looks like: A full carafe of concentrated cold drip coffee.
- Common mistake: Leaving the valve open after the water is gone. Air can make the coffee taste stale.
10. Remove the grounds. Carefully remove the filter basket and discard the used coffee grounds.
- What “good” looks like: Easy removal of the grounds without spills.
- Common mistake: Spilling the grounds into the brewed coffee.
11. Chill and dilute. Your cold drip coffee concentrate is strong. Chill it in the refrigerator for at least an hour. When ready to serve, dilute it with cold water or milk to your preferred strength. A 1:1 or 1:2 ratio of concentrate to water is a good starting point.
- What “good” looks like: A refreshing, smooth coffee beverage.
- Common mistake: Drinking the concentrate straight. It’s too intense.
Common mistakes (and what happens if you ignore them)
| Mistake | What it causes | Fix |
|---|---|---|
| Grinding coffee too fine | Slow drip, clogged filter, over-extraction, bitter taste, muddy coffee. | Use a coarse grind (like sea salt). Check your grinder settings. |
| Using tap water | Off-flavors (chlorine, minerals) that are amplified by slow brewing. | Use filtered or spring water. |
| Drip rate too fast | Under-extraction, weak coffee, sour or watery taste. | Aim for 1-2 drips per second. Adjust the valve slowly. |
| Not cleaning the brewer thoroughly | Stale, rancid coffee oils contaminate the brew, leading to bitterness. | Clean all parts meticulously before and after each brew. Check the manual for deep cleaning. |
| Packing coffee grounds down | Restricted water flow, uneven extraction, potential for channeling. | Gently level the grounds, but do not tamp. Let gravity do the work. |
| Using stale coffee beans | Lack of flavor, muted aromatics, generally dull taste. | Use freshly roasted beans (within 2-4 weeks of roast date). Grind right before brewing. |
| Not chilling the brew | Warm, less refreshing taste. May not fully appreciate the smooth profile. | Chill the concentrate for at least an hour before diluting and serving. |
| Diluting too much or too little | Coffee is too weak or too strong, masking the intended flavor profile. | Start with a 1:1 or 1:2 ratio of concentrate to water and adjust to your preference. |
| Using warm water in the top chamber | Accelerates drip rate, leads to warmer brew temperature, affects extraction. | Always use cold water and ice in the top chamber. |
| Not checking the drip valve | Inconsistent flow, potential for clogs or leaks. | Ensure the valve is clean and functions smoothly. Test it before adding coffee. |
Decision rules (simple if/then)
- If your cold drip tastes weak and sour, then your grind is likely too coarse or your drip rate is too slow, because under-extraction occurs when water doesn’t extract enough from the grounds.
- If your cold drip tastes bitter and harsh, then your grind is likely too fine or your drip rate is too fast, because over-extraction occurs when water extracts too much from the grounds.
- If your cold drip has off-flavors, then your water quality or cleanliness of your equipment is suspect, because impurities will be amplified in a slow brew.
- If your drip stops completely, then your grind is too fine or there’s a blockage, because the water can’t pass through.
- If you want a more concentrated brew, then use a higher coffee-to-water ratio (e.g., 1:6 instead of 1:8), because more coffee means a more intense flavor.
- If you want a less intense brew, then use a lower coffee-to-water ratio (e.g., 1:10 instead of 1:8) or dilute more, because less coffee or more water will mellow the flavor.
- If you’re brewing with a new coffee, then start with a standard ratio (1:8) and a moderate drip rate (1.5 drips/sec), because you can adjust based on the results.
- If you notice sediment in your cup, then your filter might be too porous or not seated correctly, because grounds are passing through.
- If your brew is taking significantly longer than expected (e.g., over 15 hours), then check your grind size and drip rate, because something is likely slowing it down too much.
- If you want to experiment with flavor, then try different coffee origins or roast levels, because cold drip highlights subtle nuances.
FAQ
What is cold drip coffee?
Cold drip coffee is brewed using gravity and time, with cold water slowly dripping through coffee grounds over several hours. It produces a smooth, low-acid, and highly concentrated coffee.
How long does cold drip coffee take to brew?
Typically, a cold drip brew takes between 4 to 12 hours to complete, depending on the brewer and the desired drip rate. Patience is definitely a virtue here.
What kind of coffee beans should I use?
Lighter to medium roasts often shine in cold drip, as their nuanced flavors are preserved without the heat. Freshly roasted beans are always recommended for the best taste.
Can I use a regular coffee maker for cold drip?
No, a standard drip coffee maker uses hot water and a much faster brew cycle. Cold drip requires a specific setup designed for slow, cold water extraction.
How should I store cold drip coffee concentrate?
Store the concentrate in an airtight container in the refrigerator. It can last for up to two weeks, though the flavor is best within the first week.
Is cold drip coffee stronger than hot coffee?
Yes, cold drip coffee is usually brewed as a concentrate. This means it’s stronger than regular drip coffee and is meant to be diluted before drinking.
What’s the difference between cold brew and cold drip?
Cold brew typically involves steeping coffee grounds in cold water for 12-24 hours. Cold drip uses a slow, continuous drip of water through the grounds, creating a different flavor profile and often a more concentrated result.
Can I make cold drip coffee without a tower?
Absolutely. You can create a DIY cold drip system using a pitcher, a filter, and a way to control the drip rate, like a valve from a homebrew supply store or even a carefully managed ice-water-filled plastic bag with a small hole.
What this page does NOT cover (and where to go next)
- Specific cold drip tower models and their features.
- Advanced techniques like bloom phases in cold drip.
- Detailed flavor profiles of specific coffee origins when brewed cold drip.
- The science behind extraction and how it differs with temperature.
- Recipes for cold drip coffee cocktails or mixed drinks.