Is Your Ninja Coffee Maker Dishwasher Safe?
Quick answer
- Most removable parts of your Ninja coffee maker are dishwasher safe, but not all.
- Always check your specific model’s manual. That’s the golden rule.
- The carafe, brew basket, and permanent filter are typically safe for the top rack.
- The heating element, base unit, and control panel are NOT dishwasher safe. Ever.
- Handwashing is often best for longevity and a truly clean machine.
What this problem usually is (and is not)
This is about understanding which parts of your Ninja coffee maker can handle a trip through the dishwasher and which can’t. It’s not about whether the whole machine can be submerged. That’s a big no-no. We’re talking about removable components, and even then, caution is key. The goal is to keep your coffee tasting great and your machine running smoothly, not to create a new cleaning chore.
If you’re looking to replace any removable parts of your Ninja coffee maker, such as the carafe or brew basket, consider exploring available Ninja coffee maker parts to ensure compatibility and continued performance.
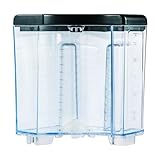
- 【ENHANCED CAPACITY WATER TANK】SLLFLY offers a water reservoir compatible with for the Ninja 12-cup coffee maker, featuring 60-ounce capacity.
- 【STURDY AND RELIABLE CONSTRUCTION 】SLLFLY's removable 60 oz water tank is meticulously crafted from high-quality materials, ensuring a lightweight yet durable construction that is free from odors, reusable, and resistant to breaking or warping. This guarantees a long-lasting and reliable performance.
- 【SIMPLIFIED CLEANING PROCESS 】The SLLFLY water tank Compatible with the Ninja 12-cup coffee maker is designed for easy removal and thorough cleaning. The tank's water flow is meticulously optimized to ensure a consistent and efficient brewing experience.
- 【MODEL CONFIRMATION REQUIRED】Prior to purchasing, please verify that the SLLFLY water tank is compatible with Ninja 12-cup coffee maker model. CE201,CE251, CE200,CE200BRN,CE200C,CE201,CE201BRN,CE201C.This 60 oz water reservoir is designed as a direct replacement part for the Ninja 12-cup coffee maker and does not include the coffee maker itself.
- 【EXEMPLARY CUSTOMER SERVICE 】SLLFLY is committed to providing exceptional customer support. Should you encounter any issues with the replacement water reservoir, our team is ready to assist you promptly, ensuring a seamless and hassle-free resolution.
Likely causes (triage list)
Dishwasher Safe Parts (Generally)
- Carafe: If it’s glass or most plastics, it’s usually fine. Check for any special coatings or decorations that might peel.
- Brew Basket/Filter Holder: These are typically sturdy plastic. Look for any integrated electronic components or delicate mesh that might be damaged.
- Permanent Filter (Mesh/Metal): Most metal or mesh filters are designed for repeated use and cleaning. Inspect for any coatings that could degrade.
Dishwasher Unsafe Parts (Definitely)
- Heating Element/Base Unit: This is the electrical heart of your machine. Water and electricity? Bad combo. Never submerge.
- Control Panel/Display: These have electronics and seals that aren’t meant for high heat and water jets.
- Power Cord and Plug: Obvious, but worth stating. Keep these dry.
- Any Part with Integrated Electronics: If it has buttons, screens, or lights, assume it’s not dishwasher safe.
Confirming the Cause:
For parts that seem questionable, the best bet is to look for symbols on the item itself (like a dishwasher-safe icon) or, as mentioned, consult your owner’s manual. For parts that are clearly electrical or electronic, the answer is always no.
Fix it step-by-step (brew workflow)
This section isn’t about fixing a broken machine, but rather about the workflow of cleaning your Ninja coffee maker, including which parts can go in the dishwasher.
1. Unplug the Machine: Always start by disconnecting the power.
- What “good” looks like: The machine is completely dead, no lights, no humming.
- Common mistake: Forgetting to unplug. This is a safety hazard and can damage the machine.
2. Remove Removable Parts: Take out the carafe, brew basket, and permanent filter if you have one.
- What “good” looks like: All detachable components are out and ready for cleaning.
- Common mistake: Forcing a part that’s stuck. Give it a gentle wiggle.
3. Inspect Removable Parts for Dishwasher Safety: Check your manual or look for symbols.
- What “good” looks like: You’ve identified which parts are dishwasher safe.
- Common mistake: Assuming everything plastic is fine. Some plastics can warp or degrade.
4. Load Dishwasher (if applicable): Place only the dishwasher-safe parts on the top rack.
- What “good” looks like: Parts are secured and won’t bang around.
- Common mistake: Overcrowding the dishwasher or placing parts where they might get damaged by other items.
5. Run Dishwasher Cycle: Use your normal wash cycle.
- What “good” looks like: A clean wash.
- Common mistake: Using a super-hot or sanitize cycle that might be too harsh for some plastics.
6. Handwash Non-Dishwasher Safe Removable Parts: Use warm, soapy water for the carafe lid, any scoops, or other accessories not going in the dishwasher.
- What “good” looks like: Clean and residue-free.
- Common mistake: Using abrasive scrubbers that can scratch surfaces.
7. Wipe Down the Machine Exterior: Use a damp cloth to clean the base, control panel, and any exterior surfaces.
- What “good” looks like: Clean, streak-free exterior.
- Common mistake: Spraying cleaner directly onto the control panel or vents.
8. Clean the Drip Tray: If your model has one, remove and wash it by hand.
- What “good” looks like: Free of coffee grounds and residue.
- Common mistake: Forgetting to empty and clean it regularly, leading to mold.
9. Rinse and Dry All Parts: Thoroughly rinse any hand-washed items and let all dishwasher-safe parts air dry completely.
- What “good” looks like: Bone dry components.
- Common mistake: Reassembling while parts are still wet, which can lead to mildew.
10. Reassemble the Machine: Put everything back together once dry.
- What “good” looks like: All parts fit snugly.
- Common mistake: Forcing parts that aren’t aligned correctly.
Prevent it next time
- Read Your Manual: Seriously, it’s the best guide for your specific Ninja.
- Top Rack Only: If a part is dishwasher safe, always place it on the top rack.
- Avoid Harsh Detergents: Stick to regular dishwasher detergent; avoid anything with bleach or strong degreasers.
- Handwash Delicate Parts: If you’re unsure, or if a part has painted details or a special finish, handwash it.
- Wipe Down Regularly: A quick wipe of the exterior after each use prevents buildup.
- Descale Periodically: Follow your manual’s instructions for descaling to keep water flowing and taste pure.
- Use Filtered Water: Less mineral buildup means less cleaning and better coffee.
- Air Dry Thoroughly: Always ensure parts are completely dry before reassembling or storing.
- Check Seals: Make sure any rubber or silicone seals on the carafe or brew basket are intact and clean.
Common mistakes (and what happens if you ignore them)
| Mistake | What it causes | Fix |
|---|---|---|
| Dishwashing the main unit | Electrical short, damage to heating element, machine failure, fire hazard | <strong>Never.</strong> Wipe with a damp cloth only. |
| Dishwashing the control panel | Water damage to electronics, buttons stop working, display failure | <strong>Never.</strong> Wipe with a damp cloth only. |
| Dishwashing parts with integrated tech | Similar to control panel damage; components will likely fail | <strong>Never.</strong> Check manual; if it has electronics, it’s not dishwasher safe. |
| Using abrasive cleaners on carafe | Scratches on glass, potential for micro-cracks, cloudy appearance | Use a soft sponge and mild soap. If dishwasher safe, let the machine do the heavy lifting. |
| Forgetting to unplug before cleaning | Risk of electric shock, accidental activation of machine | <strong>Always</strong> unplug. It’s non-negotiable. |
| Not drying parts completely | Mold, mildew, stale odors, potential for rust on metal components | Air dry thoroughly or dry with a clean towel before reassembly. |
| Using harsh dishwasher detergents | Can degrade plastic, fade colors, or damage special finishes on parts | Use standard, mild dishwasher detergent. |
| Placing parts loosely on bottom rack | Can get damaged by heavier items or high-pressure water jets | Securely place on the top rack, away from heating elements and spray arms if possible. |
| Ignoring descaling | Slow brewing, weak coffee, mineral buildup affecting taste and machine life | Follow manual for descaling frequency and procedure (usually vinegar or citric acid solution). |
| Using tap water with high mineral content | Faster scale buildup, impacting taste and performance | Use filtered or bottled water for brewing and cleaning. |
Decision rules (simple if/then)
- If a part has exposed electronics or a power cord, then do not put it in the dishwasher because water and electricity don’t mix.
- If the manual explicitly states a part is dishwasher safe, then you can use the dishwasher for that part because the manufacturer has tested it.
- If a part is made of glass or sturdy plastic and has no electronic components, then it is likely dishwasher safe, but always double-check the manual.
- If a part has painted decorations or a special coating, then consider handwashing it because these finishes can degrade in the dishwasher.
- If you’re unsure about a part’s dishwasher safety, then err on the side of caution and handwash it because it’s better to be safe than sorry.
- If you notice warping or discoloration on a part after it goes through the dishwasher, then stop dishwashing that part immediately because it’s being damaged.
- If your Ninja coffee maker has a permanent metal filter, then it’s usually dishwasher safe, but check the manual for specific instructions.
- If the carafe lid has a complex mechanism or seals, then handwashing might preserve its integrity longer than the dishwasher.
- If you’re experiencing coffee tasting “off” after cleaning, then ensure all parts, especially the carafe and brew basket, are thoroughly rinsed and dried.
- If you see any signs of rust or corrosion on a metal component, then it’s definitely not dishwasher safe and needs to be replaced if possible.
FAQ
Q: Can I put my Ninja coffee maker carafe in the dishwasher?
A: Usually, yes, but always check your model’s manual. Glass carafes and most sturdy plastic ones are generally safe for the top rack.
Q: Is the brew basket for my Ninja coffee maker dishwasher safe?
A: Most brew baskets are made of durable plastic and are dishwasher safe. Again, a quick look at your manual confirms this.
Q: What about the permanent filter if my Ninja has one?
A: Yes, the permanent mesh or metal filters are typically designed to withstand dishwashing. Ensure no food particles are stuck before loading.
Q: Can I wash the main body or base of my Ninja coffee maker?
A: Absolutely not. The base contains electrical components and the heating element. Never submerge it or put it in the dishwasher. Wipe it down with a damp cloth only.
Q: My carafe lid looks dirty, can it go in the dishwasher?
A: It depends on the lid design. If it’s simple plastic, it might be. If it has a complex mechanism or a rubber seal, handwashing is often better to ensure longevity. Check the manual.
Q: What if my manual is lost? How do I know if parts are dishwasher safe?
A: Look for dishwasher-safe symbols on the parts themselves. If no symbols are present and you’re still unsure, stick to handwashing to be safe.
Q: Will dishwashing damage my Ninja coffee maker?
A: Only if you put the wrong parts in. Dishwashing the carafe or brew basket is fine. Dishwashing the main unit will cause significant damage.
Q: How often should I clean my Ninja coffee maker?
A: Daily cleaning of the carafe and brew basket is recommended. Descaling should be done every 1-3 months, depending on water hardness and usage.
Q: My plastic parts look dull after dishwashing. What happened?
A: High heat or harsh detergents can sometimes dull the finish of plastics over time. Using the top rack and milder detergents can help prevent this.
What this page does NOT cover (and where to go next)
- Specific model troubleshooting: This guide is general. For issues unique to your model, consult your manual.
- Repairing electrical components: If your machine’s electronics are damaged, do not attempt repairs. Contact the manufacturer.
- Deep cleaning techniques for specific stains: For stubborn coffee stains, you might need specialized cleaning solutions.
- Comparing Ninja models: This article focuses on cleaning, not on which Ninja coffee maker is best.
- Advanced brewing techniques: This is about basic maintenance, not how to achieve the perfect pour-over.