Are Ninja Coffee Maker Parts Dishwasher Safe?
Quick answer
- Most removable Ninja coffee maker parts are top-rack dishwasher safe.
- Always check the specific part and your Ninja manual.
- Avoid high heat settings on your dishwasher.
- Handwashing is often gentler and prolongs part life.
- Certain materials like metal or electronic components are NOT dishwasher safe.
- If in doubt, err on the side of caution and handwash.
For those looking for replacement parts or to upgrade, consider exploring available Ninja coffee maker parts.
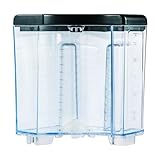
- 【ENHANCED CAPACITY WATER TANK】SLLFLY offers a water reservoir compatible with for the Ninja 12-cup coffee maker, featuring 60-ounce capacity.
- 【STURDY AND RELIABLE CONSTRUCTION 】SLLFLY's removable 60 oz water tank is meticulously crafted from high-quality materials, ensuring a lightweight yet durable construction that is free from odors, reusable, and resistant to breaking or warping. This guarantees a long-lasting and reliable performance.
- 【SIMPLIFIED CLEANING PROCESS 】The SLLFLY water tank Compatible with the Ninja 12-cup coffee maker is designed for easy removal and thorough cleaning. The tank's water flow is meticulously optimized to ensure a consistent and efficient brewing experience.
- 【MODEL CONFIRMATION REQUIRED】Prior to purchasing, please verify that the SLLFLY water tank is compatible with Ninja 12-cup coffee maker model. CE201,CE251, CE200,CE200BRN,CE200C,CE201,CE201BRN,CE201C.This 60 oz water reservoir is designed as a direct replacement part for the Ninja 12-cup coffee maker and does not include the coffee maker itself.
- 【EXEMPLARY CUSTOMER SERVICE 】SLLFLY is committed to providing exceptional customer support. Should you encounter any issues with the replacement water reservoir, our team is ready to assist you promptly, ensuring a seamless and hassle-free resolution.
Who this is for
- Ninja coffee maker owners who want to simplify cleanup.
- Anyone looking to understand the best way to care for their brewer.
- People who prefer quick maintenance over detailed manual reading (though you should still glance at it!).
What to check first
Brewer type and filter type
Know your Ninja model. Some have built-in metal filters, others use paper. The type of filter dictates some cleaning methods. Metal filters often need a good scrub. Paper filters are usually a one-and-done deal.
Water quality and temperature
This doesn’t directly impact dishwasher safety, but it’s key for great coffee. Hard water can leave mineral deposits, which might affect how well parts clean, even in a dishwasher. Using filtered water is always a good call for taste and brewer health.
Grind size and coffee freshness
Again, more about the brew than the parts. But if you’re dealing with coffee grounds stuck in a filter basket, fresh grounds are easier to rinse off than stale, oily ones. Think of it like trying to clean up flour versus old mud.
Coffee-to-water ratio
This is all about the brew itself. Too much coffee can lead to overflow and mess, which then becomes a cleaning issue. Too little coffee and you get weak brew. Get the ratio right, and you minimize the cleanup job in the first place.
Cleanliness/descale status
This is crucial. If your Ninja is caked with old coffee oils or mineral buildup, a dishwasher might not be enough. Regular descaling is non-negotiable for performance and longevity. If parts look grimy, a good soak or scrub might be needed before they even hit the dishwasher.
Step-by-step (brew workflow)
Let’s talk about cleaning your Ninja coffee maker parts. It’s not rocket science, but a little care goes a long way.
1. Unplug the brewer.
- What “good” looks like: The machine is completely powered down and cool to the touch. Safety first, always.
- Common mistake: Trying to clean while it’s still plugged in or warm. This is a recipe for a shock or a burn. Just wait a few minutes.
2. Remove the brew basket and carafe.
- What “good” looks like: These pieces come out easily without forcing.
- Common mistake: Yanking too hard. Some parts might have a slight locking mechanism. A gentle wiggle usually does the trick.
3. Discard used coffee grounds and filter.
- What “good” looks like: All grounds are out of the basket. If using a paper filter, it’s removed cleanly.
- Common mistake: Leaving grounds behind. They can get sticky and hard to remove later, especially if they dry out.
4. Rinse removable parts.
- What “good” looks like: A quick rinse under the tap washes away loose debris.
- Common mistake: Skipping this step. It makes the next stage much easier. Don’t let grounds dry and cake on.
5. Check your Ninja manual for dishwasher instructions.
- What “good” looks like: You’ve confirmed which parts are safe and where they go (usually top rack).
- Common mistake: Assuming everything is dishwasher safe. Some materials or electronic components will be damaged. Trust the manual.
6. Load dishwasher-safe parts onto the top rack.
- What “good” looks like: Parts are positioned so water can circulate and clean them effectively. Avoid overcrowding.
- Common mistake: Placing parts on the bottom rack where the heating element is. This can warp or melt plastic.
7. Run a normal dishwasher cycle.
- What “good” looks like: The cycle completes without any issues.
- Common mistake: Using a heavy-duty or sanitize cycle with very high heat. This can damage plastic parts over time. Stick to regular or light cycles.
8. For non-dishwasher-safe parts (or if handwashing):
- What “good” looks like: Use warm, soapy water and a soft sponge or cloth. Gently scrub away coffee oils and residue.
- Common mistake: Using abrasive scrubbers or harsh chemicals. These can scratch surfaces or leave behind residues that affect coffee taste.
9. Thoroughly rinse hand-washed parts.
- What “good” looks like: All soap residue is gone.
- Common mistake: Not rinsing enough. Leftover soap tastes terrible in your next cup of coffee.
10. Allow parts to air dry completely.
- What “good” looks like: No moisture is visible on any part.
- Common mistake: Reassembling while parts are still wet. This can lead to mildew or affect the brewer’s function.
11. Reassemble the brewer.
- What “good” looks like: All parts are back in their correct places.
- Common mistake: Forcing parts that don’t seem to fit. Double-check the orientation.
12. Run a water-only brew cycle periodically.
- What “good” looks like: Clean water runs through the system, flushing out any residual cleaning agents or loose debris.
- Common mistake: Skipping this after a deep clean or descaling. You don’t want last night’s dish soap in your morning joe.
Common mistakes (and what happens if you ignore them)
| Mistake | What it causes | Fix |
|---|---|---|
| Putting non-dishwasher-safe parts in | Warping, melting, or damage to electronic components. | Check your manual; handwash these parts with warm, soapy water. |
| Using high heat dishwasher cycles | Plastic parts can warp, crack, or become brittle over time. | Use normal or light dishwasher cycles; avoid sanitize or heavy-duty settings. |
| Not rinsing parts after handwashing | Lingering soap residue that ruins the taste of your coffee. | Rinse thoroughly under running water until no suds remain. |
| Leaving coffee grounds in the basket | Dried grounds become sticky and hard to remove, potentially clogging parts. | Rinse the brew basket immediately after use. |
| Using abrasive scrubbers on plastic parts | Scratches that can harbor bacteria and affect aesthetics. | Use a soft sponge or cloth with warm, soapy water. |
| Not drying parts completely before reassembly | Potential for mildew growth and water damage to internal brewer components. | Air dry all parts thoroughly or dry with a clean towel before putting them back together. |
| Skipping regular descaling | Mineral buildup that affects brewing temperature, flow rate, and taste. | Follow your Ninja manual’s descaling instructions (usually with vinegar or a descaling solution). |
| Ignoring strange noises or smells | Indicates a deeper issue, possibly related to buildup or a malfunctioning part. | Stop using the brewer and consult your manual or customer support. |
| Putting metal parts in the dishwasher | Some metal finishes can be dulled or damaged by harsh detergents. | Handwash metal components like permanent filters to preserve their finish. |
Decision rules (simple if/then)
- If a part is clearly labeled “handwash only” then do not put it in the dishwasher because it’s designed for gentler cleaning.
- If you’re unsure if a part is dishwasher safe then check the Ninja manual or err on the side of caution and handwash it because damaging a part is more hassle than a quick wash.
- If a part is made of delicate plastic or has electronic components then do not place it in the dishwasher because high heat and water can cause irreparable damage.
- If your dishwasher has a “sanitize” or “high heat” setting then use a lower temperature cycle for coffee maker parts because excessive heat can warp or degrade plastic.
- If a part feels rough or has visible scratches after cleaning then it might have been scrubbed too harshly, so use softer materials next time to avoid trapping coffee oils.
- If you notice a cloudy film on your parts after a dishwasher cycle then it could be hard water buildup, so consider using a rinse aid or a descaling cycle for the brewer itself.
- If you’ve recently used a strong cleaning solution on a part then run a water-only brew cycle afterward because you want to ensure no cleaning residue remains.
- If the carafe lid has a rubber seal then check the manual; some seals may not be dishwasher safe and can degrade or warp.
- If your Ninja has a built-in metal filter then it’s usually dishwasher safe, but a gentle scrub might be needed to remove stubborn coffee oils.
- If a part looks discolored or warped after being in the dishwasher then stop using it in the dishwasher and consider handwashing or replacing it.
FAQ
Can I put my Ninja coffee maker’s carafe in the dishwasher?
Generally, yes. Most Ninja carafes are top-rack dishwasher safe. However, always double-check your specific model’s manual to be sure, especially if it’s made of tempered glass.
Is the brew basket for my Ninja coffee maker dishwasher safe?
Usually, the brew basket is safe for the top rack of your dishwasher. If it contains a permanent metal filter, ensure it’s securely attached before washing.
What about the permanent filter that comes with some Ninja models?
Most permanent metal filters are designed to be dishwasher safe. They might require a quick scrub to remove coffee oils, but a gentle cycle should handle the rest.
Are the water reservoir and lid dishwasher safe?
Often, the water reservoir itself is not recommended for the dishwasher due to its size and potential for water to get trapped. The lid might be, but check your manual. Handwashing is usually the safest bet for the reservoir.
What if my Ninja coffee maker parts warp after being in the dishwasher?
This typically means the heat was too high. Stick to normal or light cycles. Warped parts might still function but could compromise the seal or fit, so handwashing is a better long-term strategy.
Can I use dishwasher detergent on my Ninja parts?
Yes, if the parts are dishwasher safe. However, avoid harsh detergents or abrasive cleaners if you’re handwashing, as they can damage the materials or leave a taste.
How often should I clean my Ninja coffee maker parts?
Ideally, rinse them after each use. A full wash, whether by hand or dishwasher, should happen regularly, perhaps daily or every few days depending on usage.
What parts of my Ninja coffee maker should I definitely NOT put in the dishwasher?
Never put the main unit, the heating element, or any electrical components in the dishwasher. Also, avoid any parts with digital displays or controls.
What this page does NOT cover (and where to go next)
- Specific descaling procedures for every Ninja model. (Check your manual for precise instructions.)
- Troubleshooting advanced brewing issues like inconsistent temperatures. (Look for guides on brew temperature and extraction.)
- Detailed reviews of different Ninja coffee maker models. (Explore product reviews for specific model comparisons.)
- The best types of coffee beans or grind sizes for optimal flavor. (Dive into coffee sourcing and brewing techniques.)
- Where to buy replacement Ninja coffee maker parts. (Visit the manufacturer’s website or authorized retailers.)
- Advanced cleaning techniques for heavily stained carafes. (Search for specific stain removal methods for glass or stainless steel.)