How to Properly Clean Your Ninja Single-Cup Coffee Maker
Quick answer
- Run a cleaning cycle with vinegar or a descaling solution.
- Use filtered water for brewing to reduce mineral buildup.
- Clean the brew basket and carafe after every use.
- Wipe down the exterior regularly.
- Descale every 1-3 months, depending on water hardness.
- Check the manual for specific descaling instructions for your model.
Who this is for
- Anyone who owns a Ninja single-cup coffee maker.
- Coffee drinkers who want to ensure the best possible taste from their brew.
- Home baristas looking to extend the lifespan of their appliance.
What to check first
Brewer type and filter type
First off, know what you’re working with. Is it the Ninja CE251, the CFP301, or something else? Each model might have slight variations in its cleaning process or parts. And what kind of filter are you using? A reusable mesh filter needs a different kind of scrub than a paper filter. Always check your specific model’s manual for the most accurate guidance.
If you’re looking for replacement parts for your Ninja coffee maker, such as a new brew basket or carafe, consider checking out available Ninja coffee maker parts online.
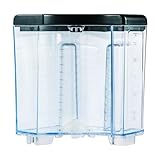
- 【ENHANCED CAPACITY WATER TANK】SLLFLY offers a water reservoir compatible with for the Ninja 12-cup coffee maker, featuring 60-ounce capacity.
- 【STURDY AND RELIABLE CONSTRUCTION 】SLLFLY's removable 60 oz water tank is meticulously crafted from high-quality materials, ensuring a lightweight yet durable construction that is free from odors, reusable, and resistant to breaking or warping. This guarantees a long-lasting and reliable performance.
- 【SIMPLIFIED CLEANING PROCESS 】The SLLFLY water tank Compatible with the Ninja 12-cup coffee maker is designed for easy removal and thorough cleaning. The tank's water flow is meticulously optimized to ensure a consistent and efficient brewing experience.
- 【MODEL CONFIRMATION REQUIRED】Prior to purchasing, please verify that the SLLFLY water tank is compatible with Ninja 12-cup coffee maker model. CE201,CE251, CE200,CE200BRN,CE200C,CE201,CE201BRN,CE201C.This 60 oz water reservoir is designed as a direct replacement part for the Ninja 12-cup coffee maker and does not include the coffee maker itself.
- 【EXEMPLARY CUSTOMER SERVICE 】SLLFLY is committed to providing exceptional customer support. Should you encounter any issues with the replacement water reservoir, our team is ready to assist you promptly, ensuring a seamless and hassle-free resolution.
Water quality and temperature
This is a big one. Hard water, loaded with minerals, is the enemy of any coffee maker. It builds up scale inside, affecting performance and taste. Using filtered or bottled water makes a world of difference. And while you’re not usually adjusting brew temperature on a single-cup machine, know that consistently brewing at the right temp is key to extraction.
Grind size and coffee freshness
For single-cup brewers, a medium grind is usually your sweet spot. Too fine, and it can clog. Too coarse, and your coffee will be weak. Always use freshly roasted beans and grind them right before brewing if you can. Stale coffee just tastes… well, stale.
Coffee-to-water ratio
This is more about taste, but it can affect cleaning too. If you’re overloading the basket, grounds can spill and make a mess. For a single cup, stick to the recommended amount. Usually, it’s about 1-2 tablespoons of coffee per 6-8 oz of water. Your manual is your best friend here.
Cleanliness/descale status
When was the last time you really cleaned this thing? If your coffee tastes bitter or weak, or if you see slow brewing, it’s probably time for a deep clean. Mineral buildup is the usual suspect. A blinking “Clean” light is your direct signal. Don’t ignore it.
Step-by-step (brew workflow)
Let’s get this Ninja single-cup coffee maker sparkling clean.
1. Unplug the machine.
- What “good” looks like: Safety first. No power, no surprises.
- Common mistake: Cleaning a plugged-in appliance. Avoid this by making sure it’s disconnected from the wall.
2. Remove the brew basket and carafe.
- What “good” looks like: All removable parts are out and ready for washing.
- Common mistake: Trying to clean around parts that should be removed. Take them out for a thorough clean.
3. Wash removable parts.
- What “good” looks like: The brew basket, carafe, and any other removable pieces are free of coffee grounds and residue.
- Common mistake: Just rinsing. Use warm, soapy water and a soft cloth or sponge to scrub away oils and buildup.
4. Prepare the cleaning solution.
- What “good” looks like: You have your descaling agent or vinegar mixed with water according to your machine’s manual.
- Common mistake: Using undiluted vinegar or the wrong descaler. Always follow the manufacturer’s recommendations. For vinegar, a 1:1 ratio with water is typical.
5. Fill the water reservoir.
- What “good” looks like: The reservoir is filled with the cleaning solution up to the maximum fill line.
- Common mistake: Overfilling or underfilling. Stick to the designated lines.
6. Place the empty carafe or a mug under the brew spout.
- What “good” looks like: The cleaning solution has a place to drip into.
- Common mistake: Forgetting to place a receptacle. You’ll have a mess on your counter.
7. Run a cleaning cycle.
- What “good” looks like: The machine goes through its cleaning cycle, dispensing the solution. Your Ninja’s manual will tell you how to initiate this – it might be a specific button or a sequence.
- Common mistake: Not running the full cycle. Let it complete the process to flush out the internal components.
8. Discard the cleaning solution.
- What “good” looks like: The dirty cleaning liquid is safely poured down the drain.
- Common mistake: Leaving the old solution in the reservoir. Dump it out completely.
9. Run rinse cycles.
- What “good” looks like: The reservoir is filled with fresh, filtered water, and you run at least two full brew cycles to flush out any remaining cleaning solution.
- Common mistake: Only running one rinse cycle. You don’t want your next cup of coffee tasting like vinegar.
10. Wipe down the exterior.
- What “good” looks like: The outside of your coffee maker is clean and streak-free.
- Common mistake: Neglecting the exterior. A damp cloth will do the trick for most surfaces.
11. Reassemble and dry.
- What “good” looks like: All parts are back in place and dry.
- Common mistake: Putting wet parts back. This can lead to mold or mildew.
Common mistakes (and what happens if you ignore them)
| Mistake | What it causes | Fix |
|---|---|---|
| Not descaling regularly | Slow brewing, weak coffee, bitter taste, machine failure | Run a descaling cycle with vinegar or descaling solution monthly or as recommended by the manual. |
| Using tap water | Mineral buildup (scale) inside the machine, affecting taste and performance | Always use filtered or bottled water for brewing and cleaning. |
| Not cleaning the brew basket | Clogged grounds, messy brewing, stale coffee taste | Wash the brew basket with soap and water after every use. |
| Ignoring the “Clean” indicator light | Escalated mineral buildup, potential damage to heating elements | Immediately run a cleaning cycle when the light comes on. |
| Using harsh chemicals or abrasive scrubbers | Damage to the machine’s interior or exterior, potential contamination of coffee | Use mild soap and water or manufacturer-approved descaling solutions. Use soft cloths or sponges. |
| Not running enough rinse cycles | Lingering taste of descaling solution (vinegar, etc.) in your coffee | Run at least two full brew cycles with fresh water after descaling. |
| Leaving the machine damp | Mold or mildew growth in internal components or the reservoir | Ensure all parts are thoroughly dried before reassembling or storing. |
| Not checking the manual for specifics | Using incorrect cleaning agents or procedures, potentially damaging the machine | Always refer to your specific Ninja model’s manual for tailored cleaning and descaling instructions. |
| Brewing with stale coffee | Poor flavor, no matter how clean the machine is | Use freshly roasted, freshly ground coffee for the best taste. |
| Overfilling the brew basket | Grounds can overflow, creating a mess and potential clogs | Stick to the recommended coffee-to-water ratio for your machine. |
Decision rules (simple if/then)
- If your coffee tastes bitter, then check the brew basket for old grounds because they can impart a burnt flavor.
- If brewing is slow, then it’s time to descale because mineral buildup is likely restricting water flow.
- If the “Clean” light is on, then run a cleaning cycle immediately because ignoring it will worsen buildup.
- If you use hard tap water, then descale more frequently, about monthly, because minerals build up faster.
- If you notice white, chalky deposits, then you definitely need to descale because that’s mineral scale.
- If the carafe or brew basket has oily residue, then wash them thoroughly with soap and water because coffee oils can go rancid.
- If your coffee tastes weak, then check your grind size and coffee-to-water ratio because they might be off.
- If you’re unsure about the descaling process, then consult your Ninja manual because it has model-specific instructions.
- If you want the best-tasting coffee, then always use filtered water because it prevents mineral buildup and tastes cleaner.
- If you’ve just descaled and still taste something off, then run another rinse cycle because you might not have flushed it all out.
- If the exterior looks grimy, then wipe it down with a damp cloth because a clean machine is a happy machine.
FAQ
How often should I descale my Ninja single-cup coffee maker?
Generally, descale every 1-3 months. If you have very hard water, you might need to do it more often, perhaps monthly. If you see the “Clean” light, don’t wait.
Can I use vinegar to descale my Ninja coffee maker?
Yes, diluted white vinegar is a common and effective descaling agent. A 1:1 ratio of vinegar to water is usually recommended. Always check your manual to confirm.
What happens if I don’t descale my coffee maker?
You’ll likely experience slower brewing times, weaker coffee, and a bitter taste due to mineral buildup. In the long run, it can damage the heating element and shorten the machine’s lifespan.
How do I clean the brew basket?
Wash it with warm, soapy water after every use. A soft sponge or cloth works best. Make sure to rinse it thoroughly and let it dry completely.
Is it okay to leave water in the reservoir?
It’s best to empty the reservoir after each use, especially if you won’t be brewing again for a while. Stagnant water can develop odors or even mold.
What kind of water should I use?
Filtered or bottled water is highly recommended. It significantly reduces mineral buildup, leading to better-tasting coffee and a longer-lasting machine.
My coffee tastes off, even after cleaning. What could it be?
Check your coffee beans and grind. Are they fresh? Is the grind size appropriate for your brewer? Even a clean machine can’t fix stale coffee.
How do I clean the exterior of my Ninja coffee maker?
Use a soft, damp cloth to wipe down the exterior. For tougher spots, a little mild dish soap can be used, but always wipe it clean with a damp cloth afterward. Avoid abrasive cleaners.
What this page does NOT cover (and where to go next)
- Troubleshooting specific error codes unique to your Ninja model.
- Deep cleaning advanced features like milk frothers or built-in grinders (if applicable).
- Detailed comparisons of different descaling solutions.
- How to repair a broken Ninja coffee maker.
- The science of coffee extraction and ideal brewing temperatures.