Homemade Plant-Based Coffee Creamer Recipes
Quick answer
- Ditch the store-bought stuff. Homemade is easy.
- Base it on nuts, seeds, or oats for creamy goodness.
- Sweeten naturally with dates or maple syrup.
- Add flavor with vanilla, cinnamon, or cocoa.
- Store in the fridge for about a week.
- Experiment! Find your perfect blend.
Who this is for
- Anyone who wants to ditch dairy in their coffee.
- Folks who like to control their ingredients.
- Coffee lovers looking for a healthier creamer option.
What to check first
Making good plant-based creamer is pretty straightforward. But a few things can trip you up.
Your Base Ingredient
This is the heart of your creamer. Think cashews, almonds, oats, or even sunflower seeds. Soaked nuts make for a smoother blend. Oats need a bit more water and can sometimes get a little slimy if over-blended. Just know your base, and you’re golden.
Your Sweetener
Are you going for pure sweetness or a little depth? Dates add a natural caramel note. Maple syrup brings its own distinct flavor. Agave is neutral. Or maybe you like it unsweetened. Choose your fighter.
Flavor Enhancers
Vanilla extract is classic. Cinnamon adds warmth. A pinch of salt can really make the flavors pop. Cocoa powder turns it into a mocha dream. Think about what tastes good to you.
Your Blender
This is key for a smooth texture. A high-powered blender is your best friend here. If you’ve got a standard one, you might need to blend longer or strain. Patience is a virtue.
A high-powered blender is essential for achieving a smooth, creamy texture in your homemade creamer. If you don’t have one, consider investing in a quality model like this one to make the process much easier.
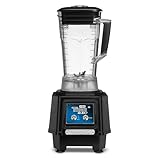
- Motor: 2 Horsepower high-performance motor delivers 24,000 max RPM for consistent blending power in commercial kitchens and bars, ensuring reliable operation during peak service hours
- Container: 64 oz BPA-free copolyester jar with stackable design maximizes storage efficiency while providing durable construction for high-volume blender use in professional settings
- Controls: 2-speed toggle switch provides simple operation with reliable performance for bartenders and kitchen staff in fast-paced commercial environments and busy food service operations
- Drive: Stainless steel user-replaceable drive coupling ensures long-lasting durability and easy maintenance for continuous commercial blender operation in demanding restaurant environments
- Certifications: cULus and NSF approved for commercial food service applications, meeting strict safety and sanitation standards for professional kitchen use in restaurants and bars
Step-by-step (how to make plant based coffee creamer)
Let’s get brewing. This is for a basic cashew creamer, but you can swap the nuts.
1. Soak your nuts (if using nuts).
- What to do: Cover 1 cup of raw cashews (or almonds, etc.) with water. Let them soak for at least 4 hours, or overnight. Drain and rinse.
- What “good” looks like: The nuts should be plump and soft.
- Common mistake: Forgetting to soak. This leads to a gritty creamer.
- Avoid it: Plan ahead. Soak them before bed or when you get home from work.
2. Gather your ingredients.
- What to do: Get your soaked nuts, fresh water, sweetener, and any flavorings ready.
- What “good” looks like: Everything is measured and within easy reach.
- Common mistake: Not measuring. You end up guessing and the flavor is off.
- Avoid it: Measure everything out before you start blending.
3. Add ingredients to the blender.
- What to do: Put your drained nuts into the blender. Add 1.5 to 2 cups of fresh water. Start with less water and add more if needed.
- What “good” looks like: All the main ingredients are in the blender.
- Common mistake: Overfilling the blender. This makes it hard to blend evenly.
- Avoid it: Blend in batches if your blender is small.
4. Add your sweetener.
- What to do: Add 1-3 tablespoons of your chosen sweetener. Dates (pitted) are great here, maybe 2-3. Maple syrup works too.
- What “good” looks like: The sweetener is in the blender.
- Common mistake: Adding too much sweetener. It can be hard to fix.
- Avoid it: Start with less, taste, and add more if you need to.
For a natural sweetness with a hint of caramel, pitted dates are an excellent choice. You can easily add 2-3 dates to your blender for a delicious, wholesome sweetener.

- NATURE'S ENERGY BOOST: Organic pitted dates packed with fiber, potassium, calcium, and iron in every serving. Enjoy a nutritious whole food that satisfies cravings and delivers quick, natural energy without the crash.
- SWEET & CHEWY: No processing and no sugar added means you get pitted organic deglet noor dates to eat exactly as nature intended with all their nutritional power intact.
- VERSATILE INGREDIENT: Transform your favorite recipes by adding these pitted dates to oatmeal, salads, and baked goods for a chewy, caramel-like sweetness.
- GUILT-FREE SNACKING: Replace candy and sugary treats with these nutrient-dense dried dates that kids and adults love. High in dietary fiber to support digestive health and keep you feeling satisfied longer.
- ORGANIC SUPERFOOD: USDA Certified Organic, vegan, gluten-free, paleo and keto-friendly dried fruit snack with nothing artificial. Just pure, sun-dried dates with a naturally sweet flavor in every bite.
5. Add flavorings.
- What to do: Add 1 teaspoon of vanilla extract. A pinch of salt is a must. Maybe a dash of cinnamon.
- What “good” looks like: The flavorings are in the blender.
- Common mistake: Going overboard with extracts. It can taste artificial.
- Avoid it: A little goes a long way with extracts.
6. Blend until smooth.
- What to do: Secure the lid. Start on low speed, then increase to high. Blend for 1-2 minutes, or until totally smooth and creamy.
- What “good” looks like: No gritty bits. The texture is like store-bought creamer.
- Common mistake: Not blending long enough. This leaves you with a watery, grainy mess.
- Avoid it: Let the blender do its work. Listen for the motor to sound consistent.
7. Check consistency.
- What to do: If it’s too thick, add a tablespoon of water at a time and blend briefly. If it’s too thin, you might need to add a few more soaked nuts (if you have them) or accept it as is.
- What “good” looks like: The creamer coats the back of a spoon.
- Common mistake: Not adjusting consistency. You end up with something you don’t like.
- Avoid it: Taste and check the texture before pouring it into a container.
8. Strain (optional but recommended for some bases).
- What to do: Pour the blended mixture through a fine-mesh sieve or nut milk bag into a bowl or directly into your storage container.
- What “good” looks like: A super smooth liquid with minimal pulp.
- Common mistake: Skipping this step with oat or almond bases. You’ll get little bits.
- Avoid it: Use a nut milk bag for the smoothest results, especially with less-powerful blenders.
9. Taste and adjust.
- What to do: Give it a quick taste. Need more sweetness? A little more vanilla? Adjust as needed and blend briefly again.
- What “good” looks like: It tastes just right to you.
- Common mistake: Not tasting. You pour it into your coffee and it’s not what you wanted.
- Avoid it: Trust your taste buds. This is your creamer!
10. Pour into storage.
- What to do: Pour the finished creamer into a clean jar or bottle.
- What “good” looks like: A clean container filled with your delicious homemade creamer.
- Common mistake: Using a dirty container. This shortens the shelf life.
- Avoid it: Always use clean storage.
11. Refrigerate.
- What to do: Seal the container and put it in the fridge.
- What “good” looks like: It’s chilling and ready for your morning cup.
- Common mistake: Leaving it out. It spoils faster.
- Avoid it: Always put it away promptly.
12. Use in coffee.
- What to do: Stir into your hot coffee. Shake the container before each use as it may separate.
- What “good” looks like: Creamy, delicious coffee.
- Common mistake: Not shaking. The water and fats can separate.
- Avoid it: Give it a good shake before pouring.
Common mistakes (and what happens if you ignore them)
| Mistake | What it causes | Fix |
|---|---|---|
| Not soaking nuts long enough | Gritty, unpleasant texture | Soak for at least 4 hours, or overnight. Use a high-speed blender. |
| Using too much water | Thin, watery creamer that doesn’t taste rich | Start with less water and add more gradually until desired consistency is reached. |
| Not blending long enough | Grainy texture, separation | Blend for at least 1-2 minutes on high speed. For tougher bases, blend longer. |
| Using stale nuts or seeds | Off-flavors, rancid taste | Use fresh, good-quality nuts and seeds. Store them properly. |
| Over-sweetening | Cloyingly sweet creamer that masks coffee flavor | Start with a small amount of sweetener and add more to taste. Dates can be potent. |
| Forgetting to shake before use | Watery layer on top, thick sludge at the bottom | Always shake well before pouring to re-emulsify the fats and liquids. |
| Using a dirty storage container | Reduced shelf life, potential spoilage | Ensure your jars and bottles are thoroughly cleaned and dried before filling. |
| Not tasting and adjusting | Unbalanced flavor (too sweet, not sweet enough) | Taste as you go. Adjust sweeteners and flavorings until it’s perfect for your palate. |
| Using unrinsed soaked oats | Slimy texture | Always rinse soaked oats thoroughly before blending. |
| Not straining (especially with oats/almonds) | Undesirable texture with small particles | Use a fine-mesh sieve or nut milk bag for a silky smooth finish. |
Decision rules (how to make plant based coffee creamer better)
- If your creamer is too thick, then add a tablespoon of water because you can always thin it out.
- If your creamer is too thin, then add a few more soaked nuts or seeds because this will add body. (Or accept it and use it quickly!)
- If your creamer tastes bland, then add a pinch of salt and a little more sweetener because salt enhances sweetness and flavor.
- If you want a richer flavor, then use soaked cashews or macadamia nuts because they have a higher fat content.
- If you want a lighter creamer, then use rolled oats or sunflower seeds because they are less dense.
- If you are sensitive to nuts, then use oats, sunflower seeds, or coconut milk (canned, full-fat) as your base because these are nut-free alternatives.
- If you want a chocolate creamer, then add 1-2 tablespoons of unsweetened cocoa powder because it blends well with most bases.
- If you want a spiced creamer, then add cinnamon, nutmeg, or cardamom because these spices add warmth and complexity.
- If your blender struggles, then soak your nuts for longer or blend in smaller batches because this makes the blending process easier.
- If you notice separation, then give your creamer a good shake because this is normal for homemade plant-based creamers.
- If you want a longer shelf life, then use less water and ensure all ingredients are fresh because this reduces the risk of spoilage.
- If you want to avoid added sugars, then use pitted dates or unsweetened applesauce as your primary sweetener because these are natural options.
FAQ
How long does homemade plant-based creamer last?
Typically, it lasts about 5-7 days in the refrigerator. Always store it in an airtight container.
Can I make it without soaking nuts?
Yes, but it’s harder to get a smooth texture. If you have a very high-powered blender, you might get away with it, but soaking is highly recommended.
What’s the best base for a creamy texture?
Soaked cashews or macadamia nuts are usually the creamiest. Canned full-fat coconut milk also makes a very rich creamer.
How can I make it sweeter without sugar?
Pitted dates are a fantastic natural sweetener. You can also use maple syrup, agave nectar, or even a touch of unsweetened applesauce.
My creamer tastes a bit watery. What did I do wrong?
You likely used too much water. Start with less and add more as needed. You can try adding a few more soaked nuts or seeds to thicken it up.
Can I add other flavors like peppermint or caramel?
Absolutely! Just be careful with extracts. A drop or two of peppermint extract or a bit of homemade caramel sauce can work wonders.
Why does my creamer separate?
This is normal for homemade plant-based creamers because they don’t contain emulsifiers like store-bought versions. Just give it a good shake before each use.
What if I don’t have a high-speed blender?
You can still make it! You’ll just need to soak your nuts longer and blend for a longer time. Straining through a nut milk bag is also more important for a smoother result.
Can I make this ahead of time?
Yes, you can make a batch and store it in the fridge for up to a week. It’s great to have on hand for your morning coffee.
What this page does NOT cover (and where to go next)
- Specific recipes for every single plant-based milk alternative.
- Advanced flavor infusion techniques (like steeping spices).
- Detailed comparisons of blender models for creamer making.
- Troubleshooting extremely thick or curdled creamer issues beyond basic fixes.
- Shelf-stable or shelf-stable commercial production methods.