Give Your Paper An Old Look With Coffee Stains
Quick answer
- Brew strong coffee.
- Let it cool.
- Dip or brush paper.
- Blot excess.
- Dry flat.
- Repeat for darker stains.
Who this is for
- Crafters looking to add vintage flair to projects.
- Writers wanting to make manuscripts look authentic.
- Anyone who digs that old-school aesthetic.
If you’re looking for a quick and easy way to achieve these coffee stains, consider an aging paper kit that includes pre-made stain solutions.
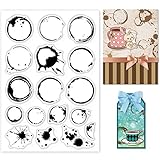
- Tea Stains Theme: Elements of the clear stamp include coffee stains in various shapes, tea cup stains coffee stains background and more. These patterns are new and interesting. They are great for scrapbooking or greeting cards.
- Material and Size: The clear stamp is made of high-quality silicone material, tasteless and safety. Healthy and environmental. The size is 4.3 x 6.3 x 0.1 inches.
- Convenient to Apply: Simply put the stamp on an acrylic block (not included), apply ink and press the stamp to the paper or card, then let them air-dry, finally an exquisite work is accomplished.
- Reusable: Silicone rubber stamps easy to use and clean, can be used repeatedly after cleaning or washing with water and easy to return to carrier to avoid losing pieces.
- Creative Ornaments: After stamping on a piece of paper or card, you can dye it with craft ink pad, which will be an exquisite embellishment for holiday cards, scrapbook pages, journaling or any other paper craft projects.
What to check first
Brewer type and filter type
This ain’t about brewing coffee to drink, but the coffee is the tool. So, what makes the best stain? A good, strong brew is key. Drip coffee makers, French presses, even a simple pour-over will work. Just aim for a concentrated result. Paper filters can catch some of the grounds, which might give a slightly cleaner stain. Metal filters or no filter means more sediment, which could add texture. For this, I usually just use my regular drip machine. Easy.
While brewing your own coffee works great, if you want a more consistent and foolproof method, an aging paper kit can be a fantastic shortcut.
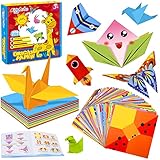
- Colorful Origami Paper Set: Our 308 PCS Kids Origami Paper Set contains 108 double-sided vivid folded paper with 54 different patterns like ice cream, puppy, hat, etc. and 200 practice colored paper in 20 colors,a craft guiding manual. We have everything you need. Colorful and cute origami figures have enough charm, kids will love it!
- Easy to Fold: The origami set has different levels of difficulty, from simple to complex, to guide children step by step. Beginners needn't worry, the instruction manual shows the steps in great detail and clearly, with images and instructions for each step, easy to follow. If you are an advanced-level crafters, we also have colorful origami paper for you to create. Perfect for playing at home, school or on the go.
- Educational Toys for Kids 6-12 : Children are exposed to paper from the beginning of school, turn an ordinary piece of paper into something else, let them feel the magic of art origami. And keep them entertained for hours without any additional equipment. At the same time, it exercises kids' hands-on ability, imagination and creativity, and also provides opportunities for parent-child interaction and sharing with friends.
- Safe and Premium: Our colorful origami paper kit is made of high-quality materials, eco-friendly, odor-free and soft edges, safe for kids. The paper is flexible enough to not tear easily and can hold the creases and shape well. Durable and not easy to fade, the box can collect the rest of your unused origami, no mess!
- Ideal Art Craft Gift: Fun art craft supplies for school, classroom crafting activities. Cute origami products can also be used to decorate your room and study. Great economical origami kit. A classic origami game, suitable for Children's Day gift, birthday gift, Christmas gift, party favors, etc.
Water quality and temperature
Tap water is usually fine for this. You’re not trying to extract nuanced flavors, just color. Temperature matters for brewing the coffee itself, but for the staining, you want the coffee liquid to be cool or at room temperature. Hot liquid can make paper too fragile.
Grind size and coffee freshness
A coarser grind might result in less sediment in your stain. Freshness? Not a huge deal here. Old coffee grounds will still give you color. You can even use pre-ground coffee if that’s what you have.
Coffee-to-water ratio
This is where you get your strength. Use more coffee grounds than you normally would for drinking. Think double or triple strength. If you normally use 2 tablespoons of coffee for 6 oz of water, try 4 or 6.
Cleanliness/descale status
Make sure your coffee maker is clean. You don’t want residue from old coffee oils or cleaning agents messing with your paper’s color. A clean machine means a cleaner, more predictable stain.
Step-by-step (brew workflow)
1. Brew Strong Coffee: Use more coffee grounds than usual. Aim for a dark, concentrated brew.
- What “good” looks like: A deep brown liquid, much darker than your morning cup.
- Common mistake: Brewing too weak. You won’t get that aged look. Use way more grounds.
2. Cool the Coffee: Let the brewed coffee cool down to room temperature or cooler.
- What “good” looks like: The liquid is no longer steaming.
- Common mistake: Using hot coffee. This can weaken the paper and lead to tears. Patience is key.
3. Prepare Your Workspace: Lay down newspaper or a plastic sheet. You’re gonna get messy.
- What “good” looks like: Your surface is protected from drips and spills.
- Common mistake: Not protecting your surface. Coffee stains are permanent, folks.
4. Submerge or Brush: You can either dip the paper directly into a tray of coffee or use a brush/sponge to apply the liquid.
- What “good” looks like: The paper is evenly saturated with coffee.
- Common mistake: Uneven application with a brush. This can create splotchy results instead of a natural fade. Try blotting with a sponge for a more random effect.
5. Soak (Optional): For a deeper stain, let the paper soak for a few minutes.
- What “good” looks like: The paper has darkened considerably.
- Common mistake: Soaking for too long with thin paper. It can disintegrate. Check it often.
6. Blot Excess Liquid: Gently blot the paper with a clean cloth or paper towel to remove excess moisture.
- What “good” looks like: The paper is damp, not dripping wet.
- Common mistake: Rubbing too hard. This can cause the paper to stretch or tear. Gentle dabbing is best.
7. Dry the Paper: Lay the paper flat on a clean, dry surface or hang it carefully.
- What “good” looks like: The paper is drying without wrinkles or warping.
- Common mistake: Drying it crumpled or in a humid area. This leads to uneven drying and potential mold.
8. Repeat for Deeper Stains (Optional): Once dry, you can reapply coffee for darker, more varied tones.
- What “good” looks like: You’re achieving the desired level of aging and discoloration.
- Common mistake: Applying too many layers too quickly. Let each layer dry fully before the next.
Common mistakes (and what happens if you ignore them)
| Mistake | What it causes | Fix |
|---|---|---|
| Using hot coffee | Weakened paper, tearing, uneven drying | Let the coffee cool completely before applying. |
| Not protecting your workspace | Permanent stains on furniture or floors | Cover your area with newspaper, a plastic sheet, or an old towel. |
| Applying coffee too unevenly | Splotchy, unnatural-looking stains | Dip the paper fully, or use a sponge/cloth to blot for a more random, aged effect. |
| Rubbing the paper while wet | Stretching, tearing, or damaging the paper fibers | Gently blot excess liquid with a clean cloth or paper towel. |
| Drying paper in direct heat or sun | Warping, cracking, or fading the stain | Dry paper flat in a well-ventilated area away from direct heat sources. |
| Using too little coffee or water | Faint, weak stains that don’t look aged | Brew coffee much stronger than you would for drinking; use a higher coffee-to-water ratio. |
| Not letting layers dry completely | Blurring of stains, uneven saturation | Allow each layer of coffee stain to dry thoroughly before applying another. |
| Using very thin or delicate paper | Paper disintegrating or tearing easily | Test on a scrap piece first; consider using thicker cardstock or archival paper. |
| Forgetting to clean your brewer | Unwanted residue or off-colors in the stain | Clean your coffee maker or brewing equipment thoroughly before starting. |
| Not testing on a scrap piece of paper | Unexpected results on your final project | Always do a test run on a similar piece of paper to gauge color and saturation before committing. |
Decision rules (simple if/then)
- If you want a light, subtle aged look, then use a weaker coffee solution and blot quickly.
- If you want deep, dark stains, then brew very strong coffee and let the paper soak longer.
- If the paper starts to tear, then stop applying liquid immediately and gently blot.
- If you’re using a brush, then aim for random strokes to mimic natural aging, because perfect lines look fake.
- If you want to create “watermark” effects, then use a damp sponge to lift color after the paper has partially dried.
- If you notice the paper warping, then try drying it between two clean, dry towels under light pressure.
- If you want to seal the stain, then wait until the paper is completely dry and use a spray sealant.
- If you’re working with a photograph, then use a very weak coffee solution and a very light touch to avoid damage.
- If you want to layer colors, then let each coffee stain dry completely before applying a different shade or concentration.
- If the paper looks too uniform, then go back and add a few more random drips or brush strokes.
- If you’re trying to age a whole document, then work in sections to ensure evenness and control.
- If you want to speed up drying, then use a fan on a low setting, but avoid high heat.
FAQ
Can I use instant coffee?
Yeah, you can. Just mix it with a bit of water to create a strong paste or liquid. It might give a slightly different color than brewed coffee, but it’ll still work for aging.
How long does it take to dry?
It varies. Thin paper might dry in an hour or two, especially if you blot well. Thicker paper or multiple layers can take several hours or even overnight.
Will this make the paper smell like coffee?
A little, at first. The scent usually fades as the paper dries completely. If you don’t want any lingering smell, you can air it out for a few days.
Can I use different types of coffee?
Sure. Different roasts and beans might produce slightly different shades of brown. Experiment to see what you like best. A dark roast will generally give a deeper color.
What if I mess up and make it too dark?
It’s tough to fully reverse, but you can try gently dabbing the wet stain with a damp cloth to lift some of the color. You can also try to cover it up with other aging techniques.
Can I use this on fabric?
You can, but the results will be different. Fabric absorbs more liquid and might require different drying methods. It’s best to test on a scrap piece of the same fabric first.
Does the type of paper matter?
It sure does. Thicker paper, like cardstock, holds up better to the moisture. Thinner paper, like printer paper or tissue paper, can become fragile and tear easily.
How can I get more of a “tea stain” look?
Use less coffee grounds and more water, or brew a weaker batch. You can also try using decaf coffee for a lighter color.
What this page does NOT cover (and where to go next)
- Using other natural dyes for different colors.
- Advanced techniques like burning edges or distressing with wax.
- Archival methods for preserving aged documents long-term.
- Specific recommendations for sealing sprays or fixatives.