Achieving An Aged Look On Paper With Coffee
Quick answer
- Brew strong coffee.
- Use a brush or sponge for application.
- Apply thin, even coats.
- Let it dry completely between layers.
- Consider heat-setting for permanence.
- Experiment with different coffee roasts and brewing methods.
Who this is for
- Crafters and artists looking for a vintage aesthetic.
- Writers wanting to give their manuscripts an antique feel.
- Anyone experimenting with DIY aging techniques for paper projects.
For those looking for a quick and easy solution, consider pre-made coffee stains for paper to achieve that perfect vintage look without the brewing process.
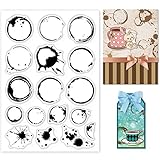
- Tea Stains Theme: Elements of the clear stamp include coffee stains in various shapes, tea cup stains coffee stains background and more. These patterns are new and interesting. They are great for scrapbooking or greeting cards.
- Material and Size: The clear stamp is made of high-quality silicone material, tasteless and safety. Healthy and environmental. The size is 4.3 x 6.3 x 0.1 inches.
- Convenient to Apply: Simply put the stamp on an acrylic block (not included), apply ink and press the stamp to the paper or card, then let them air-dry, finally an exquisite work is accomplished.
- Reusable: Silicone rubber stamps easy to use and clean, can be used repeatedly after cleaning or washing with water and easy to return to carrier to avoid losing pieces.
- Creative Ornaments: After stamping on a piece of paper or card, you can dye it with craft ink pad, which will be an exquisite embellishment for holiday cards, scrapbook pages, journaling or any other paper craft projects.
What to check first
Brewer type and filter type
This matters less for paper aging than for drinking coffee, but it can affect the final look. A French press might give you a more sediment-rich brew, leading to a mottled appearance. A drip machine with a fine filter will give you a cleaner stain. For this task, simpler is often better. Just get a decent brew.
Water quality and temperature
Use filtered water if your tap water is heavily chlorinated or mineralized. It won’t make a huge difference to the stain, but it’s a good habit. The temperature of the water for brewing is also less critical here than for coffee extraction. Room temperature water will work fine for a cold brew stain, or you can use hot water for a quicker, stronger brew.
Grind size and coffee freshness
A coarser grind might be easier to strain out if you’re worried about grounds sticking to the paper. Freshly ground coffee will likely produce a richer color, but stale coffee will still do the job. Don’t overthink this part for paper aging. Just grind some beans.
Coffee-to-water ratio
This is key. You want a concentrated brew. Think of it like making espresso, but for staining. Aim for a ratio of about 1:10 or even 1:5 (coffee to water by weight). This means using more coffee grounds than you would for a regular cup. A stronger brew equals a darker stain.
Cleanliness/descale status
Make sure your coffee maker is clean. Old coffee oils can sometimes leave a greasy residue, which might affect how the stain absorbs or looks. A clean machine means a cleaner stain.
Step-by-step (brew workflow)
1. Brew strong coffee.
- What to do: Measure out a generous amount of coffee grounds. Use a ratio of at least 1:10 (coffee to water by weight), but 1:5 is even better for a dark stain. Brew it like you normally would, or just use hot water to steep the grounds.
- What “good” looks like: A dark, concentrated liquid. It should look much darker than your typical cup of coffee.
- A common mistake and how to avoid it: Using too little coffee. This will result in a pale stain that looks more like weak tea. Measure generously.
2. Strain the coffee.
- What to do: If you used a method that leaves grounds (like a French press or cowboy coffee), strain the liquid through a fine-mesh sieve, cheesecloth, or even a coffee filter.
- What “good” looks like: A clear, dark liquid free of loose grounds.
- A common mistake and how to avoid it: Leaving grounds in the liquid. They can stick to the paper and create an uneven, messy look. Strain thoroughly.
3. Prepare your paper.
- What to do: Lay your paper flat on a protected surface. Use a drop cloth or old newspapers. Make sure the paper is smooth and free of wrinkles.
- What “good” looks like: Flat, clean paper ready to receive the stain.
- A common mistake and how to avoid it: Not protecting your work surface. Coffee stains are permanent, and you don’t want to ruin your table.
4. Apply the first layer.
- What to do: Dip a brush, sponge, or even a cotton ball into the coffee. Apply it to the paper in thin, even strokes. You can go with the grain or create random patterns.
- What “good” looks like: The paper is evenly moistened with coffee. It should start to darken.
- A common mistake and how to avoid it: Applying too much at once. This can cause the paper to warp or tear, and it leads to blotchy results. Work in thin layers.
5. Dry the first layer.
- What to do: Let the paper dry completely. You can let it air dry, or speed it up with a hairdryer on a low setting.
- What “good” looks like: The paper is dry to the touch and the color has settled.
- A common mistake and how to avoid it: Applying a second layer before the first is fully dry. This will cause the paper to become saturated and may lead to the coffee bleeding or creating unwanted textures. Patience is key.
6. Apply subsequent layers.
- What to do: Repeat steps 4 and 5, adding more layers of coffee until you achieve the desired aged look. Vary your application technique if you want different effects – dabbing with a sponge can create a more mottled look.
- What “good” looks like: The paper has a rich, varied color with subtle darkening and perhaps some lighter areas.
- A common mistake and how to avoid it: Over-applying. Too many layers can make the paper look muddy or overly dark, losing the subtle aged effect.
7. Add details (optional).
- What to do: For specific effects, you can use a stiffer brush to create “water stains” by dabbing, or use a darker, more concentrated brew for accents. You can also gently crumple the paper and then flatten it for a creased look.
- What “good” looks like: The paper has character and looks genuinely old, not just stained.
- A common mistake and how to avoid it: Trying to force too many effects. Sometimes less is more. Focus on a natural progression of color.
If you’re looking for a more comprehensive approach to aging paper, an aging paper kit can provide a variety of tools and mediums for diverse effects.
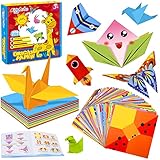
- Colorful Origami Paper Set: Our 308 PCS Kids Origami Paper Set contains 108 double-sided vivid folded paper with 54 different patterns like ice cream, puppy, hat, etc. and 200 practice colored paper in 20 colors,a craft guiding manual. We have everything you need. Colorful and cute origami figures have enough charm, kids will love it!
- Easy to Fold: The origami set has different levels of difficulty, from simple to complex, to guide children step by step. Beginners needn't worry, the instruction manual shows the steps in great detail and clearly, with images and instructions for each step, easy to follow. If you are an advanced-level crafters, we also have colorful origami paper for you to create. Perfect for playing at home, school or on the go.
- Educational Toys for Kids 6-12 : Children are exposed to paper from the beginning of school, turn an ordinary piece of paper into something else, let them feel the magic of art origami. And keep them entertained for hours without any additional equipment. At the same time, it exercises kids' hands-on ability, imagination and creativity, and also provides opportunities for parent-child interaction and sharing with friends.
- Safe and Premium: Our colorful origami paper kit is made of high-quality materials, eco-friendly, odor-free and soft edges, safe for kids. The paper is flexible enough to not tear easily and can hold the creases and shape well. Durable and not easy to fade, the box can collect the rest of your unused origami, no mess!
- Ideal Art Craft Gift: Fun art craft supplies for school, classroom crafting activities. Cute origami products can also be used to decorate your room and study. Great economical origami kit. A classic origami game, suitable for Children's Day gift, birthday gift, Christmas gift, party favors, etc.
8. Heat-set (optional but recommended).
- What to do: Once completely dry, place the paper between two sheets of parchment paper and iron it on a medium-low setting for a few minutes. This helps set the stain and makes it more resistant to smudging.
- What “good” looks like: The paper is smooth, and the coffee stain feels more permanent.
- A common mistake and how to avoid it: Using too high a heat setting on the iron. This can scorch the paper or the stain. Always test on a scrap piece first.
Common mistakes (and what happens if you ignore them)
| Mistake | What it causes | Fix |
|---|---|---|
| Using weak coffee | Pale, washed-out color that doesn’t look old. | Brew a much stronger, more concentrated coffee. |
| Applying too much liquid at once | Paper warps, tears, or becomes overly saturated, leading to blotches. | Apply thin, even layers and let each dry completely. |
| Not drying between layers | Coffee bleeds and creates an uncontrolled, muddy appearance. | Wait until the paper is fully dry before applying the next layer. |
| Leaving coffee grounds on the paper | Uneven texture, splotches, and an unprofessional look. | Strain the coffee thoroughly before application. |
| Not protecting the work surface | Permanent coffee stains on tables, countertops, or floors. | Always use a drop cloth or old newspapers. |
| Using a very fine paper | The paper can easily become too saturated and fall apart. | Use heavier weight paper or cardstock for best results. |
| Not heat-setting (if desired) | The coffee stain may smudge or fade over time, especially with handling. | Iron the dried paper between parchment sheets on a medium-low setting. |
| Trying to achieve the look too quickly | Rushing the drying process leads to poor results and paper damage. | Be patient. Allow adequate drying time between each step. |
| Using old, oily coffee residue | Can leave a greasy sheen on the paper, interfering with the stain. | Ensure your coffee maker is clean before brewing. |
| Applying unevenly on the first layer | Creates a base that is hard to correct with subsequent layers. | Aim for consistent coverage on the initial application. |
Decision rules (simple if/then)
- If you want a very dark, antique look, then use a very strong coffee-to-water ratio (e.g., 1:5) because this maximizes the pigment.
- If you want a lighter, more subtle aged look, then use a weaker coffee ratio (e.g., 1:15) and fewer layers because this controls the intensity.
- If you notice the paper starting to buckle or tear, then stop applying liquid immediately because you’re over-saturating it.
- If you want to avoid smudging later, then heat-set the final dry paper with an iron because this seals the stain.
- If you see grounds in your coffee liquid, then strain it again because they will ruin the evenness of your stain.
- If you want a mottled, uneven look, then experiment with dabbing with a sponge or crumpled paper towel because this creates texture.
- If you’re using a very absorbent paper, then use a lighter hand and fewer layers because it will soak up the coffee quickly.
- If you want to create the look of water spots or rings, then use a dropper or a very small brush with concentrated coffee on specific areas after the main stain is dry.
- If the paper feels too stiff after drying, then gently bend and flex it to soften it up because this mimics the feel of old paper.
- If you’re not getting the color depth you want, then try a darker roast of coffee because different roasts have different pigment densities.
- If you want to preserve the paper’s original texture as much as possible, then use a spray bottle on a fine mist setting, but be aware this can be tricky to do evenly.
- If you want to age a whole book or document, then work in small sections to ensure consistent results and manageable drying times.
FAQ
How long does it take to make paper look old with coffee?
It depends on how many layers you apply and how quickly the paper dries. You could do a quick job in an hour or two, but for a more nuanced look with multiple layers, it might take several hours or even a day.
Can I use instant coffee?
Yes, you can. Instant coffee is essentially concentrated coffee. Just dissolve it in hot water until you get a very dark liquid. You might need to experiment with the ratio to get the desired strength.
Will the coffee stain fade over time?
Without heat-setting, the stain might fade slightly with exposure to light or handling. Heat-setting with an iron helps make it more permanent. Storing aged paper out of direct sunlight is also a good idea.
Can I use other liquids to age paper?
Absolutely. Tea is another popular option, and you can even mix coffee and tea for varied effects. Some artists use diluted acrylics or watercolors for more controlled aging.
What kind of paper works best?
Heavier weight paper or cardstock generally holds up better to the moisture. Thinner papers can wrinkle, warp, or even tear if they become too saturated.
How do I get a really dark, almost black stain?
Use a very dark roast coffee, brew it extremely strong (high coffee-to-water ratio), and apply multiple, thin layers, allowing each to dry completely. You might even consider a second brewing of the same grounds for an extra-dark second batch.
Can I get different colors of “old”?
Yes. Lighter roasts might give a yellower, parchment-like look, while darker roasts give a browner, more aged appearance. Experimenting with different coffee beans is part of the fun.
What if I want a more textured look?
Try dabbing the coffee on with a sponge, a crumpled paper towel, or even a stiff brush. You can also gently crumple the paper after it’s mostly dry and then flatten it out to create creases.
What this page does NOT cover (and where to go next)
- Using specialized aging chemicals or commercial aging products.
- Advanced techniques like creating simulated burn marks or specific historical document replication.
- Archival permanence and long-term preservation of documents beyond basic heat-setting.
- Using coffee for other craft projects besides paper aging.