Easy Ways To Make Coffee While Traveling
Quick answer
- Pack a portable brewer like an AeroPress or pour-over cone.
- Invest in a good travel grinder and pre-portioned coffee bags.
- Use a quality insulated mug to keep your brew hot.
- Look for filtered water sources or bring your own.
- Master a simple, consistent brew method.
- Don’t forget a reliable heat source, like a small butane stove.
For ultimate convenience, consider a portable coffee maker that combines grinding and brewing into one compact device.

- 【LIGHTWEIGHT & PORTABLE】: OutIn Portable Espresso Machine weighs only 670 grams. Made of food-grade stainless steel and sustainable materials, OutIn espresso maker Easy to disassemble and wash.
- 【FAST SELF-HEATING & RICH CREMA】: OutIn Nano coffee machine heats 1.7oz of 77°F room temperature water to 198°F within 200 seconds. 20-bar pressure ensures a smooth extraction with rich crema comparable to results from professional desktop coffee machines!
- 【PREMIUM BATTERY CAPACITY 】: Travel espresso maker comes with 3 × 2500mAh lithium batteries, compatible with 10–15 watts USB-C car chargers for universal charging, which supports up to 5 hot shots with 1.7oz 77°F room temperature water or 200+ shots with hot water.
- 【2-in-1 BREWER & ONE-BUTTON CLICK】: Compatible with both Ground Coffee & Capsule, the camping coffee maker has been tested with hundreds of designs to ensure ease of use. With just ONE-BUTTON CLICK, you can enjoy perfect espresso in just 3-4 minutes.
- 【OutIn SERVICE】 The OutIn Nano portable espresso machine is equipped with a leak-proof and insulated design, providing a 12-month support period. If you have any questions, you can consult our Amazon OutIn Store.
Who this is for
- Campers and hikers who want good coffee in the backcountry.
- Road trippers who want to skip hotel coffee.
- Anyone who travels and misses their morning ritual.
What to check first
Brewer type and filter type
Different brewers need different filters. Paper filters are common for pour-overs. Metal filters work for French presses or some reusable pour-over cones. Make sure you have the right ones for your setup. A clogged filter is the enemy of a good cup.
Water quality and temperature
Tap water can taste funky. If you can, use bottled or filtered water. For brewing, you want water just off the boil, around 195-205°F. Too hot, and you’ll scorch the grounds. Too cool, and you’ll get a weak, sour cup. A small thermometer is handy, or just let boiling water sit for about 30 seconds.
Grind size and coffee freshness
Freshly ground beans make a huge difference. A burr grinder is best for consistency. For travel, a manual burr grinder is a solid choice. Match your grind to your brewer. Coarse for French press, medium for drip/pour-over, fine for espresso. Pre-ground coffee loses flavor fast.
Coffee-to-water ratio
This is key for flavor. A good starting point is 1:15 to 1:17. That means for every gram of coffee, use 15-17 grams of water. For ounces, think about 2 tablespoons of coffee for every 6 oz of water. Experiment to find what you like.
Cleanliness/descale status
Always start with clean gear. Coffee oils build up and go rancid, making your coffee taste bitter. Even when traveling, give your brewer a rinse after each use. If you’re using a machine, check its descaling status.
Step-by-step (brew workflow)
1. Heat your water.
- What to do: Heat your water to the target temperature (195-205°F).
- What “good” looks like: Water is steaming but not aggressively boiling.
- Common mistake: Using boiling water directly, which burns the coffee. Avoid this by letting it cool slightly.
2. Grind your coffee.
- What to do: Grind your beans to the appropriate size for your brewer.
- What “good” looks like: Consistent particle size, no dust or large chunks.
- Common mistake: Grinding too fine or too coarse, leading to over/under-extraction. Use the right setting for your brewer.
3. Prepare your brewer and filter.
- What to do: Assemble your brewer and insert the correct filter. Rinse paper filters with hot water.
- What “good” looks like: Brewer is stable, filter is seated properly, and paper filters are rinsed to remove papery taste.
- Common mistake: Forgetting to rinse paper filters, leaving a papery taste. Do it!
4. Add coffee grounds.
- What to do: Add your weighed or measured coffee grounds to the filter.
- What “good” looks like: Grounds are evenly distributed.
- Common mistake: Tapping the brewer too hard, creating an uneven bed that leads to channeling. Be gentle.
5. Bloom the coffee.
- What to do: Pour just enough hot water to saturate all the grounds. Wait 30 seconds.
- What “good” looks like: The grounds puff up and release CO2, forming a bubbly surface.
- Common mistake: Skipping the bloom, resulting in a less flavorful, potentially sour cup. It’s crucial for degassing.
6. Pour the remaining water.
- What to do: Slowly pour the rest of the water over the grounds in a controlled manner.
- What “good” looks like: A steady stream, avoiding pouring directly down the sides of the filter.
- Common mistake: Pouring too fast or unevenly, causing water to bypass the grounds. Aim for a spiral motion.
7. Let it drip/steep.
- What to do: Allow all the water to pass through the grounds (pour-over) or let it steep (French press).
- What “good” looks like: The brew finishes within the expected time frame (e.g., 2-4 minutes for pour-over).
- Common mistake: Brew time too short or too long. Adjust grind size next time if it’s off.
8. Remove the brewer/filter.
- What to do: Carefully remove the brewer or press the plunger.
- What “good” looks like: All liquid has been extracted.
- Common mistake: Leaving the grounds in contact with the brewed coffee for too long, leading to over-extraction.
9. Serve and enjoy.
- What to do: Pour into your favorite mug and savor.
- What “good” looks like: A delicious, well-balanced cup of coffee.
- Common mistake: Letting it get cold before drinking. Enjoy it fresh!
Common mistakes (and what happens if you ignore them)
| Mistake | What it causes | Fix |
|---|---|---|
| Using stale, pre-ground coffee | Weak, flat, papery taste | Grind fresh beans just before brewing. |
| Incorrect grind size | Under-extracted (sour) or over-extracted (bitter) | Match grind to brewer type; adjust finer for faster brew, coarser for slower. |
| Water too hot or too cold | Scorched (bitter) or weak/sour taste | Aim for 195-205°F; let boiling water rest for 30 seconds. |
| Incorrect coffee-to-water ratio | Too strong or too weak | Start with 1:15-1:17 ratio (grams); adjust to taste. |
| Not blooming the coffee | Uneven extraction, less flavor, potentially sour | Always do the bloom for 30 seconds. |
| Pouring water too quickly or unevenly | Channeling, weak spots, uneven extraction | Pour slowly and in a controlled spiral motion. |
| Not cleaning your gear | Rancid oils, bitter and unpleasant taste | Rinse brewer after every use; descale regularly. |
| Using poor quality water | Off-flavors, dull taste | Use filtered or bottled water when possible. |
| Inconsistent brewing technique | Unpredictable results | Stick to a routine; measure everything (coffee, water, time). |
| Over-extraction (e.g., leaving grounds) | Bitter, harsh, astringent taste | Remove grounds promptly after brewing is complete. |
Decision rules (simple if/then)
- If your coffee tastes sour, then try grinding finer because a finer grind increases surface area for extraction.
- If your coffee tastes bitter, then try grinding coarser because a coarser grind slows down extraction.
- If your coffee is weak, then use more coffee or less water because you’re likely under-extracting.
- If your coffee is too strong, then use less coffee or more water because you’re likely over-extracting.
- If your water is not hot enough, then let it boil and cool for a minute because insufficient heat leads to sourness.
- If your water is too hot, then let it cool for 30-60 seconds because boiling water will scorch the grounds.
- If your pour-over is brewing too fast, then grind finer because a finer grind will slow the flow rate.
- If your pour-over is brewing too slow, then grind coarser because a coarser grind will speed up the flow rate.
- If your French press coffee is muddy, then use a coarser grind and don’t press too hard because fine particles create sediment.
- If your coffee tastes like paper, then rinse your paper filter thoroughly with hot water before adding grounds because this removes the papery taste.
- If you’re short on time, then consider a simple immersion brewer like an AeroPress or a quick pour-over because they are generally faster than complex methods.
FAQ
What’s the easiest way to make coffee while camping?
An AeroPress or a simple pour-over cone with a good travel grinder and filtered water. These are lightweight and forgiving.
An AeroPress coffee maker is an excellent choice for camping due to its durability and ease of use.

- The Brewer That Started It All – AeroPress Original was the first single cup coffee maker to combine 3 brew methods in one compact, portable device for a faster brew and better extraction giving coffee lovers a smooth, rich cup bursting with coffee bean flavor—without the bitterness or acidity found in other methods.
- A New Standard in Coffee Flavor – Equal parts French press, pour-over, and espresso, AeroPress patented 3 in 1 technology distills the best of all three brewing methods into one sleek, portable device. The result? A rich, full-bodied cup in under two minutes—free of bitterness and grit, and full of delicious coffee bean flavor.
- The Secret to AeroPress Superior Flavor – Air Pressure and micro-filtration work together to speed up extraction for less bitterness than other methods, so you can finally enjoy the full spectrum of coffee bean flavor, from smooth tasting notes to level of roast and country of origin
- Brew and Clean in 2 Minutes – To brew, simply add coffee and water, wait 30 seconds, then press for a clean, well-balanced cup. The AeroPress coffee maker includes 50 paper micro-filters, ensuring smooth, grit-free coffee. To clean, just pop out the grinds and rinse! Fast, easy brewing at home or on the go.
- Brew Like a Pro, Wherever You Go – One of the only coffee makers that offers full control over brew time, temperature and grind size so you can personalize your favorites faster - from classics to cold brew and iced coffee to espresso-style drinks like cappuccino and lattes. Built for travel, AeroPress is compact, lightweight and shatterproof. Fits in your backpack, carry-on or bag, so you can make exceptional coffee on the road, at the office, while camping or wherever your brew takes you.
Do I really need a special travel coffee maker?
Not necessarily. You can adapt many home methods, but dedicated travel gear is often more compact and durable. Think about what fits your travel style.
How do I keep my coffee hot on the go?
A quality insulated travel mug is your best friend. It will keep your brew warm for hours.
To keep your coffee hot for hours, a high-quality insulated travel mug is an essential companion.
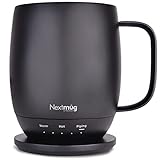
- ALWAYS THE PERFECT TEMPERATURE – The Nextmug will keep your hot coffee, tea or preferred beverage at the perfect temperature wherever you are. Simply select Warm (130° F), Hot (140° F), or Piping (150° F) and enjoy for hours.
- SMART MUG TECHNOLOGY – Long-lasting battery maintains your ideal temperature. LED lights display battery life & real-time temperature. Includes Spill-Resistant Lid & Charging Coaster.
- SUPER SIMPLE – On-board Control Button easily turns mug On/Off & sets the temperature. Takes only seconds to set the mug to your perfect temperature. No app required - no passwords, re-booting or security concerns.
- THE PERFECT GIFT - Give the gift for him and the gift for her that is certain to delight. Perfect for everyone on your list…moms, dads, grandmas, grandpas, teachers, birthdays, graduations and more!
- NEXTMUG CARES - Nextmug cares about our communities and our customers. We care by donating Nextmugs to teachers and first responders . We’re also committed to sustainable packaging by using 100% recyclable materials with all our products. Our dedicated customer service agents are based in the USA and always ready to help.
Is filtered water really that important when traveling?
Yes, if you want good-tasting coffee. Tap water can have minerals or chlorine that affect flavor. If you can’t find good water, bring your own or use purification tablets.
What’s the deal with blooming coffee?
Blooming releases trapped CO2 from freshly roasted coffee. It allows for more even extraction and better flavor. Don’t skip this step!
Can I use instant coffee?
Sure, it’s the easiest for travel. But if you’re looking for good coffee, it’s usually a step down. Many travelers find the effort for fresh grounds is worth it.
How much coffee should I bring?
Bring enough for your trip, plus a little extra. Pre-portioning it into small bags or containers makes it easy to measure.
What if I don’t have a scale?
Use a tablespoon as a rough guide. A common starting point is 2 tablespoons of coffee per 6 oz of water. It’s not perfect, but it’s a decent approximation.
What this page does NOT cover (and where to go next)
- Specific brand recommendations or comparisons. (Look for reviews of individual brewers.)
- Advanced brewing techniques like syphon or Moka pot travel setups. (These are more niche and complex.)
- Detailed troubleshooting for electronic coffee makers. (Check the manufacturer’s manual.)
- How to find the best local coffee shops while traveling. (That’s a whole other adventure!)
- Extensive guides on water chemistry for coffee. (Focus on clean and hot water first.)