Brewing A Single Cup Of Coffee
Quick answer
- Use fresh, quality beans. Grind them right before brewing.
- Measure your coffee and water accurately.
- Heat your water to the right temperature, usually between 195-205°F.
- Choose a brewing method that suits your taste and equipment.
- Pay attention to brew time. Too short is weak, too long is bitter.
- Keep your gear clean. Seriously, it makes a huge difference.
Who this is for
- The solo coffee drinker who doesn’t want to brew a whole pot.
- Anyone looking to elevate their morning routine with a better cup.
- Folks experimenting with different brewing methods at home.
If you’re looking for a reliable and efficient way to brew your perfect single cup, consider investing in a quality single cup coffee maker.
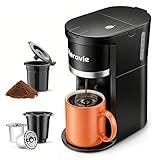
- Brew in Two Ways: Horavie single serve coffee maker supports both k pod and ground coffee, offering flexible brew sizes from 6 to 12oz to meet your varying coffee needs. Whether you want a quick cup or to savor a slow drink, it handles both with ease
- Safe and High-Quality Materials: Made from BPA-free and heat-resistant materials, this single cup coffee maker ensures durability and safety. The built-in water tank with view window allows you to monitor the water level at any time, preventing issues during brewing
- One-Touch Quick Brewing: This coffee machine combines fast brewing technology with one button operation mode that is simple and fast for any user. Simply press the button and enjoy hot coffee in just 120s, perfect for busy mornings or office use
- Compact Size fits Anywhere: Whether at home, in the office, or while traveling, the Horavie small coffee maker seamlessly fits into your lifestyle. Its compact design and light weight make it ideal for small kitchens, office or RVs, especially in space-limited environments
- Descaling Reminder & Self-Cleaning: The mini one cup coffee maker features an automatic descaling reminder that illuminates in red when cleaning is needed. Simply add a descaling solution and press the buttons for 2 seconds to initiate the self-cleaning process. This feature helps prevent clogging and ensures optimal performance, significantly extending the lifespan of your K-Pod coffee maker
What to check first
Brewer type and filter type
What are you working with? A pour-over cone, a French press, an AeroPress, or maybe just a trusty old drip machine for one? Each has its own quirks. And the filter? Paper, metal, cloth? Paper filters catch more oils, giving a cleaner cup. Metal lets more through, adding body. Know your gear, know your cup.
Water quality and temperature
This is huge. If your tap water tastes funky, your coffee will too. Filtered water is usually the way to go. For temperature, you’re aiming for that sweet spot, typically 195-205°F. Too hot scorches the grounds, too cool under-extracts. A kettle with temperature control is nice, but you can also just let boiling water sit for about 30 seconds to a minute.
Grind size and coffee freshness
Freshly roasted beans are king. Aim to grind them right before you brew. The grind size depends on your brewer. Coarse for French press, medium for drip, fine for espresso (though we’re not doing espresso here). Stale beans? They’re like sad, dusty ghosts of coffee past.
Coffee-to-water ratio
This is your flavor foundation. A good starting point for a single cup (say, 8-10 oz) is around 1:15 to 1:17. That means for every gram of coffee, you use 15-17 grams of water. A scale is your best friend here. Eyeballing it can get you close, but a scale is precise.
For precise measurements and consistent results, a good coffee scale is an invaluable tool for any home barista.

- Barista-Level Precision: A 0.1g high-precision sensor with a rapid refresh rate responds instantly to changes in weight, helping you achieve consistent results across espresso, pour over, drip coffee, Chemex, V60, and filter coffee brewing.
- Integrated Brew Timer: A built-in count-up and count-down timer tracks bloom, extraction, and espresso shots. Ideal for dialing in espresso, timing Chemex and V60 pour over recipes, or steeping tea. Auto-shutoff helps preserve battery life between brews.
- Durable Waterproof Silicone Cover: The heat-resistant, dishwasher-safe silicone cover helps protect the coffee scale's spacious 5.25" x 5.25" weighing surface from splashes, spills, and hot equipment. The grooved surface provides added stability and makes cleanup quick and easy.
- Versatile Measurement Options: Quick-tare and 6 unit options make it easy to weigh coffee beans, espresso shots, matcha portions, and more. Choose from g, ml, lb, lb:oz, oz, and fl oz for added flexibility in the kitchen and coffee bar.
- Intuitive Design: A bright dual-color LCD display clearly separates weight and timer readings, while simple controls make daily brewing easy. Includes 3 AAA batteries and is backed by 5 years of coverage, with support from our St. Louis-based team whenever you need a hand.
Cleanliness/descale status
Nobody likes coffee tasting like old socks. Rinse your brewer and filter holder after every use. If you have a machine, descale it regularly according to the manufacturer’s instructions. Mineral buildup is the enemy of good flavor and machine longevity.
Step-by-step (brew workflow)
Here’s a general workflow for a pour-over, a popular single-cup method. Adjust for your specific brewer.
1. Heat your water. Fill your kettle and heat water to 195-205°F.
- Good looks like: Water at the right temp, not boiling furiously.
- Common mistake: Using water straight off a rolling boil. This can scald your coffee. Avoid it by letting the water cool slightly.
2. Grind your coffee. Weigh out your beans (e.g., 15-20 grams for a 10 oz cup) and grind them to a medium-fine consistency.
- Good looks like: A uniform grind, like coarse sand.
- Common mistake: Grinding too fine or too coarse. Too fine clogs the filter and leads to bitterness; too coarse results in weak, watery coffee.
3. Prepare your filter and brewer. Place the paper filter in your pour-over cone. Rinse it with hot water to remove any papery taste and preheat the brewer. Discard the rinse water.
- Good looks like: A clean, wet filter that’s sealed to the cone.
- Common mistake: Not rinsing the paper filter. This can leave a papery taste in your cup.
4. Add coffee grounds. Place the brewer on your mug or carafe. Add your freshly ground coffee to the filter. Gently shake to level the grounds.
- Good looks like: An even bed of coffee grounds.
- Common mistake: Not leveling the grounds. This can lead to uneven extraction, with some parts of the coffee bed getting too much water and others too little.
5. Bloom the coffee. Start a timer. Pour just enough hot water over the grounds to saturate them evenly, about twice the weight of the coffee. Wait 30-45 seconds.
- Good looks like: The coffee grounds puffing up and releasing gas (CO2). This is the bloom.
- Common mistake: Skipping the bloom or pouring too much water. The bloom allows gases to escape, leading to a more even extraction.
6. Begin pouring. Slowly pour the remaining hot water in concentric circles, starting from the center and moving outwards, avoiding pouring directly onto the filter paper. Aim for a steady, controlled pour.
- Good looks like: A consistent, gentle stream of water.
- Common mistake: Pouring too fast or too aggressively. This can agitate the grounds too much and cause channeling, where water bypasses parts of the coffee bed.
7. Control the flow rate. Aim to finish pouring all your water within about 2 to 3 minutes, depending on your brewer and grind size.
- Good looks like: The water level in the cone stays relatively consistent, not draining too fast or getting backed up.
- Common mistake: Pouring all the water at once or letting it drain too quickly. This messes with extraction time.
8. Let it drip. Once all the water has passed through, let the remaining water drip from the grounds.
- Good looks like: A clean, aromatic cup of coffee ready to go.
- Common mistake: Letting it drip too long after the main flow stops. This can sometimes extract bitter compounds from the over-saturated grounds.
9. Remove the brewer. Carefully remove the pour-over cone and discard the used grounds and filter.
- Good looks like: A clean workspace and a finished brew.
- Common mistake: Leaving the brewer sitting on the mug, allowing more liquid to drip.
10. Serve and enjoy. Give your coffee a quick swirl and taste.
- Good looks like: A balanced, delicious cup tailored to your preferences.
- Common mistake: Not tasting it! You worked hard for this cup.
Common mistakes (and what happens if you ignore them)
| Mistake | What it causes | Fix |
|---|---|---|
| Using stale or pre-ground coffee | Weak, dull, or bitter coffee | Buy fresh, whole beans and grind them right before brewing. |
| Incorrect water temperature | Scorched (bitter) or under-extracted (sour) coffee | Use a thermometer or let boiling water sit for 30-60 seconds before pouring. |
| Wrong grind size for the brewer | Over-extraction (bitter) or under-extraction (weak) | Match grind size to your brewer type (coarse for French press, medium for drip, fine for AeroPress). |
| Inaccurate coffee-to-water ratio | Coffee is too weak or too strong/overpowering | Use a kitchen scale to measure coffee and water for precision. |
| Skipping the coffee bloom | Uneven extraction, potentially sour or bitter notes | Always bloom your coffee for 30-45 seconds to release CO2. |
| Pouring water too fast or unevenly | Channeling, leading to uneven extraction | Pour slowly and steadily in concentric circles, avoiding the filter edges. |
| Not cleaning your brewing equipment | Off-flavors, stale coffee taste | Rinse your brewer and filter holder after every use. Descale machines regularly. |
| Using poor-quality or unfiltered water | Off-flavors that mask coffee notes | Use filtered or spring water for a cleaner, purer coffee taste. |
| Brewing with a dirty grinder | Grinds get contaminated with old coffee oils | Clean your grinder regularly to remove stale residue. |
| Incorrect brew time | Under-extracted (sour) or over-extracted (bitter) | Time your brew and adjust grind size or pour rate to achieve the target brew time. |
Decision rules (simple if/then)
- If your coffee tastes sour, then you likely under-extracted it because your grind might be too coarse or your water too cool. Try grinding finer or using hotter water.
- If your coffee tastes bitter, then you likely over-extracted it because your grind might be too fine or your brew time too long. Try grinding coarser or shortening your brew time.
- If your coffee tastes weak, then you might not be using enough coffee grounds or your grind is too coarse. Increase your coffee dose or grind finer.
- If your coffee tastes muddy or has a lot of sediment, then your filter might be too porous or your grind too fine for the method. Check your filter type or adjust grind size.
- If your pour-over drains too fast, then your grind is likely too coarse. Try a finer grind.
- If your pour-over is clogging and draining too slowly, then your grind is likely too fine. Try a coarser grind.
- If you’re using a French press and it’s hard to plunge, then your grind is probably too fine. Coarsen it up.
- If your French press coffee is weak, then your grind might be too coarse or you didn’t let it steep long enough. Try a finer grind or increase steep time.
- If your coffee has an off-flavor you can’t place, then check the cleanliness of your equipment first. It’s usually the culprit.
- If you want a cleaner cup with less body, then use a paper filter.
- If you prefer a richer, fuller-bodied cup, then consider a metal filter or a French press.
- If you’re in a hurry, an AeroPress can make a great single cup relatively quickly.
FAQ
How much coffee should I use for one cup?
A good starting point is about 1:15 to 1:17 coffee-to-water ratio. For an 8 oz cup (about 237ml or 237g of water), that’s roughly 14-16 grams of coffee. Adjust to your taste.
What’s the best water temperature for brewing coffee?
Most experts recommend water between 195°F and 205°F (90°C to 96°C). Water that’s too hot can scorch the coffee, making it bitter. Water that’s too cool won’t extract enough flavor, leading to a weak, sour cup.
Can I reuse my coffee filter?
Generally, no. Paper filters are designed for single use to prevent channeling and ensure proper filtration. Reusing them can lead to stale flavors and poor extraction. Metal filters are reusable and just need a good rinse.
How do I make my coffee taste less bitter?
Bitterness often comes from over-extraction. Try grinding your coffee a bit coarser, using slightly cooler water (around 195°F), or reducing your brew time. Also, ensure your equipment is clean.
My coffee tastes weak and sour. What’s wrong?
This usually means under-extraction. Try grinding your coffee finer, using hotter water (closer to 205°F), or increasing your coffee-to-water ratio slightly. Make sure you’re letting it steep or brew for the appropriate time.
What’s the deal with blooming coffee?
Blooming is the initial pour of hot water that saturates the coffee grounds and allows trapped CO2 gas to escape. This degassing phase is crucial for an even extraction and better flavor.
How important is fresh coffee?
It’s incredibly important. Coffee beans start losing their volatile aromatic compounds and flavor shortly after roasting. Grinding them right before brewing captures the most flavor. Aim for beans roasted within the last few weeks.
What this page does NOT cover (and where to go next)
- Espresso brewing techniques and equipment.
- Cold brew coffee preparation.
- Advanced latte art or milk steaming.
- Detailed coffee bean sourcing and roasting profiles.
- Commercial or industrial coffee brewing systems.