DIY Shadow Box Coffee Table: Unique Design
Quick Answer
- Plan your design and materials.
- Source a suitable coffee table base.
- Build a sturdy shadow box insert.
- Secure the glass top.
- Add your personal touches.
- Enjoy your custom creation.
Who This Is For
- DIY enthusiasts looking for a unique furniture project.
- Homeowners wanting a statement piece for their living room.
- Anyone who loves to showcase personal items or collectibles.
What to Check First
This project is about building a shadow box coffee table. So, the first things you need to nail down are the foundation and the frame.
Coffee Table Base
You need a table that can support the weight of your shadow box and glass.
- Stability is key. A wobbly table will make your whole project feel cheap.
- Consider the height and size. Does it fit your space? Will the shadow box dimensions work?
- Think about the material. Solid wood is usually best. Metal can work too. Avoid flimsy particleboard if you can.
For a solid foundation, consider a durable coffee table base that can support your custom shadow box design.
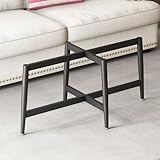
- Unique and Stylish Design: These coffee table legs are designed with a creative and eye-catching aesthetic, adding a touch of elegance and sophistication to your living space.
- Versatile Application: These table legs with suction cups and screws are suitable for a wide range of surfaces, including glass, wood, tile, and more. They can be used for tables, desks, or any other furniture that requires a stable base.
- High-quality Materials: Crafted from premium materials. Baked powder coating surface treatment helps create a uniform, durable finish, makes it resistant to chipping, peeling, and scratching, enabling our product to withstand rainy weather and to be suitable for outdoor use.
- Adjustable Feet Pad: A set of foot pads. Use them to protect your floors from damage. Perfect for uneven floors, to make sure that your table legs are always sturdy.
- Easy to Install: Pre-drilled holes on the mounting plate make installation quick and easy. The mounting plate is wide and the strew holes are clear and aligned.
Shadow Box Design & Dimensions
This is where your personality shines.
- Measure everything twice. The interior dimensions of your shadow box need to fit the space on your table.
- Plan your depth. How much room do you need for your items? Don’t go too deep or it’ll feel cavernous.
- Sketch it out. A simple drawing helps visualize the final product and potential issues.
Step-by-Step: Building Your Shadow Box Coffee Table
Let’s get this done.
1. Gather Your Materials.
- What to do: Collect your chosen coffee table, wood for the box, screws, wood glue, glass top (cut to size), and any finishing supplies.
- What “good” looks like: Everything is organized and ready to go. No last-minute runs to the hardware store.
- Common mistake: Forgetting a crucial screw or the right kind of glue. Double-check your list.
2. Prepare the Coffee Table.
- What to do: Clean the existing coffee table thoroughly. If it needs sanding or refinishing, do it now.
- What “good” looks like: A clean, stable surface to build upon.
- Common mistake: Skipping cleaning and ending up with dust and grime sealed under your new creation.
3. Measure and Cut Wood for the Shadow Box.
- What to do: Based on your design, measure and cut the wood pieces for the sides and bottom of your shadow box.
- What “good” looks like: Precise cuts that will fit together snugly.
- Common mistake: Measuring incorrectly, leading to gaps or pieces that don’t fit. Use a good tape measure and a sharp saw.
4. Assemble the Shadow Box Frame.
- What to do: Use wood glue and screws to assemble the sides and bottom of the shadow box.
- What “good” looks like: A sturdy, square frame with no visible gaps.
- Common mistake: Rushing the glue-up or not using enough screws. Let the glue cure properly.
Ensure a strong, lasting bond for your shadow box frame by using a high-quality wood glue in conjunction with screws.

- VERSATILE ADHESIVE: Bonds a wide range of lightweight materials (i.e., paper, cardboard fabric, insulation, plastic, metal, wood, felt, fiberglass, foam, leather, and more)
- INDUSTRIAL GRADE: Provides professional, industrial strength for demanding applications
- AGGRESSIVE TACK: Offers a fast, aggressive tack for a quick bond that reduces set time
- BOND TIME: Allows for a bond time of 15 seconds to 30 minutes
- REPOSITIONABLE: Initially repositionable while providing long lasting strength; Helps to create soft, non dimpling glue lines
5. Fit the Shadow Box to the Coffee Table.
- What to do: Position the assembled shadow box onto the coffee table. Secure it firmly from underneath or with brackets.
- What “good” looks like: The box is perfectly centered and doesn’t budge.
- Common mistake: Not checking for squareness or stability. A loose box is a disaster waiting to happen.
6. Add Interior Supports (Optional).
- What to do: If you plan to display items that need support, add small shelves or dividers inside the box.
- What “good” looks like: Functional and aesthetically pleasing supports that don’t detract from your display.
- Common mistake: Making supports too bulky or adding them after the glass is on. Plan this early.
7. Finish the Wood.
- What to do: Sand the exterior of the shadow box and apply your chosen finish (paint, stain, varnish).
- What “good” looks like: A smooth, professional-looking finish that complements your style.
- Common mistake: Applying finish over glue residue or not sanding enough. This looks amateur.
8. Prepare for the Glass Top.
- What to do: Ensure the top edge of your shadow box is perfectly level and clean.
- What “good” looks like: A smooth, debris-free surface ready to accept the glass.
- Common mistake: Leaving small wood splinters or dust. The glass will sit directly on this.
9. Install the Glass Top.
- What to do: Carefully place the custom-cut glass top onto the shadow box. Secure it using glass adhesive or appropriate clips.
- What “good” looks like: The glass sits flush and is securely attached.
- Common mistake: Not using glass-specific adhesive or clips. Regular glue can damage glass or fail.
10. Arrange Your Display Items.
- What to do: Carefully place your chosen items inside the shadow box.
- What “good” looks like: A thoughtfully arranged display that tells a story or showcases your treasures.
- Common mistake: Overcrowding the box. Less is often more.
Common Mistakes (and What Happens If You Ignore Them)
| Mistake | What It Causes | Fix |
|---|---|---|
| Using a flimsy coffee table base | Wobbly table, potential damage to items, safety hazard | Choose a sturdy, solid wood or metal base. Reinforce if necessary. |
| Inaccurate measurements for the box | Gaps, ill-fitting pieces, unprofessional look | Measure twice, cut once. Use a reliable tape measure and square. |
| Skipping wood glue during assembly | Weak joints, box falls apart under stress | Always use wood glue in conjunction with screws for strong joints. |
| Not letting glue cure properly | Joints separate, structural failure | Allow adequate drying time for wood glue before stressing the joints. |
| Rushing the finishing process | Uneven stain, visible brush strokes, poor adhesion | Sand thoroughly between coats. Apply thin, even layers. |
| Using the wrong adhesive for glass | Glass detaches, cracks, or adhesive stains the glass | Use a silicone-based glass adhesive or specialized clips. |
| Overcrowding the shadow box display | Cluttered look, items get damaged, hard to see | Curate your display. Allow space for each item to be appreciated. |
| Forgetting to seal the box edges | Dust and pests can enter, items can get dirty | Ensure all seams are tight. Consider a sealant if needed. |
| Not considering weight of items | Table or box structure fails, glass breaks | Distribute weight evenly. Use internal supports for heavy items. |
| Improperly handling the glass top | Chipped edges, cracks, personal injury | Wear gloves. Lift with a partner. Keep edges protected during transport. |
Decision Rules
Here’s how to navigate some common choices.
- If your coffee table is antique, then you should avoid permanent modifications and focus on a freestanding shadow box insert.
- If you want to display very fragile items, then consider adding extra padding or support within the shadow box.
- If you’re on a tight budget, then repurpose an old dresser drawer or a sturdy wooden crate for your shadow box.
- If you want a modern look, then consider a minimalist design with clean lines and perhaps a matte black finish.
- If you plan to display books or heavier items, then ensure your shadow box wood is thick enough and your coffee table base is exceptionally sturdy.
- If you’re unsure about cutting glass, then order it pre-cut from a local glass shop. It’s worth the peace of mind.
- If you want to protect items from UV damage, then use UV-filtering glass for your coffee table top.
- If your shadow box needs to be extra secure, then consider using L-brackets to attach it firmly to the coffee table.
- If you want to make the display easily changeable, then design the shadow box with a removable bottom or side panel.
- If you’re worried about condensation, then ensure there’s some minimal ventilation, especially if displaying organic items.
FAQ
Can I use any coffee table for this project?
It’s best to use a sturdy coffee table made of solid wood or metal. A flimsy table won’t support the weight of the shadow box and glass.
How do I ensure the shadow box is level?
Use a spirit level when assembling the box and when attaching it to the coffee table. Shim any uneven spots on the table itself before attaching the box.
What kind of wood should I use for the shadow box?
Pine is affordable and easy to work with for beginners. Hardwoods like oak or maple are more durable and offer a premium look.
How deep should the shadow box be?
This depends entirely on what you want to display. A few inches is usually sufficient for most items, but measure your objects first.
Can I make the shadow box removable?
Yes, you can design it to sit on top and be secured with discreet clips or brackets, rather than permanently attaching it.
What if I don’t want a glass top?
You could use a clear acrylic sheet instead of glass. It’s lighter and less prone to breaking, but can scratch more easily.
How do I clean the inside of the shadow box?
Once assembled, it’s best to clean the interior before placing items. For ongoing cleaning, carefully remove items, dust, and then replace them.
Is it safe to put plants in a shadow box coffee table?
It can be, but you need to manage moisture carefully. Use sealed containers for plants and ensure good drainage to prevent rot or damage to the wood.
What This Page Does NOT Cover (And Where to Go Next)
- Specific wood joinery techniques (like dovetails or mortise and tenon).
- Advanced finishing techniques (like epoxy resin pours or complex inlay work).
- Electrical wiring for integrated lighting within the shadow box.
- Detailed instructions for specific types of displays (e.g., terrariums, delicate artifacts).