Brewing A Single Cup Of Coffee In Your Maker
Quick answer
- Use the smallest amount of coffee and water your machine allows.
- Adjust grind size for the brew method.
- Always use fresh, filtered water.
- Measure your coffee and water accurately.
- Keep your machine clean.
- Don’t rush the brew.
Who this is for
- The solo coffee drinker who doesn’t want to waste beans.
- Someone who just needs that one perfect cup to start their day.
- The budget-conscious brewer looking to save on coffee.
For those who truly only need one cup, a dedicated single cup coffee maker can be a game-changer, ensuring you get the perfect brew without waste. Consider investing in a reliable single cup coffee maker to simplify your morning routine.
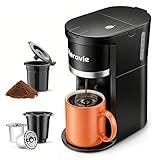
- Brew in Two Ways: Horavie single serve coffee maker supports both k pod and ground coffee, offering flexible brew sizes from 6 to 12oz to meet your varying coffee needs. Whether you want a quick cup or to savor a slow drink, it handles both with ease
- Safe and High-Quality Materials: Made from BPA-free and heat-resistant materials, this single cup coffee maker ensures durability and safety. The built-in water tank with view window allows you to monitor the water level at any time, preventing issues during brewing
- One-Touch Quick Brewing: This coffee machine combines fast brewing technology with one button operation mode that is simple and fast for any user. Simply press the button and enjoy hot coffee in just 120s, perfect for busy mornings or office use
- Compact Size fits Anywhere: Whether at home, in the office, or while traveling, the Horavie small coffee maker seamlessly fits into your lifestyle. Its compact design and light weight make it ideal for small kitchens, office or RVs, especially in space-limited environments
- Descaling Reminder & Self-Cleaning: The mini one cup coffee maker features an automatic descaling reminder that illuminates in red when cleaning is needed. Simply add a descaling solution and press the buttons for 2 seconds to initiate the self-cleaning process. This feature helps prevent clogging and ensures optimal performance, significantly extending the lifespan of your K-Pod coffee maker
What to check first
Brewer type and filter type
Know what you’re working with. Is it a drip machine? A pod system? A pour-over setup? Each has its own quirks. For drip machines, are you using a paper filter, a gold-tone filter, or no filter at all? Make sure it fits right. A filter that’s too small can overflow. A filter that’s too big is just annoying.
Water quality and temperature
This is huge. Bad water makes bad coffee, plain and simple. If your tap water tastes funky, your coffee will too. Use filtered water, or even good ol’ bottled spring water. For most drip machines, the water heats up internally. If you’re doing pour-over, you’ll heat it yourself. Aim for around 195-205°F (90-96°C) for optimal extraction. Too hot, and it’ll be bitter. Too cool, and it’ll be weak.
Grind size and coffee freshness
Fresh beans are king. Pre-ground coffee loses its magic fast. Grind right before you brew. For a standard drip machine, a medium grind is usually good. Too fine, and it might clog or over-extract, leading to bitterness. Too coarse, and you’ll get weak, watery coffee. For single cups, you might need to fine-tune this.
Coffee-to-water ratio
This is where single cups get tricky. Most machines are built for larger batches. A common starting point for a full pot is about 1:15 to 1:18 (coffee to water by weight). For a single cup, you’ll need to scale this down. Think about 15-20 grams of coffee for about 8-10 oz of water. Don’t just eyeball it. A cheap kitchen scale is your friend here.
Cleanliness/descale status
A dirty machine is a flavor killer. Coffee oils build up, and mineral deposits from water (scale) can affect performance and taste. Run a cleaning cycle regularly. Descale your machine every few months, depending on your water hardness. Check your manual for specific instructions. It’s like cleaning your grill – you gotta do it.
Step-by-step (brew workflow)
1. Measure your coffee.
- What to do: Weigh out your whole beans or pre-ground coffee. For a single cup, aim for around 15-20 grams.
- What “good” looks like: You have a precise amount of coffee ready. This ensures consistency.
- Common mistake: Guessing the amount. This leads to weak or bitter coffee. Avoid it by using a scale.
2. Grind your coffee (if using whole beans).
- What to do: Grind the beans to a medium consistency, similar to sand.
- What “good” looks like: Evenly ground particles, no dust or huge chunks.
- Common mistake: Grinding too fine or too coarse for your machine. Avoid it by knowing your brewer’s sweet spot and adjusting your grinder.
3. Prepare the filter.
- What to do: Place your chosen filter (paper, metal) into the brew basket. If using a paper filter, rinse it with hot water.
- What “good” looks like: The filter is seated properly and any paper taste is rinsed away.
- Common mistake: Not rinsing paper filters. This can leave a papery taste in your coffee. Avoid it by giving it a quick rinse.
4. Add coffee grounds to the filter.
- What to do: Pour your measured coffee grounds into the prepared filter.
- What “good” looks like: The grounds are evenly distributed in the filter.
- Common mistake: Tamping down the grounds. This can create channeling and uneven extraction. Avoid it by just letting them settle naturally.
5. Measure your water.
- What to do: Measure out the amount of filtered water you’ll need for your single cup, typically 8-10 oz.
- What “good” looks like: You have the correct water volume for your desired coffee strength.
- Common mistake: Using tap water or an incorrect amount. Avoid it by using filtered water and measuring precisely.
6. Add water to the reservoir.
- What to do: Pour the measured water into your coffee maker’s water reservoir.
- What “good” looks like: The water level is within the machine’s markings, and no water is spilled.
- Common mistake: Overfilling the reservoir. This can lead to overflow during brewing. Avoid it by sticking to the measured amount.
7. Start the brew cycle.
- What to do: Turn on your coffee maker and let it do its thing.
- What “good” looks like: The machine is heating and dripping coffee into your cup.
- Common mistake: Leaving the machine unattended for too long or not starting it immediately. Avoid it by staying nearby and starting the brew promptly after adding water.
8. Monitor the brew.
- What to do: Watch the coffee drip into your cup. For some machines, you might be able to pause and bloom the coffee.
- What “good” looks like: A steady, even stream of coffee.
- Common mistake: Interrupting the brew cycle unnecessarily. For most machines, it’s best to let it run its course. Avoid it by resisting the urge to fiddle with it.
9. Remove the brew basket.
- What to do: Once the dripping stops, carefully remove the brew basket.
- What “good” looks like: The basket is removed cleanly, and the grounds are contained.
- Common mistake: Removing the basket too soon, before all the coffee has dripped. Avoid it by waiting until the flow has completely stopped.
10. Serve and enjoy.
- What to do: Pour your freshly brewed single cup of coffee into your favorite mug.
- What “good” looks like: A hot, aromatic cup of coffee ready to drink.
- Common mistake: Letting the coffee sit on a hot plate for too long. This can “cook” the coffee and make it taste burnt. Avoid it by drinking it immediately or transferring it to a thermal carafe.
Common mistakes (and what happens if you ignore them)
| Mistake | What it causes | Fix |
|---|---|---|
| Using stale or pre-ground coffee | Weak, flavorless, or bitter coffee | Buy fresh, whole beans and grind them just before brewing. |
| Incorrect grind size | Under-extraction (sour, weak) or over-extraction (bitter) | Adjust your grinder to match your brew method (medium for drip). |
| Wrong coffee-to-water ratio | Coffee too weak or too strong | Use a scale to measure both coffee and water precisely. |
| Using poor-quality or unfiltered water | Off-flavors, mineral buildup in the machine | Use filtered or bottled spring water for a cleaner taste. |
| Not rinsing paper filters | Papery taste in the coffee | Briefly rinse paper filters with hot water before adding grounds. |
| Overfilling the water reservoir | Overflow during brewing, messy counter | Measure water accurately and don’t exceed the machine’s maximum line. |
| Brewing with a dirty machine | Burnt, oily, or stale coffee flavors | Clean your coffee maker regularly and descale as needed. |
| Not waiting for the brew cycle to finish | Weak coffee, grounds in the cup | Let the machine complete its full brew cycle before removing the basket. |
| Using a pod system with no single-cup setting | Brews a full pot or half pot, wasting coffee | Look for machines with a dedicated single-cup option or brew method. |
Decision rules (simple if/then)
- If your coffee tastes bitter, then try a coarser grind because coarser grounds extract slower.
- If your coffee tastes sour or weak, then try a finer grind because finer grounds extract faster.
- If your coffee tastes like burnt plastic, then clean your machine because old coffee oils are likely the culprit.
- If you’re brewing a single cup in a machine designed for pots, then scale down your coffee and water significantly because you don’t want to waste beans.
- If your tap water tastes bad, then use filtered water because water quality is crucial for coffee flavor.
- If you’re using a paper filter and getting a papery taste, then rinse the filter with hot water before brewing because this removes any papery residue.
- If your coffee maker is taking longer to brew or sounds strained, then it’s time to descale because mineral buildup is likely affecting performance.
- If you’re trying to make one cup and your machine only has a “full pot” button, then consider a different brew method or a machine with more options because you’ll likely waste coffee.
- If you want a stronger cup, then increase the coffee dose slightly, but don’t go overboard, because too much can lead to bitterness.
- If you want a weaker cup, then slightly decrease the coffee dose or increase the water, but don’t dilute too much because you’ll lose flavor.
FAQ
Can I just put one scoop of coffee in my regular drip machine?
You can try, but it’s usually not ideal. Most drip machines are calibrated for larger batches. Using too little coffee might not trigger the brew cycle correctly, or it could lead to very weak coffee. It’s better to adjust your coffee-to-water ratio precisely.
How much coffee should I use for one cup?
A good starting point is about 15-20 grams of coffee for 8-10 ounces of water. This is roughly 2-3 tablespoons, but weighing is always more accurate.
What if my coffee maker doesn’t have a single-cup setting?
You’ll need to be creative. Some people use a “travel mug” setting if available. Others might try to brew a half-pot and just drink half, though this can still be wasteful. A dedicated single-serve brewer or a pour-over setup might be a better investment.
Does the type of filter matter for a single cup?
Yes, it can. Paper filters tend to produce a cleaner cup, while metal filters allow more oils through, which can add body but also some sediment. Choose based on your preference.
Why is my single cup tasting bitter?
This is often due to over-extraction. Check your grind size – it might be too fine. Also, ensure your water temperature isn’t too high and that your machine is clean.
My single cup is too weak. What did I do wrong?
This is usually under-extraction. Try a finer grind size, ensure your water is hot enough (around 195-205°F), and make sure you’re using enough coffee grounds for the amount of water.
How do I avoid wasting coffee when making just one cup?
The best way is to use a scale to measure your coffee and water accurately, no matter how small the amount. This prevents over-brewing or using more beans than you need.
Is it okay to use hot water from a kettle instead of the machine’s reservoir for a single cup?
If you’re doing pour-over, absolutely. For a standard drip machine, it’s not designed for that. You’d be bypassing the machine’s heating and brewing mechanism, essentially just using it as a funnel.
What this page does NOT cover (and where to go next)
- Specific machine troubleshooting for every brand and model. (Check your manual or the manufacturer’s website.)
- Advanced brewing techniques like bloom phases or specific pour-over methods. (Explore guides on manual brewing methods.)
- The science of coffee bean varietals and roast profiles. (Look for resources on coffee tasting and sourcing.)
- Using specialized single-serve pod machines. (Consult the user guide for your specific pod system.)
- Making cold brew coffee. (Search for cold brew specific guides.)