Baking Coffee Macarons: A Delicate Treat Recipe
Quick answer
- Master the meringue: stiff peaks are your friend.
- Sift your dry ingredients twice. No lumps allowed.
- Age your egg whites for better stability.
- Fold gently, don’t overmix. Stop when it flows like lava.
- Rest those shells. A skin is crucial for that smooth top.
- Bake at the right temp. Too hot, they crack. Too cool, they don’t rise.
- Fill when completely cool. Warm filling makes a soggy mess.
Who this is for
- Home bakers looking to tackle a challenging but rewarding dessert.
- Coffee lovers who want to infuse their favorite flavor into a sophisticated treat.
- Anyone ready to impress guests with a show-stopping homemade confection.
What to check first
Brewer type and filter type
Wait, what? This isn’t about brewing coffee. This is about baking with coffee flavor. So, your coffee maker type doesn’t matter here. But for the flavor in your macarons, we’re talking about instant espresso powder or a very finely ground coffee specifically for baking. You want that intense coffee punch without gritty texture.
For that intense coffee punch, consider using a high-quality instant espresso powder. It’s perfect for infusing rich flavor without altering texture.

- Award-winning espresso powder - Named Best Espresso Powder by America's Test Kitchen. Premium Colombian coffee expertly roasted and finely ground for rich espresso flavor.
- Fine powder - Blends easily into batters, frostings, beverages, and recipes for consistent coffee flavor.
- Instant convenience - No brewing, grinding, or coffee grounds required.
- Versatile applications - Ideal for brownies, cakes, cookies, desserts, smoothies, mochas, and coffee creations.
- Rich espresso flavor - Adds deep coffee flavor with roasted notes that complement chocolate and baked goods.
Water quality and temperature
Again, not brewing here. But if your recipe calls for a liquid coffee element (like a dissolved instant powder), use filtered water. It’ll taste cleaner. Temperature? Room temp for dissolved powders is fine. No need for boiling or chilling.
Grind size and coffee freshness
For the flavoring in macarons, you want super fine. Think powder. If you’re using espresso powder, that’s perfect. If you’re grinding beans, make sure it’s an espresso grind or finer, and ideally, use it fresh for the best aroma. Stale coffee flavor won’t cut it.
Coffee-to-water ratio
This is more about the ratio of your coffee flavoring to the rest of your macaron batter. Too much coffee powder can dry out your shells. Too little, and you’ll barely taste it. We’re aiming for a noticeable coffee note, not an overwhelming bitterness. Recipes vary, so follow yours, but keep an eye on the batter’s consistency.
Cleanliness/descale status
This is super important for macarons. Any grease or residue on your bowls or whisk attachments can ruin your meringue. Make sure everything is spotless. Like, really spotless. Even a tiny bit of oil can prevent your egg whites from whipping up properly.
Step-by-step (brew workflow)
Hold up, this isn’t a brew workflow. This is a macaron workflow. Let’s get this straight.
Step 1: Prepare Baking Sheets
What to do: Line baking sheets with parchment paper or silicone mats. If using parchment, draw circles on the underside as guides (about 1.5 inches).
What “good” looks like: Smooth, flat surfaces ready for batter.
Common mistake: Not drawing guides or drawing them too close together.
How to avoid it: Use a template or a glass to draw uniform circles. Leave space between them for spreading.
To ensure uniform, perfectly shaped macarons, using macaron baking mats can be a game-changer. They often come with pre-drawn circles, making piping a breeze.
No products found.
To ensure uniform, perfectly shaped macarons, using macaron baking mats can be a game-changer. They often come with pre-drawn circles, making piping a breeze.
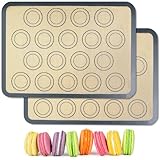
- Baking Mats Made from fiberglass and food-safe silicone, BPA-free, fade-resistant, and reusable
- Oven-safe up to 500°F (260°C), distributes heat evenly; use with a baking sheet for support - Do not place the mat directly on the oven rack
- Non-stick silicone surface, quick and easy to clean by hand with soap and water
- Includes a 18-cavity macaron template (size guiding circles), perfect for creating uniformly sized macarons and cookies
- Rectangular baking mat (set of 2), Mats measures: 13" L x 9" W (32.5 x 23.5cm), perfect for Quarter Sheet Size pans
Step 2: Sift Dry Ingredients
What to do: Sift almond flour and powdered sugar together into a bowl. Do this at least twice. Add your coffee flavoring powder here.
What “good” looks like: A fine, lump-free powder.
Common mistake: Not sifting enough, leaving lumps.
How to avoid it: Be patient. Use the back of a spoon to push stubborn bits through the sieve.
Step 3: Age Egg Whites
What to do: Separate egg whites and let them sit in a covered bowl at room temperature for at least 24 hours (or up to 3 days).
What “good” looks like: Slightly less viscous, more stable egg whites.
Common mistake: Using fresh egg whites.
How to avoid it: Plan ahead! This step is non-negotiable for good macarons.
Step 4: Whip Meringue
What to do: Beat aged egg whites on medium speed until foamy. Gradually add granulated sugar, increasing speed to high. Whip until stiff, glossy peaks form.
What “good” looks like: The meringue holds its shape when you lift the whisk; it doesn’t droop.
Common mistake: Under-whipping or over-whipping the meringue.
How to avoid it: Watch for the stiff peaks. If it looks dry and crumbly, you’ve gone too far.
Step 5: Macaronage (The Fold)
What to do: Gently fold the sifted dry ingredients into the meringue in thirds. Use a rubber spatula. Fold until the batter flows like thick lava or ribbon.
What “good” looks like: A smooth, glossy batter that falls off the spatula in a continuous ribbon and slowly melts back into itself.
Common mistake: Overmixing (too runny) or undermixing (too stiff).
How to avoid it: Stop folding when you can draw a “figure 8” with the batter that holds its shape for a few seconds.
Step 6: Pipe Shells
What to do: Transfer batter to a piping bag fitted with a round tip. Pipe rounds onto your prepared baking sheets.
What “good” looks like: Uniform, neat circles with no peaks.
Common mistake: Piping unevenly or leaving pointy tops.
How to avoid it: Hold the piping bag straight up and down. Release pressure and flick your wrist to finish the dot.
Step 7: Tap and Rest
What to do: Firmly tap the baking sheets on the counter to release air bubbles. Let the piped shells rest at room temperature until a dry skin forms.
What “good” looks like: The surface is dry to the touch. When gently poked, it doesn’t stick to your finger.
Common mistake: Skipping the tapping or resting.
How to avoid it: Tapping is key for smooth tops. Resting prevents cracking during baking.
Step 8: Bake
What to do: Bake in a preheated oven (typically 300-325°F or 150-160°C) for 12-18 minutes.
What “good” looks like: Shells have developed “feet” (the ruffled base) and don’t wobble when gently touched.
Common mistake: Oven too hot (cracked shells) or too cool (no feet, hollow shells).
How to avoid it: Know your oven! Use an oven thermometer. Rotate pans halfway through if needed.
Step 9: Cool and Fill
What to do: Let shells cool completely on the baking sheets before removing. Once cool, pair matching shells and fill with your coffee-flavored buttercream or ganache.
What “good” looks like: Cleanly removed shells, neatly filled.
Common mistake: Trying to remove shells while warm or filling warm shells.
How to avoid it: Patience! Warm shells stick and break. Warm filling makes a mess.
Common mistakes (and what happens if you ignore them)
| Mistake | What it causes | Fix |
|---|---|---|
| Using fresh egg whites | Meringue won’t whip properly, flat shells | Age egg whites in the fridge for 24-72 hours. |
| Not sifting dry ingredients | Lumpy shells, rough texture | Sift almond flour and powdered sugar at least twice. |
| Overmixing the batter | Runny batter, flat shells, no feet | Fold until the batter flows like lava; stop when you can draw a figure 8. |
| Undermixing the batter | Stiff batter, dry shells, cracked tops | Fold until the batter is smooth and flows easily. |
| Skipping the resting period | Cracked shells, no feet | Let shells air dry until a skin forms; they shouldn’t stick to your finger. |
| Oven temperature too high | Cracked shells, burnt bottoms, hollow interiors | Use an oven thermometer; calibrate your oven temp. |
| Oven temperature too low | No feet, pale shells, undercooked interiors | Increase oven temp slightly; bake longer if needed. |
| Trying to remove shells too soon | Broken shells, sticking to parchment | Let shells cool completely on the baking sheet. |
| Filling warm shells | Soggy bottoms, melted filling | Ensure shells are fully cooled before filling. |
| Using too much coffee powder | Dry batter, cracked shells, bitter taste | Stick to recipe ratios; start with less if unsure. |
Decision rules (simple if/then)
- If your meringue looks dry and crumbly, then you’ve over-whipped it because the proteins have broken down too much. Stop whipping immediately.
- If your batter is too runny to pipe, then you’ve overmixed it during the macaronage stage because you folded too much. Try adding a tiny bit more sifted dry ingredients, but be careful not to overdo it.
- If your batter is too stiff to pipe smoothly, then you’ve undermixed it during macaronage because not enough air was incorporated. Gently fold a little longer, watching for the lava-like consistency.
- If your shells are cracking during baking, then your oven is likely too hot because the rapid rise causes the shell to split. Reduce your oven temperature by 10-20°F.
- If your shells have no “feet,” then either your meringue wasn’t stiff enough, or you didn’t let them rest long enough to form a skin. Revisit meringue technique or ensure adequate resting time.
- If your shells are hollow, then it’s often a meringue issue (under-whipped) or oven temperature too low, causing the inside to not cook through properly. Ensure stiff peaks and correct oven temp.
- If your shells stick to the parchment paper after baking, then they weren’t fully baked or cooled. Ensure they are completely cool before attempting removal.
- If your macarons are chewy and soft, then they may be underbaked or have too much moisture. Bake them a bit longer or ensure your dry ingredients are very dry.
- If your macarons taste bland, then you need more coffee flavoring or ensure you’re using a high-quality instant espresso powder.
- If your macarons are too sweet, then adjust your filling recipe or consider adding a pinch of salt to the batter to balance the sweetness.
FAQ
Q: Can I use regular ground coffee instead of espresso powder?
A: It’s not ideal. Regular grounds are too coarse and will make your macarons gritty. Use finely ground espresso or instant espresso powder for the best texture and flavor.
Q: How do I get that smooth, shiny top on my macarons?
A: Proper macaronage (folding) is key. You want a batter that flows like lava. Also, make sure you tap your baking sheets firmly to release air bubbles and allow the shells to rest until a skin forms.
Q: My macarons always crack. What am I doing wrong?
A: This is usually an oven temperature issue. Your oven might be too hot. Try reducing the temperature by 10-20°F and using an oven thermometer to be sure. Also, ensure your shells have rested enough to form a skin.
Q: How long do coffee macarons last?
A: Properly stored in an airtight container in the refrigerator, they can last for about 3-5 days. They actually get better after a day or two as the filling softens the shells slightly.
Q: Can I make the coffee filling ahead of time?
A: Absolutely! Most coffee buttercream or ganache recipes can be made a day or two in advance and stored in the refrigerator. Let it come to room temperature and re-whip if necessary before filling.
Q: What’s the deal with aging egg whites?
A: Aging egg whites removes some of their water content and breaks down some proteins. This makes them more stable and easier to whip into a stronger meringue, which is crucial for macaron success.
Q: My macarons are hollow. Why?
A: Hollow macarons are often caused by an under-whipped meringue or an oven that’s too cool. Make sure your meringue reaches stiff peaks and your oven is at the correct temperature.
Q: Can I add coffee extract instead of powder?
A: Coffee extract can be used, but it’s potent. Start with a very small amount (like 1/4 teaspoon) and taste your batter. Too much can make them taste artificial.
What this page does NOT cover (and where to go next)
- Specific coffee bean origins and their flavor profiles in baking.
- Advanced piping techniques for intricate designs.
- Detailed troubleshooting for every single possible macaron failure.
- Alternative meringue methods beyond the French method.
- The science behind gluten development in baking (not relevant here, but good to know for bread!).
- How to brew the perfect cup of coffee to enjoy with your macarons.