Bake Adorable Coffee Cup Cakes
Quick answer
- Use your favorite coffee maker for a strong brew.
- Don’t overmix the batter; it ruins the texture.
- Bake at the right temperature. Too hot burns, too cool is gummy.
- Cool completely before frosting. Patience is key here.
- Frosting is where you get creative. Go wild!
- Have fun with it. It’s cake, after all.
Who this is for
- Anyone who wants a fun, easy dessert project.
- Coffee lovers looking to add a caffeine kick to their sweets.
- Beginners in the kitchen who want a foolproof recipe.
What to check first
Brewer type and filter type
This isn’t about brewing coffee for drinking, but for the cake itself. You’ll want a concentrated coffee flavor. A drip machine with a fine-mesh filter or even a French press can work. Just make sure you’re using enough coffee grounds to get a strong shot.
Water quality and temperature
For the cake batter, filtered water is always a good call. It avoids any weird mineral tastes. The water you use to brew your coffee for the cake should also be good quality. Temperature matters for brewing, but for the batter, it just needs to be cool enough to mix in.
Grind size and coffee freshness
For brewing the coffee that goes into the cake, a medium grind is usually best for drip machines. If you’re using a French press, go a bit coarser. Freshly ground beans will always give you the best flavor. Stale coffee tastes like… well, stale coffee. Nobody wants that in their cake.
Coffee-to-water ratio
When brewing the coffee for the cake, aim for a stronger ratio than you would for drinking. Think 1:15 or even 1:12 coffee to water. This ensures that the coffee flavor really comes through in the final product. You want a rich, robust coffee presence.
Cleanliness/descale status
Make sure your coffee maker is clean. Old coffee residue can make your cake taste bitter. And for the oven, ensure it’s clean too. Crumbs from previous bakes can burn and create unpleasant smells and tastes. A clean workspace is a happy workspace.
Step-by-step (brew workflow)
Here’s how to get those delicious coffee cup cakes going.
To ensure you have everything you need for these delicious treats, consider stocking up on essential baking supplies.
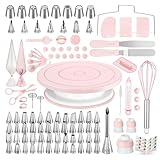
- All-in-One Cake Decorating Supplies Kit: Total 158pcs baking accessories, includes everything you need to start decorating your cakes: a revolving cake stand, 3 scrapers, angled & straight spatulas, 49 standard-size piping tips, 8 Russian tips, 7 Korean nozzles, tips cleaning brush, 3 couplers, 50 disposable pastry bags, 2 reusable piping bags, 2 bag ties, 2 flower nails, flower lifter, cake pen and 3 cake pen top, cake leveler, 14 fondant molds, smoother, 5 measuring spoons, egg separator, and whisk.
- 360° Spinning Cake Turntable: This essential baking supplies tool features a cake stand with an 11-inch diameter in a macaron color that spins smoothly on a hidden ball bearing, allowing you to achieve stunningly consistent patterns and gorgeous designs. With 360° clockwise and counterclockwise rotation, you can decorate like a PRO. The light color design makes you enjoy your cake decorating projects.
- Piping Bags and Tips Set: 49 standard-sized, 8 Russian, and 7 Korean numbered piping tips, 50 disposable piping bags, 2 pink reusable pastry bags, 3 couplers, and 2 bag ties. With this frosting set, you can design different patterns for your cakes. Don’t worry, we have a pattern chart to help you eliminate guesswork by providing outcomes for each tip. Besides, a tips cleaning brush for easy cleaning of the nozzles after use.
- Angled and Straight Icing Spatulas: Made from high-quality stainless steel, these exceptional frosting spatulas simplify the process of achieving evenly frosted layers and working on layered cakes. With a 12.5-inch angled spatula and a 10.6-inch straight spatula, you can effortlessly create smooth surfaces and crumb-free layers.
- E-Book Guide to Use: Come with a pattern chart that serves as a guide for the numbered icing tips. Furthermore, a detailed and professional E-Book is available, providing advanced guidance on using Kootek baking tools and creating exquisite cakes or cupcakes. This valuable resource is ideal for beginners as well as for professionals, making our set the perfect choice for those seeking to improve their baking skills. Also a thoughtful gift for Mother's Day, a wedding, or a party.
1. Preheat Your Oven: Get that oven to 350°F (175°C).
- What “good” looks like: The oven is fully heated and ready to go.
- Common mistake: Forgetting to preheat. This leads to uneven baking and sad cakes. Set a timer if you have to.
2. Brew Strong Coffee: Brew about 1/2 cup of very strong coffee.
- What “good” looks like: A concentrated, dark liquid. It should smell intensely of coffee.
- Common mistake: Brewing weak coffee. You won’t get that coffee punch. Use more grounds or less water.
3. Combine Dry Ingredients: In a large bowl, whisk together flour, sugar, cocoa powder, baking soda, baking powder, and salt.
- What “good” looks like: A uniform mixture with no lumps of leavening agents.
- Common mistake: Not whisking enough. This can lead to pockets of baking soda or powder, causing weird textures or tastes.
4. Combine Wet Ingredients: In a separate bowl, mix eggs, milk, oil, and vanilla extract.
- What “good” looks like: A smooth, emulsified mixture.
- Common mistake: Overbeating the eggs. You don’t want them frothy, just combined.
5. Add Coffee to Wet Ingredients: Pour the cooled, strong coffee into the wet ingredients.
- What “good” looks like: Everything mixes together smoothly.
- Common mistake: Adding hot coffee. It can cook the eggs. Let it cool slightly first.
6. Combine Wet and Dry: Pour the wet ingredients into the dry ingredients.
- What “good” looks like: Just combined. A few small lumps are okay.
- Common mistake: Overmixing. This develops gluten and makes your cakes tough. Stop as soon as you don’t see dry flour. Seriously, stop.
7. Fill Muffin Cups: Line a muffin tin with liners or grease it well. Fill each cup about two-thirds full.
- What “good” looks like: Evenly filled cups. They won’t overflow when baking.
- Common mistake: Overfilling. This causes a messy overflow and uneven tops.
8. Bake: Bake for 18-22 minutes, or until a toothpick inserted into the center comes out clean.
- What “good” looks like: The cakes are springy to the touch and a toothpick comes out clean.
- Common mistake: Underbaking. Gummy centers are no fun. Check early and often.
9. Cool: Let the cakes cool in the muffin tin for a few minutes, then transfer them to a wire rack to cool completely.
- What “good” looks like: Completely cool cakes. You should be able to handle them without them being warm.
- Common mistake: Frosting warm cakes. The frosting will melt into a sad, greasy mess. Patience, grasshopper.
10. Frost and Decorate: Once cool, frost your cup cakes. Get creative!
- What “good” looks like: Beautifully decorated cakes ready to be devoured.
- Common mistake: Rushing the frosting. Make sure the cakes are truly cool.
Common mistakes (and what happens if you ignore them)
| Mistake | What it causes | Fix |
|---|---|---|
| Overmixing batter | Tough, dense, chewy cakes | Mix <em>just</em> until combined. Lumps are fine. |
| Underbaking | Gummy, raw center, collapses | Bake until a toothpick comes out clean. Check early. |
| Overbaking | Dry, crumbly, hard cakes | Start checking for doneness at the lower end of the bake time. |
| Using stale coffee | Weak, bitter, or dull coffee flavor | Use fresh, good-quality coffee beans. |
| Not preheating the oven | Uneven baking, poor rise, pale tops | Always preheat your oven thoroughly. Use an oven thermometer. |
| Frosting warm cakes | Melted, sliding frosting; greasy appearance | Let cakes cool <em>completely</em> on a wire rack. |
| Using incorrect grind size | Poor extraction for coffee flavor in cake | Medium grind for drip, coarser for French press. |
| Not cleaning coffee maker | Off-flavors transferred to the cake | Descale and clean your brewer regularly. |
| Overfilling muffin cups | Messy overflow, unevenly baked cakes | Fill cups about two-thirds full. |
| Using room temp ingredients | Batter might not emulsify well | Ensure eggs and milk are at room temperature for better mixing. |
Decision rules (simple if/then)
- If your cakes are coming out too dry, then try reducing the baking time by a couple of minutes because overbaking is the usual culprit.
- If the coffee flavor is too weak, then brew your coffee even stronger next time because a higher coffee-to-water ratio is key.
- If your cakes have a gummy center, then bake them longer because they likely weren’t fully cooked through.
- If your frosting is melting, then your cakes are definitely too warm because heat is the enemy of frosting.
- If the batter seems lumpy, then don’t worry too much because a few small lumps are better than overmixing.
- If your cakes are sinking in the middle, then check your leavening agents or oven temperature because they might be expired or too low.
- If you want a more intense coffee flavor, then consider adding a teaspoon of instant espresso powder to the dry ingredients because it boosts coffee notes.
- If your cakes are sticking to the tin, then make sure you greased or lined the muffin cups adequately because proper prep prevents sticking.
- If you notice a bitter taste, then check your coffee quality and your brewer’s cleanliness because off-flavors can come from old grounds or residue.
- If the cakes are tough, then you probably overmixed the batter because that develops too much gluten.
- If you want a richer chocolate-coffee flavor, then use dark cocoa powder because it has a deeper taste.
FAQ
Q: Can I use decaf coffee for these cup cakes?
A: Absolutely. You’ll still get the coffee flavor, just without the caffeine. Just make sure it’s brewed strong!
Q: How do I store coffee cup cakes?
A: Store them in an airtight container at room temperature for up to 3 days. If they’re heavily frosted with buttercream, you might want to refrigerate them, but let them come to room temp before eating.
Q: Can I make these vegan?
A: You sure can. Swap the milk for a plant-based alternative (like almond or soy) and use an egg replacer or a flax egg.
Q: What kind of frosting works best?
A: A classic buttercream is great. A cream cheese frosting also pairs wonderfully with coffee flavor. Even a simple chocolate ganache would be killer.
Q: My cakes taste a bit bland. What did I miss?
A: Double-check your coffee strength and freshness. Also, ensure you used enough salt in the dry ingredients; it really balances sweetness.
Q: Can I make this recipe gluten-free?
A: Yes, you can substitute a good quality gluten-free all-purpose flour blend. You might need to adjust the liquid slightly depending on the blend.
Q: How do I get that perfect domed top on my cup cakes?
A: A hot oven and not overfilling the cups usually does the trick. Also, ensure your leavening agents are fresh.
Q: Can I add chocolate chips?
A: Go for it! Mini chocolate chips would be awesome mixed into the batter. They complement coffee so well.
What this page does NOT cover (and where to go next)
- Advanced cake decorating techniques (fondant work, intricate piping).
- Specific brand comparisons for coffee makers or baking ingredients.
- Detailed scientific explanations of gluten development or leavening reactions.
- Recipes for coffee-flavored beverages to serve alongside your cakes.
- Troubleshooting for specific oven models or unique kitchen environments.