Simple Steps To Make Delicious Cold Coffee
Quick answer
- Use a coarse grind for cold brew.
- Steep coffee grounds in cold water for 12-24 hours.
- Filter thoroughly to remove sediment.
- Use a 1:8 coffee-to-water ratio as a starting point.
- Taste and adjust concentration with water or ice.
- Keep your equipment clean.
Who this is for
- Anyone who loves iced coffee but hates the watered-down taste.
- Busy folks who want to prep coffee ahead of time.
- Campers and travelers looking for a simple, delicious brew on the go.
What to check first
Brewer type and filter type
Most cold coffee methods use simple immersion. Think a jar, a French press, or a dedicated cold brew maker. The filter is key. Paper filters can work, but mesh filters are often better for cold brew to avoid clogging. If you’re using a French press, the built-in filter is usually sufficient.
For optimal results and to avoid clogging, consider using a dedicated mesh coffee filter; they are often superior to paper for cold brew.
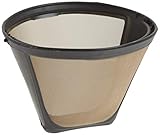
- Genuine Cuisinart Item
- Permanent gold-tone filter
- Helps provide full-flavored coffee
- Cortado con láser
Water quality and temperature
Good coffee starts with good water. Filtered tap water is usually your best bet. Avoid distilled water; it lacks minerals that help extract flavor. For cold coffee, you’re obviously using cold water to start. No need to get fancy here, just make sure it’s clean.
Grind size and coffee freshness
This is a big one for cold brew. You want a coarse grind, like breadcrumbs. Too fine, and you’ll get sludge and over-extraction. Freshly roasted beans make a difference. Grind right before you brew if you can. Stale coffee just tastes… stale, no matter the method.
Coffee-to-water ratio
This is where you can really dial it in. A good starting point for cold brew concentrate is a 1:8 ratio by weight. That means 1 part coffee to 8 parts water. For example, 100 grams of coffee to 800 grams (or ml) of water. You can adjust this later.
To achieve this precision, a reliable coffee scale is indispensable for accurately measuring your coffee and water.

- Barista-Level Precision: A 0.1g high-precision sensor with a rapid refresh rate responds instantly to changes in weight, helping you achieve consistent results across espresso, pour over, drip coffee, Chemex, V60, and filter coffee brewing.
- Integrated Brew Timer: A built-in count-up and count-down timer tracks bloom, extraction, and espresso shots. Ideal for dialing in espresso, timing Chemex and V60 pour over recipes, or steeping tea. Auto-shutoff helps preserve battery life between brews.
- Durable Waterproof Silicone Cover: The heat-resistant, dishwasher-safe silicone cover helps protect the coffee scale's spacious 5.25" x 5.25" weighing surface from splashes, spills, and hot equipment. The grooved surface provides added stability and makes cleanup quick and easy.
- Versatile Measurement Options: Quick-tare and 6 unit options make it easy to weigh coffee beans, espresso shots, matcha portions, and more. Choose from g, ml, lb, lb:oz, oz, and fl oz for added flexibility in the kitchen and coffee bar.
- Intuitive Design: A bright dual-color LCD display clearly separates weight and timer readings, while simple controls make daily brewing easy. Includes 3 AAA batteries and is backed by 5 years of coverage, with support from our St. Louis-based team whenever you need a hand.
Cleanliness/descale status
Seriously, clean your gear. Old coffee oils go rancid and will wreck your brew. Give your jars, filters, and any brewing device a good wash after each use. If you have a machine, check the manual for descaling. For simple methods, a good scrub usually does the trick.
Step-by-step (brew workflow)
1. Measure your coffee beans.
- What good looks like: Accurate measurement ensures consistency. A scale is best.
- Common mistake: Guessing the amount. This leads to weak or bitter coffee. Use a scale.
2. Grind the coffee beans coarsely.
- What good looks like: Grounds resembling coarse sea salt or breadcrumbs.
- Common mistake: Using a fine grind. This will make your cold brew muddy and bitter. Grind just before brewing.
3. Combine coffee grounds and cold water.
- What good looks like: All grounds are saturated. Stir gently to ensure no dry pockets.
- Common mistake: Not fully saturating the grounds. Some grounds might float, leading to uneven extraction.
4. Steep at room temperature or in the fridge.
- What good looks like: The mixture sits undisturbed. Room temp brews a bit faster, fridge is slower and smoother.
- Common mistake: Agitating the brew too much. Let it do its thing.
5. Steep for 12-24 hours.
- What good looks like: The liquid has darkened significantly and smells rich. Longer steeping generally means a stronger concentrate.
- Common mistake: Steeping for too short a time. You won’t get full flavor extraction.
6. Gently stir the mixture.
- What good looks like: A quick, gentle stir to help settle the grounds before filtering.
- Common mistake: Vigorous stirring. This can stir up fine particles and make filtering harder.
7. Filter the coffee concentrate.
- What good looks like: Clear liquid with minimal sediment. You might need to filter twice.
- Common mistake: Rushing the filtration. This leaves grit in your coffee. Patience is key.
8. Dilute the concentrate.
- What good looks like: The coffee is at your desired strength. Start with a 1:1 ratio of concentrate to water or ice.
- Common mistake: Drinking the concentrate straight. It’s super strong! Dilute it first.
9. Serve over ice.
- What good looks like: A chilled, refreshing drink.
- Common mistake: Not using enough ice. Your coffee will warm up and get watery quickly.
Once your cold brew is perfectly diluted, pour it over plenty of ice into your favorite iced coffee glasses for the ultimate refreshing experience.
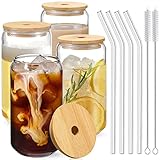
- PRODUCT CONFIGURATION: Drinking glass set includes 4 glass cups [ Diameter - 3 inches, Height - 5.6 inches ],4 nature bamboo lids, 4 reusable glass straws and 2 cleaning brushes, Classic design tumbler
- DURABLE and SAFE: The glasses are made of high-quality durable clear glass, Lead-free and BPA-free. It can be used safely for a long time. This thick clear glass can withstand the sudden changes in the temperature difference between -68°F to 212°F, making them dishwasher safe. If you want to decorate this glass, you can do DIY easily without breakage
- MULTI-PURPOSE: The glassware Great for any Occasion, any hot and cold drinks, home essentials. It is widely loved by families, kitchen, breweries, cafes, bars and restaurants. You can use it to make perfect tea, bubble Pearl Milk Tea, soda, water, iced coffee, smoothie, fruit juice or any other interesting holiday drinks
- AMAZING GIFT: This jar is very fashionable, aesthetic and characteristic. Excellent workmanship. Perfect Gifts for Women, House warming gifts, Tea mug Sets, Highball Glasses, Home Bar Accessories, Birthdays, Graduation, Weddings and Christmas Gifts
- SATISFIED SERVICE: This glass set is packaged in the heavy bubble holder and thick carton box to prevent damage while in transport. If the glass set you received was damaged or imperfect or you are not satisfied, we will offer a satisfactory solution
10. Taste and adjust.
- What good looks like: Your perfect cup. Add more water, ice, or a touch of sweetener if needed.
- Common mistake: Settling for “okay.” Tweak it until it’s perfect for you.
Common mistakes (and what happens if you ignore them)
| Mistake | What it causes | Fix |
|---|---|---|
| Using a fine grind | Muddy, bitter coffee; clogged filters | Use a coarse grind (like breadcrumbs). |
| Not saturating grounds | Uneven extraction, weak spots in the brew | Stir gently after adding water to ensure all grounds are wet. |
| Steeping for too short a time | Weak, underdeveloped flavor | Steep for at least 12 hours, up to 24. |
| Steeping for too long (over 24 hrs) | Bitter, astringent flavor | Stick to the 12-24 hour window. |
| Rushing the filtration | Gritty coffee, sediment at the bottom | Filter slowly, possibly twice, using a fine mesh or paper filter. |
| Not diluting the concentrate | Extremely strong, undrinkable coffee | Dilute with water or ice, typically 1:1 or to taste. |
| Using stale coffee beans | Flat, dull, or off-flavors | Use freshly roasted beans and grind them just before brewing. |
| Not cleaning equipment | Rancid coffee oils, off-flavors, poor extraction | Wash all brewing gear thoroughly after each use. |
| Using hard or chlorinated water | Off-flavors, poor extraction | Use filtered water. |
| Over-agitating during brewing | Increased bitterness, potential sediment issues | Let the brew steep undisturbed. Gentle stir before filtering. |
Decision rules (simple if/then)
- If your cold brew tastes bitter, then you likely used too fine a grind or steeped too long, because these lead to over-extraction.
- If your cold brew tastes weak, then you might need to use more coffee, steep longer, or use a finer grind (but not too fine!), because under-extraction is the culprit.
- If your filtered coffee has a lot of sediment, then your filter is too coarse or you rushed the process, because a good filter and patience are key.
- If you prefer a brighter, more acidic coffee, then cold brew might not be your first choice, because cold brewing naturally produces a smoother, less acidic cup.
- If you want to brew quickly, then cold brew is not the answer, because it requires significant steeping time.
- If you’re camping and have limited gear, then a simple jar and a fine-mesh strainer will work, because cold brew is forgiving with equipment.
- If you notice off-flavors, then check your water quality and equipment cleanliness, because these are common sources of unwanted taste.
- If you want a strong coffee concentrate to use for multiple drinks, then aim for a 1:8 or 1:5 coffee-to-water ratio, because this will give you a potent base.
- If you find the concentrate too strong even after diluting, then use less concentrate or more water/ice next time, because personal preference is king.
- If your grounds are clumping excessively, then your water might be too hot, or you didn’t stir enough initially, because even cold water needs to saturate the grounds.
FAQ
What’s the best coffee bean for cold brew?
Medium to dark roasts often work well, bringing out chocolatey or nutty notes. However, experiment with lighter roasts if you enjoy brighter flavors. Freshness is more important than roast level.
Can I use pre-ground coffee?
Yes, but make sure it’s a coarse grind. If you only have access to finer grinds, you might need to filter more carefully and be mindful of over-extraction.
How long does cold brew concentrate last?
Stored in an airtight container in the refrigerator, cold brew concentrate typically lasts for about 1-2 weeks. It’s best consumed within the first week.
Do I need a special cold brew maker?
Nope! A simple mason jar, a French press, or even a pitcher with a strainer can make excellent cold brew. Dedicated makers just offer convenience.
What’s the difference between cold brew and iced coffee?
Traditional iced coffee is hot-brewed coffee that’s cooled down, often resulting in a more watered-down taste. Cold brew is steeped in cold water, producing a smoother, less acidic, and often more concentrated flavor.
Can I reheat cold brew?
You can, but it defeats the purpose of cold brew and can make it taste bitter. It’s meant to be enjoyed cold.
Why is my cold brew cloudy?
This usually happens if the grind is too fine, if you agitated it too much, or if your filter isn’t fine enough. A double filter can help clear it up.
What’s the ideal water temperature for cold brew?
Just cold water straight from the tap or fridge. No heating involved!
What this page does NOT cover (and where to go next)
- Specific brand reviews of cold brew makers.
- Advanced techniques like flash chilling or nitrogen infusion.
- Detailed discussions on water chemistry and mineral content.
- Recipes for cold brew cocktails or specialty drinks.