Making Your Own Coffee With A Keurig 2.0 Brewer
Quick Answer: Can You Make Your Own Coffee in a Keurig 2.0?
- Yes, you can make your own coffee in a Keurig 2.0 brewer, but it requires specific accessories to bypass the brewer’s built-in safeguards.
- The primary method involves using a reusable K-Cup filter designed for Keurig 2.0 machines.
- You’ll need to purchase your own ground coffee or grind whole beans yourself.
- Ensure the reusable filter is compatible with the Keurig 2.0’s “Smart Screen” technology.
- Properly filling the reusable filter and selecting the correct brew size are crucial for good results.
- While it offers more control, the brewing process might take slightly longer than using pre-packaged K-Cups.
You’ll need your own ground coffee or whole beans to grind yourself. For convenience, consider purchasing pre-ground coffee specifically for Keurig brewers.
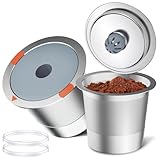
- K cup reusable fully fested for compatibility - The Cafe Save k cup reusable coffee filters work with K-Express Kmini, K-Classic, K-Elite, K-Latte, K-Cafe, K-Select, K-Compact, and Keurig 1.0 and 2.0 coffee machines.Breville K CUP, Mr. Coffee K CUP, Please see compatibility chart for full details of compatible models.(See full detailed list picture)
- NOT compatible with K-iced, K-Duo Plus, and all Multi-Stream Brewers: K-Supreme/Plus/Smart, K-Slim, K-Café, K-Brew Chill, K-Duo Hot & Iced. Using it with incompatible coffee makers may prevent the machine from closing properly.(See full detailed list picture)
- Eco-Friendly:Keurig reusable k cup is made of high-quality stainless steel and 100% BPA, lead, and DEHP free. You know ,paper filters need to cut down 1 billion trees every year,countless discarded plastic coffee capsules flow into the ocean, causing marine life to eat by mistake, and how much pain it brings to them! When using our reusable k-cup, you reduce the use of a large number of paper filters and plastic coffee capsules.(Contribute to the protection of the environment)
- Keurig reusable coffee pods design science: Coffee reusable k cup adopts one-piece design, tightly sealed top cover to prevent coffee overflow during use; 360-degree perforation on the bottom and side walls allows water to fully soak the coffee powder, optimize coffee extraction, and obtain a richer flavor The flavour ensures that delicious coffee is brewed, and the reusable k-cup filter is very useful for coffee lovers.
- Reusable k cups Health and safety -Stainless steel k cup reusable design, preserving the coffee natural oils and flavors entirely. Using stainless steel refillable K Cup brewing coffee, you will taste the great coffee you never have! These Reusable Coffee Pods keep coffee original, Dishwasher safe
Who This Is For
- The Budget-Conscious Coffee Drinker: If you want to save money compared to constantly buying disposable K-Cups, this guide is for you.
- The Flavor Explorer: For those who want to experiment with different coffee beans, roasts, and grind sizes beyond what’s available in pre-made pods.
- The Eco-Minded Brewer: If you’re looking to reduce waste generated by single-use K-Cups, making your own coffee is a more sustainable option.
What to Check First for Your Keurig 2.0 Coffee
Before you begin brewing your own coffee in a Keurig 2.0, it’s essential to ensure your setup is correct.
Brewer Type and Filter Type
- What to Check: Confirm you have a Keurig 2.0 model. These brewers are identifiable by their “Smart Screen” interface and the requirement for K-Cups with a rim band.
- Why It Matters: Keurig 2.0 brewers are designed to read the rim band on K-Cups to ensure compatibility. Standard K-Cups and older Keurig models will not work. You will need a specifically designed reusable K-Cup filter that is compatible with the Keurig 2.0 system. These typically have a different lid or a way to bypass the sensor.
- What “Good” Looks Like: Your Keurig 2.0 brewer powers on and displays the Smart Screen interface. You have a reusable K-Cup filter that is explicitly stated to be compatible with Keurig 2.0 models.
Water Quality and Temperature
- What to Check: Assess the quality of your tap water. If it has a strong taste or odor, consider using filtered water.
- Why It Matters: Coffee is over 98% water, so its quality significantly impacts the final taste. Poor water can introduce off-flavors. Keurig brewers are also designed to heat water to an optimal brewing temperature, typically between 190-200°F. You generally don’t need to worry about adjusting the temperature, as the machine handles this.
- What “Good” Looks Like: Your water tastes clean and neutral. Your Keurig brewer heats water effectively, producing hot coffee. If you notice mineral buildup, it’s time to descale.
Grind Size and Coffee Freshness
- What to Check: Ensure your coffee beans are fresh and ground to the correct size for your reusable filter.
- Why It Matters: Freshly roasted coffee beans offer the best flavor. Grinding them just before brewing preserves volatile aromatics. For most drip-style brewing methods, a medium grind is recommended. Too fine a grind can lead to over-extraction and bitterness, while too coarse a grind can result in weak, watery coffee.
- What “Good” Looks Like: Your coffee beans have a recent roast date. Your ground coffee has a consistent texture, resembling coarse sand or sea salt. If you’re grinding your own beans, do so immediately before brewing.
Coffee-to-Water Ratio
- What to Check: Determine how much coffee grounds to use for the amount of water your Keurig 2.0 will brew.
- Why It Matters: The ratio of coffee to water is fundamental to a balanced cup. Too little coffee will result in a weak brew, and too much can lead to bitterness or a muddy taste. A common starting point for drip coffee is a ratio of 1:15 to 1:18 (coffee to water by weight). For Keurig 2.0, this translates to roughly 1-2 tablespoons of grounds per 6 oz of water, but you’ll need to adjust based on your reusable filter’s capacity and personal preference.
- What “Good” Looks Like: Your coffee tastes balanced, not too strong or too weak. You’ve found a ratio that consistently produces a pleasing cup for your palate.
Cleanliness/Descale Status
- What to Check: Ensure your Keurig 2.0 brewer is clean and has been recently descaled.
- Why It Matters: Mineral deposits (scale) can build up inside your brewer over time, affecting water flow, temperature, and ultimately, the taste of your coffee. Old coffee oils and residue can also impart stale or bitter flavors. Regular cleaning and descaling are crucial for optimal performance and taste.
- What “Good” Looks Like: Your brewer operates smoothly, without unusual noises. The coffee tastes clean and fresh, not metallic or stale. The descaling indicator light on your Keurig 2.0 is off, or you’ve recently completed the descaling process.
Step-by-Step: Brewing Your Own Coffee in a Keurig 2.0
Follow these steps to make your own coffee using a compatible reusable K-Cup filter with your Keurig 2.0 brewer.
1. Prepare Your Reusable Filter: Ensure your reusable K-Cup filter is clean. If it’s a new filter, rinse it thoroughly.
- What “Good” Looks Like: The filter is free of any dust or manufacturing residue.
- Common Mistake: Using a dirty reusable filter. This can impart stale flavors.
- Avoidance: Always rinse or wash your reusable filter before each use.
2. Grind Your Coffee Beans: Grind your preferred coffee beans to a medium consistency, similar to coarse sand.
- What “Good” Looks Like: The grounds are uniform in size and texture.
- Common Mistake: Grinding too fine. This can clog the filter and lead to over-extraction.
- Avoidance: Use a burr grinder for consistency and set it to a medium grind setting. If using a blade grinder, pulse it carefully.
3. Fill the Reusable Filter: Spoon your ground coffee into the reusable filter. Aim for about 1 to 2 level tablespoons per 6 oz brew size, but adjust to your taste. Do not overfill.
- What “Good” Looks Like: The grounds fill the filter basket without being packed down, leaving a small space at the top.
- Common Mistake: Overfilling the filter. This can cause grounds to escape into your coffee.
- Avoidance: Leave about 1/4 inch of space at the top of the filter basket.
4. Level the Grounds (Optional but Recommended): Gently tap the filter or use a finger to lightly level the coffee grounds. Avoid pressing them down.
- What “Good” Looks Like: The coffee bed is relatively flat and even.
- Common Mistake: Tamping the grounds too firmly. This restricts water flow.
- Avoidance: Just lightly level the surface; don’t compress the grounds.
5. Place the Reusable Filter into the Brewer: Insert the filled reusable K-Cup filter into the K-Cup holder in your Keurig 2.0 brewer. Ensure it’s seated correctly.
- What “Good” Looks Like: The filter is securely in place, and the brewer’s lid closes properly.
- Common Mistake: Not fully seating the filter. This can prevent the brewer from recognizing it or cause leaks.
- Avoidance: Push down firmly but gently until you feel it click or settle into place.
6. Close the Brewer Lid: Close the lid of your Keurig 2.0 brewer securely.
- What “Good” Looks Like: The lid closes without excessive force and clicks into place.
- Common Mistake: Forcing the lid if the filter isn’t seated correctly. This can damage the brewer or the filter.
- Avoidance: If the lid resists closing, remove the filter and re-seat it.
7. Select Brew Size and Strength: Use the Smart Screen to select your desired brew size (e.g., 6 oz, 8 oz). Some reusable filters may also allow you to select a strength setting.
- What “Good” Looks Like: The screen displays your selected brew size and any available strength options.
- Common Mistake: Forgetting to select the brew size. The brewer might default to a small size.
- Avoidance: Always confirm your selection on the Smart Screen before starting.
8. Start Brewing: Press the brew button to begin the coffee-making process.
- What “Good” Looks Like: The brewer starts dispensing hot coffee into your mug.
- Common Mistake: Pressing the wrong button or starting before selections are made.
- Avoidance: Double-check your selections on the screen before hitting brew.
9. Wait for Brewing to Complete: Allow the brewer to finish its cycle.
- What “Good” Looks Like: The dispensing stops, and the brewer returns to its ready state.
- Common Mistake: Removing the mug too early. This can result in a weaker brew.
- Avoidance: Let the machine complete its full brewing cycle.
10. Remove and Dispose of Grounds: Carefully remove the hot reusable filter. Discard the used coffee grounds.
- What “Good” Looks Like: The filter is empty of grounds and ready for cleaning.
- Common Mistake: Touching the hot filter without protection.
- Avoidance: Use a towel or oven mitt to handle the hot filter.
11. Clean the Reusable Filter: Rinse the reusable filter under running water. For a more thorough cleaning, wash it with soap and water.
- What “Good” Looks Like: The filter is clean and ready for its next use.
- Common Mistake: Leaving grounds in the filter for extended periods. This can lead to mold or odors.
- Avoidance: Clean the filter immediately after use.
Common Mistakes (and What Happens If You Ignore Them)
| Mistake | What It Causes | Fix |
|---|---|---|
| Using a non-Keurig 2.0 compatible filter | Brewer won’t recognize the filter, or you’ll get an error message. | Purchase a reusable filter specifically designed for Keurig 2.0 brewers. |
| Overfilling the reusable filter | Coffee grounds can escape into your cup, making it muddy and gritty. | Fill the filter basket with grounds, but leave about 1/4 inch of space at the top. Do not pack them down. |
| Grinding coffee too fine | Water can’t flow through properly, leading to over-extraction and bitterness. | Use a medium grind size, similar to coarse sand. A burr grinder is recommended for consistency. |
| Grinding coffee too coarse | Water flows through too quickly, resulting in weak, watery coffee. | Adjust your grinder to a finer setting, but avoid espresso-fine grinds. |
| Using stale coffee beans | The coffee will taste flat, dull, and lack aroma and flavor complexity. | Use freshly roasted beans (check the roast date) and grind them just before brewing. Store beans in an airtight container away from light and heat. |
| Not cleaning the reusable filter regularly | Old coffee oils and residue can build up, imparting bitter or stale flavors. | Rinse the filter after every use and wash it with soap and water periodically. Check the manual for specific cleaning instructions for your filter type. |
| Not descaling the Keurig brewer | Mineral buildup can affect brew temperature, flow rate, and taste. | Follow your Keurig 2.0 manual’s instructions for descaling, typically using a vinegar/water solution or a commercial descaling solution every 3-6 months. |
| Using tap water with off-flavors | These flavors will transfer to your coffee, negatively impacting the taste. | Use filtered water (e.g., from a Brita pitcher or refrigerator filter) for a cleaner-tasting cup. |
| Incorrect coffee-to-water ratio | Coffee will be too weak or too strong/bitter. | Start with 1-2 tablespoons of grounds per 6 oz of water and adjust based on your preference. Keep notes on what works best for you. |
| Rushing the brew cycle | Coffee might not be fully extracted, leading to a less flavorful cup. | Allow the Keurig 2.0 to complete its entire brewing cycle before removing your mug. |
Decision Rules for Keurig 2.0 Homemade Coffee
- If your reusable filter is not specifically advertised as Keurig 2.0 compatible, then it likely won’t work because the brewer’s sensors will prevent brewing.
- If you want to avoid gritty coffee, then ensure you don’t overfill the reusable filter and don’t pack the grounds down.
- If your coffee tastes bitter, then try a coarser grind or less coffee grounds.
- If your coffee tastes weak, then try a finer grind, more coffee grounds, or a smaller brew size.
- If the brewer displays an error message or won’t brew, then check that the reusable filter is correctly seated and compatible with the Keurig 2.0.
- If your coffee has an unpleasant metallic taste, then it’s likely time to descale your Keurig brewer.
- If you notice a significant difference in taste from day to day, then ensure you are using consistent measurements of coffee grounds and fresh beans.
- If your Keurig 2.0 seems to be brewing slower than usual, then mineral buildup might be the cause; consider descaling.
- If you want to experiment with different roasts, then buy whole beans and grind them yourself just before brewing for maximum freshness.
- If your reusable filter has a lid that needs to be secured, then ensure it’s properly closed to prevent grounds from entering the brew path.
- If you’re unsure about the optimal amount of coffee grounds, then start with 1.5 tablespoons per 6 oz of water and adjust in 0.5 tablespoon increments.
FAQ
Can I use any K-Cup filter with a Keurig 2.0?
No, Keurig 2.0 brewers require specific K-Cups with a rim band that the brewer can read. For making your own coffee, you must use a reusable filter explicitly designed to be compatible with Keurig 2.0 models.
How much coffee grounds should I put in the reusable filter?
A good starting point is 1 to 2 level tablespoons of coffee grounds for every 6 ounces of water you plan to brew. It’s best to experiment to find the ratio that suits your taste preferences.
What kind of grind size is best?
A medium grind size, similar to coarse sand or sea salt, typically works best for most reusable K-Cup filters. Too fine a grind can clog the filter, while too coarse a grind can lead to weak coffee.
Why does my homemade coffee taste bitter?
Bitter coffee often results from over-extraction. This can be caused by a grind that is too fine, too much coffee grounds, or water that is too hot (though Keurig brewers control temperature). Try a coarser grind, less coffee, or a larger brew size.
Why does my homemade coffee taste weak?
Weak coffee is usually due to under-extraction. This can happen if the grind is too coarse, if you’re using too few coffee grounds, or if the water flows through too quickly. Try a finer grind, more coffee grounds, or a smaller brew size.
How often should I clean my reusable K-Cup filter?
It’s best to rinse your reusable filter after every use to remove grounds. A more thorough wash with soap and water should be done periodically, perhaps weekly, to prevent oil buildup.
Do I need to descale my Keurig 2.0 if I use a reusable filter?
Yes, you still need to descale your Keurig 2.0 brewer regularly, regardless of whether you use disposable K-Cups or a reusable filter. Mineral buildup affects all brewing processes.
Can I use pre-ground coffee?
Yes, you can use pre-ground coffee, but for the best flavor, it’s recommended to grind whole beans just before brewing. If using pre-ground coffee, ensure it’s a medium grind suitable for drip coffee makers.
Will using a reusable filter void my Keurig warranty?
Generally, using compatible third-party accessories like reusable filters designed for your specific Keurig model should not void your warranty. However, always check your Keurig warranty documentation for specifics.
What This Page Does Not Cover (And Where to Go Next)
- Detailed comparisons of different reusable K-Cup filter brands and models.
- Specific recommendations for coffee bean origins or roast profiles.
- Advanced brewing techniques like pour-over or Aeropress methods.
- Troubleshooting specific error codes unique to Keurig 2.0 models.
- Maintenance and repair guides beyond basic cleaning and descaling.