Making Instant Coffee From Roasted Beans
Quick Answer
- Roast your own beans: Start with green coffee beans and roast them to your desired level.
- Grind finely: A very fine grind is crucial for efficient extraction.
- Brew concentrated coffee: Use a high coffee-to-water ratio to create a strong liquid.
- Evaporate water: Gently heat the concentrated brew to remove most of the water, leaving behind soluble coffee solids.
- Dry the solids: Finish drying the solids until they are completely brittle and crystalline.
- Store properly: Keep your homemade instant coffee in an airtight container away from light and moisture.
For those who want to start from scratch, a quality coffee bean roaster is essential for achieving the perfect roast level for your instant coffee. Consider investing in one to control the entire flavor profile.
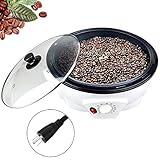
- 【Premium Quality】Operating at 110V and 800W, this electric coffee bean roaster features a non-stick chassis for easy cleaning. Equipped with a stirring rod, it ensures even roasting by continuously agitating the beans during the process. The professional thermostat provides automatic, constant temperature heating, and allows for adjustable temperature settings, enabling you to roast a variety of cereals to perfection.
- 【Honeycomb Non-Stick Bottom】The roasting chamber features a honeycomb-shaped design with a black food-grade Teflon coating. This ensures safe, easy cleaning and provides even, uniform heating for consistently perfect roasts.
- 【Professionally designed】The roaster features a heat-resistant, durable transparent cover with a four-hole ventilation system. This allows you to monitor the roasting process and observe changes in the coffee beans effortlessly while maintaining optimal ventilation.
- 【Large Capacity】Featuring an 800g tank, this roaster can accommodate a substantial amount of coffee beans, allowing you to roast in larger batches quickly and conveniently. For optimal results, we recommend roasting between 300g and 500g of beans at a time.
- 【Multifunction Use】This versatile machine is not only perfect for roasting coffee beans but also for baking a variety of other items, including beans, peanuts, chestnuts, barley, dried fruit, and popcorn. Ideal for home use, coffee shops, or restaurants, it allows you to craft and customize your unique coffee flavors to your preference.
Who This Is For
- Adventurous home roasters: Those who already roast their own coffee beans and want to experiment further.
- DIY enthusiasts: Individuals who enjoy the process of making things from scratch and are curious about transforming roasted beans.
- Preparedness-minded individuals: People looking for methods to preserve coffee for long-term storage or emergency situations.
What to Check First
Before you begin the process of making instant coffee from roasted beans, it’s important to ensure you have the right foundation. This isn’t about a specific brewer type, but rather the state of your coffee and water.
Brewer Type and Filter Type
While this process doesn’t directly use a standard drip brewer or French press in the traditional sense, understanding extraction principles is key. The method you’ll use for brewing the concentrated coffee will influence the outcome. For example, a pour-over setup or even a Moka pot can be adapted to create a very strong brew. The filter type you choose for this initial brew is less critical than ensuring it doesn’t impart off-flavors. Paper filters are generally good for a clean cup, but a fine mesh filter might be more suitable if you plan to separate solids later.
While not used for the final instant coffee, a pour over coffee maker can be a great tool for brewing the initial concentrated extract. Its controlled flow helps ensure even extraction, which is key for this process.

- Pour Over Coffee: Manual Pour Over Coffee Maker allows you to brew an excellent cup of Coffee in minutes
- Stainless steel: Includes a new and improved permanent, stainless steel mesh filter that helps extract your coffee's aromatic oils and subtle flavors instead of being absorbed by a paper filter
- Coffee Carafe: Made of durable, heat-resistant borosilicate glass with Cork Band detailing that is both functional and elegant; single wall
- Quick and Easy: Simply add coarse ground Coffee to filter, pour a small amount of water in a circular motion over ground Coffee until soaked then add the remaining water and let drip
- Servings: Pour Over Coffee Maker makes 8 cups of Coffee, 4 oz each; dishwasher safe
Water Quality and Temperature
The quality of your water significantly impacts the taste of any coffee, including instant. Using filtered water, free from chlorine or strong mineral tastes, is highly recommended. For the initial brewing phase, a temperature between 195°F and 205°F is ideal for extracting the most flavor from your roasted coffee. Too cool, and you won’t get full extraction; too hot, and you risk scorching the grounds.
Grind Size and Coffee Freshness
This is perhaps the most critical element for making instant coffee from roasted beans. You will need a very fine grind, similar to what you would use for espresso or even a bit finer. The goal is to maximize the surface area exposed to water for efficient extraction. Freshly roasted beans will yield the best flavor. For this process, beans roasted within the last few days to a couple of weeks are ideal. Stale beans will result in a flat, uninspired instant coffee.
Coffee-to-Water Ratio
To make instant coffee, you need to brew an extremely concentrated coffee liquid. This means using a much higher ratio of coffee to water than you would for a regular cup. Think of it as creating a coffee “extract.” A starting point could be a 1:5 or 1:6 ratio (e.g., 1 gram of coffee to 5 or 6 grams of water). This will produce a thick, syrupy liquid that can then be further processed.
Cleanliness/Descale Status
Ensuring all your equipment is clean is paramount. Any residual oils or mineral buildup from previous brews can introduce off-flavors into your homemade instant coffee. This applies to any vessels you use for brewing, heating, or drying. If you use a kettle or heating element, make sure it’s free of scale for efficient and clean heating.
Step-by-Step: Brewing Your Instant Coffee Extract
This process requires patience and careful attention to detail. The goal is to extract as much soluble coffee material as possible and then remove the water.
1. Roast Your Coffee Beans:
- What to do: If you haven’t already, roast your green coffee beans to your desired roast level. Aim for a medium to dark roast, as these tend to produce more soluble solids.
- What “good” looks like: Beans are evenly roasted with a pleasant aroma, free from scorching or chaff.
- Common mistake: Roasting too dark can lead to bitter flavors that will be concentrated. Avoid over-roasting.
2. Cool and Degas Beans:
- What to do: Allow the roasted beans to cool completely. Then, let them degas for at least 12-24 hours.
- What “good” looks like: Beans are cool to the touch, and the initial intense aroma has mellowed slightly.
- Common mistake: Grinding beans too soon after roasting. This can lead to a less developed flavor and potentially affect extraction.
3. Grind Coffee Very Finely:
- What to do: Grind your roasted beans to an extremely fine consistency, similar to powdered sugar or flour.
- What “good” looks like: A uniform, powdery grind. If you rub it between your fingers, it should feel like dust.
- Common mistake: Grinding too coarse. This will lead to poor extraction and a weak final product. Use a high-quality grinder capable of fine grinds.
4. Prepare for Concentrated Brew:
- What to do: Set up your brewing method. A pour-over cone with a paper filter, a fine mesh strainer, or even a French press can be adapted. You’ll need a vessel to collect the concentrated brew.
- What “good” looks like: Your brewing apparatus is clean and ready to go.
- Common mistake: Not having a clean collection vessel. Any residue can contaminate your extract.
5. Brew the Coffee Extract:
- What to do: Use a very high coffee-to-water ratio (e.g., 1:5 or 1:6). Slowly pour hot water (195-205°F) over the grounds, allowing them to bloom and then extracting the coffee. Aim for a total brew time of around 2-4 minutes.
- What “good” looks like: A very dark, syrupy liquid that is considerably thicker than regular coffee.
- Common mistake: Using too much water. This will result in a less concentrated brew, making the subsequent drying step much longer and less efficient.
6. Filter the Extract (Optional but Recommended):
- What to do: If you used a method that leaves sediment (like a French press), strain the liquid through a very fine mesh sieve or a clean paper filter to remove all coffee grounds.
- What “good” looks like: A clear, dark liquid free of any solid particles.
- Common mistake: Leaving fine sediment in the liquid. This can burn during the drying phase and impart a bitter taste.
7. Evaporate Water (Gentle Heating):
- What to do: Pour the concentrated coffee extract into a shallow, wide pan (like a stainless steel skillet or a non-stick pan). Heat very gently over low heat, stirring frequently. The goal is to slowly evaporate the water.
- What “good” looks like: The liquid will start to thicken and become more viscous. You’ll see steam rising.
- Common mistake: Using high heat. This can scorch the coffee solids, leading to a burnt flavor. Low and slow is key.
8. Continue Evaporation Until Syrupy:
- What to do: Keep heating gently and stirring. The liquid will reduce significantly and become syrupy, almost like molasses.
- What “good” looks like: A very thick, sticky syrup that coats the back of a spoon.
- Common mistake: Stopping too soon. You need to remove most of the water for it to dry properly.
9. Final Drying:
- What to do: Once it’s a thick syrup, you can try to spread it very thinly on a non-stick surface (like parchment paper on a baking sheet) and continue drying it in a very low oven (around 150-170°F) or a dehydrator on a low setting. Alternatively, continue heating in the pan very carefully, stirring constantly until it becomes brittle.
- What “good” looks like: The substance should break easily into brittle, crystalline pieces or a fine powder. It should not be sticky at all.
- Common mistake: Not drying completely. If any moisture remains, it will clump and spoil quickly.
10. Cool and Package:
- What to do: Let the dried coffee solids cool completely. Then, carefully transfer them to an airtight container.
- What “good” looks like: Dry, brittle coffee solids.
- Common mistake: Packaging while warm. This can cause condensation and clumping.
Common Mistakes (and What Happens If You Ignore Them)
| Mistake | What It Causes | Fix |
|---|---|---|
| Using stale or poorly roasted beans | Flat, dull, or unpleasant flavor in the final instant coffee. | Start with freshly roasted, high-quality green beans and roast them yourself or source them from a reputable roaster. |
| Grinding too coarsely | Incomplete extraction, weak instant coffee, wasted grounds. | Grind to a very fine, powdery consistency, similar to espresso or finer. |
| Using too much water for the extract | Diluted coffee liquid, longer and less efficient drying. | Use a very high coffee-to-water ratio (e.g., 1:5 or 1:6) for the initial brew. |
| Heating the extract too quickly | Scorched coffee solids, burnt, bitter taste. | Use very low heat and stir constantly during the evaporation and drying phases. Patience is key. |
| Not filtering out fine sediment | Sediment can burn during drying, creating bitter notes. | Filter the concentrated brew through a very fine mesh sieve or paper filter to remove all solids before evaporation. |
| Stopping the drying process too early | Clumping, potential for mold, significantly reduced shelf life. | Ensure the coffee solids are completely brittle and shatter easily. They should not be sticky or pliable in any way. |
| Packaging while still warm | Condensation forms, leading to clumping and spoilage. | Allow the dried instant coffee solids to cool completely to room temperature before storing them. |
| Storing in a non-airtight container | Moisture absorption, loss of aroma, clumping, spoilage. | Use a glass jar with a tight-fitting lid or a vacuum-sealed bag. Store in a cool, dark place. |
| Using tap water with strong flavors | Off-flavors transferred to the final instant coffee. | Use filtered water for brewing the initial concentrated coffee. |
| Roasting beans too dark for this process | Concentrated bitterness and harshness in the final product. | Opt for a medium to medium-dark roast; very dark roasts can become overly bitter when concentrated. |
Decision Rules
- If your ground coffee looks like coarse sand, then you need to grind it finer because a fine grind is essential for proper extraction.
- If your initial brewed liquid is thin and watery, then you used too much water and will need to evaporate for much longer.
- If you notice a burnt smell while gently heating the coffee extract, then the heat is too high, and you risk ruining the batch.
- If the dried coffee solids are still slightly soft or sticky, then they are not dry enough and need further drying to prevent clumping.
- If your final instant coffee tastes bitter, then it’s likely due to scorched solids from high heat or over-extraction of bitter compounds.
- If you want to maximize flavor, then use beans roasted within the last 1-2 weeks.
- If you are brewing a regular cup of coffee and then trying to evaporate it, then you are doing it wrong; you must start with a highly concentrated brew.
- If your homemade instant coffee clumps together in storage, then it wasn’t dried thoroughly enough or is absorbing moisture from the air.
- If you are using a very cheap grinder, then you may struggle to achieve the necessary fine grind consistency.
- If you want to preserve the coffee for longer storage, then ensure it is completely dry and stored in an absolutely airtight container.
FAQ
Can I use pre-ground coffee to make instant coffee?
No, this method requires freshly roasted beans ground to an extremely fine powder just before brewing. Pre-ground coffee loses its volatile aromatics quickly and won’t yield good results.
What is the best way to roast beans for this process?
A medium to medium-dark roast is generally recommended. This roast level balances the development of soluble sugars and oils without becoming overly bitter, which would be concentrated in the final product.
How long does it take to make instant coffee from roasted beans?
The entire process can take several hours, depending on your method of evaporation and drying. The initial brew is quick, but the water removal is a slow, gradual process.
What kind of pan should I use for evaporating the water?
A shallow, wide pan made of stainless steel or a good quality non-stick surface is ideal. This provides a large surface area for efficient evaporation and allows for easy stirring.
How should I store my homemade instant coffee?
Store it in a completely airtight container, such as a glass jar with a tight-fitting lid or a vacuum-sealed bag. Keep it in a cool, dark, and dry place.
How do I make a cup of coffee from my homemade instant coffee?
Simply add hot water to a small amount of your homemade instant coffee crystals or powder. Stir until dissolved. Adjust the amount of instant coffee to your taste preference.
Why is my homemade instant coffee not dissolving well?
This could be due to incomplete drying, causing it to clump, or if it’s been exposed to moisture. Ensure it’s fully brittle and stored in an airtight container.
Can I use this method for decaf beans?
Yes, you can use decaffeinated green beans. The roasting and extraction process will be similar, but the final product will be decaffeinated instant coffee.
What This Page Does Not Cover (And Where to Go Next)
- Commercial instant coffee production: This guide focuses on a home-scale, experimental process. Industrial methods involve freeze-drying or spray-drying, which require specialized equipment.
- Specific roasting profiles: While general advice is given, achieving the perfect roast is a separate skill. Explore resources on home coffee roasting for detailed techniques.
- Advanced extraction science: This guide uses basic principles. For deeper understanding, research solubility, extraction yield, and TDS (Total Dissolved Solids).
- Long-term preservation techniques beyond airtight storage: While airtight storage is key, methods like vacuum sealing or adding desiccants can further extend shelf life.