Making Espresso Using The Ninja Coffee Bar
Quick answer
- Use the “Specialty Brew” or “Over Ice” setting for concentrated coffee.
- Grind your beans fine, like table salt.
- Use a good quality, fresh coffee.
- Experiment with coffee-to-water ratios for strength.
- Pre-heat your mug.
- Don’t expect true Italian espresso, but get close.
Who this is for
- Ninja Coffee Bar owners who want a stronger coffee shot.
- Home baristas looking for a versatile brewer that can do more than just drip.
- Anyone wanting to make espresso-style drinks without a dedicated espresso machine.
If you’re a Ninja Coffee Bar owner looking to elevate your coffee game, this guide will help you achieve a stronger, espresso-style shot. For those new to the Ninja Coffee Bar, consider this a great starting point for exploring its capabilities.
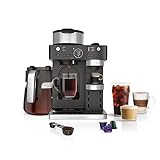
- BARISTA PLUS TECHNOLOGY: The 19-bar pressure system delivers ultra-flavorful espresso with a silky-smooth crema by brewing at the optimal temperature and pressure.
- COFFEEHOUSE DRINKS AT HOME: The built-in, fold-away frother allows you to create espresso-based cappuccinos, lattes, flat whites, and more.
- BREW SINGLE-SERVE ESPRESSO: Choose your favorite espresso capsule and brew up to 3 styles: Espresso (1.35 oz), Lungo (3.75 oz), and Over Ice (1 oz).
- BREW THROUGH COFFEE GROUNDS: Make a Classic, Rich, or Over Ice brew. Select 9 different sizes ranging from cup, to travel mug, to a full 12-cup carafe.
- VERSATILITY TO ENTERTAIN: Treat your guests to an espresso-based coffeehouse drink or brew a 12-cup carafe for the crowd.
What to check first
Brewer type and filter type
Your Ninja Coffee Bar likely has a carafe and a brew basket. For espresso-style shots, you’ll probably want to use the brew basket and a paper filter, or the permanent filter if it came with one. Some models might have specific settings or accessories for concentrated brews. Check your manual if you’re unsure about specific attachments.
Water quality and temperature
Good coffee starts with good water. If your tap water tastes funky, your coffee will too. Filtered water is usually best. The Ninja Coffee Bar heats the water for you, so you don’t need to worry about temperature as much, but ensure it’s functioning correctly. A hotter brew generally extracts more flavor.
Grind size and coffee freshness
This is crucial for that concentrated shot. You want a fine grind, similar to table salt. Too coarse, and the water will rush through, giving you weak coffee. Too fine, and it might clog or over-extract, leading to bitterness. Freshly ground beans make a world of difference. Aim to grind right before you brew.
Coffee-to-water ratio
For espresso-style, you’ll use less water and more coffee than a standard drip brew. A good starting point is often around 1:2 or 1:3 (coffee to water, by weight). For example, if you use 15 grams of coffee, aim for 30-45 ml of water. You’ll need a scale for accuracy, but you can eyeball it initially.
Cleanliness/descale status
A dirty machine makes bad coffee, plain and simple. If your Ninja Coffee Bar hasn’t been descaled recently, or if the brew basket and carafe are grimy, that gunk will affect the taste. Make sure everything is clean and free of old coffee residue. Regular descaling is key for optimal performance and flavor.
Step-by-step (brew workflow)
1. Gather your gear: Get your Ninja Coffee Bar, fresh coffee beans, grinder, scale (optional but recommended), and your mug.
- What “good” looks like: Everything is clean and ready to go.
- Common mistake: Grabbing stale beans or a dirty grinder. Avoid this by doing a quick clean-up before you start.
2. Select the right setting: Choose a concentrated brew setting on your Ninja Coffee Bar. This might be labeled “Specialty Brew,” “Over Ice,” or have a “Concentrated” option.
- What “good” looks like: The machine is set to produce a stronger, smaller batch of coffee.
- Common mistake: Using the regular “Drip” or “Full Carafe” setting. This won’t give you the concentration you need.
3. Measure and grind your coffee: Weigh out your coffee beans (e.g., 15-20 grams for a single shot). Grind them to a fine consistency, like table salt.
- What “good” looks like: Uniformly ground coffee, not powdery but not chunky.
- Common mistake: Grinding too coarse or too fine. Too coarse leads to weak coffee; too fine can cause bitterness or clogging.
4. Add coffee to the filter: Place a paper filter in the brew basket, or use the permanent filter. Add your freshly ground coffee.
- What “good” looks like: The grounds are evenly distributed in the filter.
- Common mistake: Tamping down the grounds too much. This can restrict water flow. Just level them out.
5. Add water to the reservoir: Measure your desired amount of water. For a single shot, this might be only a few ounces (e.g., 2-3 oz). Use filtered water.
- What “good” looks like: The correct amount of clean water is in the reservoir.
- Common mistake: Overfilling or underfilling the reservoir. Too much water dilutes the shot; too little might not trigger the brew cycle properly.
6. Pre-heat your mug: While the machine is getting ready, fill your mug with hot water and let it sit for a minute. This keeps your espresso-style shot hotter for longer.
- What “good” looks like: A warm mug ready for your brew.
- Common mistake: Pouring hot coffee into a cold mug. It cools down way too fast.
7. Start the brew cycle: Place your pre-heated mug under the brew basket and start the selected concentrated brew setting.
- What “good” looks like: The machine begins to drip a dark, concentrated liquid.
- Common mistake: Forgetting to place the mug. You’ll make a mess.
8. Observe the flow: Watch the coffee as it brews. It should drip slowly and steadily, producing a rich crema on top.
- What “good” looks like: A consistent, dark stream with a nice foamy layer.
- Common mistake: The coffee brewing too fast or too slow. Too fast means under-extraction; too slow means over-extraction or a potential clog.
9. Discard used grounds: Once the brew is complete, carefully remove the brew basket and discard the used coffee grounds.
- What “good” looks like: The grounds are clumped together and easy to remove.
- Common mistake: Not cleaning the brew basket immediately. Old grounds can go rancid.
10. Enjoy your shot: Discard the hot water from your pre-heated mug and pour in your fresh espresso-style shot.
- What “good” looks like: A small, potent shot of coffee ready to drink or use in a recipe.
- Common mistake: Letting it sit too long before drinking. Espresso-style coffee is best fresh.
Common mistakes (and what happens if you ignore them)
| Mistake | What it causes | Fix |
|---|---|---|
| Using stale coffee beans | Flat, dull flavor, lack of aroma | Buy fresh beans and grind them just before brewing. |
| Grinding too coarse | Weak, watery coffee (under-extracted) | Adjust your grinder to a finer setting. |
| Grinding too fine | Bitter, burnt taste, or slow/stopped brew (over-extracted) | Adjust your grinder to a coarser setting. |
| Using tap water with off-flavors | Unpleasant taste in the final brew | Use filtered or bottled water. |
| Not cleaning the machine regularly | Bitter, burnt, or off-flavors; slow brewing | Descale and clean your Ninja Coffee Bar according to the manual. |
| Using the wrong brew setting | Weak coffee that isn’t concentrated | Select “Specialty Brew” or “Over Ice” or similar concentrated mode. |
| Not pre-heating your mug | Coffee cools down too quickly | Fill your mug with hot water while brewing. |
| Incorrect coffee-to-water ratio | Too weak or too strong/bitter | Experiment with ratios, starting around 1:2 to 1:3 (coffee:water). |
| Overfilling the brew basket | Water bypasses grounds, leading to weak coffee | Don’t pack the grounds; level them gently. |
| Not using enough coffee grounds | Watery, weak espresso-style shot | Increase the amount of coffee grounds used. |
Decision rules (simple if/then)
- If your coffee tastes weak and sour, then you likely need a finer grind because the water is passing through too quickly.
- If your coffee tastes bitter and burnt, then you likely need a coarser grind because the water is extracting too much.
- If the brew is taking a very long time or not dripping at all, then your grind is likely too fine or the brew basket is overfilled.
- If you want a stronger shot, then increase the amount of coffee grounds you use, keeping the water volume consistent.
- If you want a less intense shot, then decrease the amount of coffee grounds or slightly increase the water volume.
- If your brewed coffee tastes like plastic or chemicals, then your machine needs cleaning or descaling.
- If you’re making a latte or cappuccino, then pre-heating your milk is a good idea for better texture.
- If you’re using pre-ground coffee, then try to use it within a week of opening the bag for best results.
- If your coffee has no crema, then your grind might be too coarse, the coffee is stale, or the brew temperature isn’t optimal.
- If you’re experiencing channeling (water finding fast paths through the grounds), then try distributing the grounds more evenly.
FAQ
Can the Ninja Coffee Bar really make true espresso?
No, not technically. True espresso requires very high pressure (around 9 bars). The Ninja Coffee Bar uses pressure from the water flow, which is much lower. You’ll get a concentrated, espresso-style coffee, perfect for many drinks, but it won’t have the same thick crema or intensity as machine-made espresso.
What’s the best way to get crema with my Ninja Coffee Bar?
Crema is that foamy layer on top. To maximize it, use very fresh, finely ground coffee and ensure your brew setting is indeed a concentrated one. A slightly finer grind than you might expect can help, but be careful not to go too fine.
How much coffee should I use for an espresso-style shot?
For a single shot (around 2-3 oz of liquid), start with about 15-20 grams of coffee beans. You’ll want to use a scale for accuracy, but you can also eyeball it. Adjust based on your taste preference.
Is it okay to use the permanent filter for espresso-style shots?
Yes, you can often use the permanent filter. However, paper filters can sometimes yield a cleaner cup and might help with finer grinds. Experiment to see which you prefer.
My coffee tastes sour. What did I do wrong?
A sour taste usually means under-extraction. This often happens with a grind that’s too coarse, water that’s not hot enough, or not enough coffee grounds for the amount of water used. Try a finer grind first.
My coffee tastes bitter. What’s the fix?
Bitterness typically points to over-extraction. This can be caused by a grind that’s too fine, water that’s too hot, or brewing for too long. Try a slightly coarser grind.
How do I make a latte or cappuccino with this?
Brew your concentrated coffee shot using the Ninja Coffee Bar. Then, heat and froth your milk separately using a frother or even a French press. Combine the two for your drink.
Do I need a special grinder?
A burr grinder is highly recommended for consistent, fine grinds needed for espresso-style coffee. Blade grinders can produce uneven particle sizes, leading to inconsistent extraction.
What this page does NOT cover (and where to go next)
- Detailed comparisons of different Ninja Coffee Bar models and their specific espresso capabilities. (Check your model’s manual or Ninja’s website.)
- Advanced milk steaming and latte art techniques. (Look for guides on milk frothing and latte art.)
- Recipes for specific espresso-based drinks beyond a basic latte or cappuccino. (Search for “espresso drink recipes.”)
- Troubleshooting specific error codes or mechanical issues with your Ninja Coffee Bar. (Consult your appliance manual or contact customer support.)