Keeping Coffee Hot in Your Coffee Maker
Quick answer
- Pre-warm your carafe and mug. It’s the simplest trick.
- Use a thermal carafe if your brewer has the option. Keeps coffee hot for hours.
- Brew directly into a thermal travel mug. Saves a step and keeps it toasty.
- Don’t let brewed coffee sit on a hot plate too long. It gets bitter.
- Consider a small, single-serve brewer for immediate consumption. No sitting around.
- Invest in a good insulated mug. Your best bet for on-the-go heat.
Invest in a good insulated mug. Your best bet for on-the-go heat.
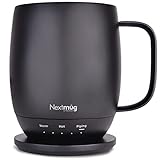
- ALWAYS THE PERFECT TEMPERATURE – The Nextmug will keep your hot coffee, tea or preferred beverage at the perfect temperature wherever you are. Simply select Warm (130° F), Hot (140° F), or Piping (150° F) and enjoy for hours.
- SMART MUG TECHNOLOGY – Long-lasting battery maintains your ideal temperature. LED lights display battery life & real-time temperature. Includes Spill-Resistant Lid & Charging Coaster.
- SUPER SIMPLE – On-board Control Button easily turns mug On/Off & sets the temperature. Takes only seconds to set the mug to your perfect temperature. No app required - no passwords, re-booting or security concerns.
- THE PERFECT GIFT - Give the gift for him and the gift for her that is certain to delight. Perfect for everyone on your list…moms, dads, grandmas, grandpas, teachers, birthdays, graduations and more!
- NEXTMUG CARES - Nextmug cares about our communities and our customers. We care by donating Nextmugs to teachers and first responders . We’re also committed to sustainable packaging by using 100% recyclable materials with all our products. Our dedicated customer service agents are based in the USA and always ready to help.
Who this is for
- Anyone who likes their coffee hot, not lukewarm.
- Folks who brew a pot but don’t drink it all at once.
- Busy mornings where coffee needs to stay ready.
What to check first
Brewer type and filter type
Know what you’re working with. Drip, pour-over, French press? Each has its own way of holding heat. Paper filters can cool things down a bit as the coffee drips through. Metal filters? Less so.
Water quality and temperature
Start with good water. Filtered water tastes better and prevents mineral buildup. For brewing, aim for that sweet spot, usually between 195-205°F. Too cool, and you won’t extract properly. Too hot, and you might scorch the grounds.
Grind size and coffee freshness
Freshly ground beans make a huge difference. Grind right before you brew. The grind size matters too – too fine for a drip brewer can lead to over-extraction and bitterness. Too coarse, and it’ll be weak.
Coffee-to-water ratio
This is your flavor foundation. A common starting point is about 1:15 to 1:18 (coffee to water by weight). So, for 30 grams of coffee, you’d use around 450-540 grams of water. Play around to find what you like.
Cleanliness/descale status
A clean brewer is a happy brewer. Mineral buildup from hard water can affect temperature and flow. Descale regularly, usually every 1-3 months depending on your water and usage. Check your brewer’s manual for specific instructions.
Step-by-step (brew workflow)
1. Gather your gear.
- What to do: Get your brewer, filter, fresh coffee beans, grinder, and scale ready.
- What “good” looks like: Everything clean and within easy reach. No frantic searching for a filter.
- Common mistake: Forgetting a key item and having to stop mid-brew. Avoid this by setting up everything before you start.
2. Pre-warm your carafe/mug.
- What to do: Fill your carafe or mug with hot water from the tap or kettle. Let it sit for a minute.
- What “good” looks like: The glass/metal feels warm to the touch. This prevents the hot coffee from losing heat instantly.
- Common mistake: Skipping this step. Your coffee cools down way faster without a pre-warmed vessel.
3. Heat your brewing water.
- What to do: Heat fresh, filtered water to your target temperature (195-205°F).
- What “good” looks like: Water is at the right temp and ready to go. A gooseneck kettle gives you more control for pour-over.
- Common mistake: Using water that’s too hot or too cool. This messes with extraction and flavor.
4. Weigh and grind your coffee.
- What to do: Weigh your whole beans using your desired ratio. Grind them to the appropriate size for your brewer.
- What “good” looks like: Freshly ground coffee with the right consistency. For drip, it’s medium, like sand. For French press, coarser.
- Common mistake: Using pre-ground coffee or grinding too far in advance. It loses aroma and flavor fast.
5. Prepare the brewer.
- What to do: Place your filter in the brewer. If it’s a paper filter, rinse it with hot water. Discard the rinse water.
- What “good” looks like: The filter is seated properly and rinsed clean of any papery taste.
- Common mistake: Not rinsing paper filters. This can leave a papery taste in your final cup.
6. Add ground coffee.
- What to do: Add your freshly ground coffee to the filter. Gently shake to level the bed.
- What “good” looks like: An even bed of coffee grounds. This ensures water flows through uniformly.
- Common mistake: Tamping down the grounds too hard or leaving them uneven. This leads to channeling and uneven extraction.
7. Bloom the coffee (if applicable).
- What to do: For pour-over or manual drip, pour just enough hot water to saturate the grounds. Wait 30-45 seconds.
- What “good” looks like: The grounds puff up and release CO2, looking like a bubbly lava flow. This is degassing.
- Common mistake: Skipping the bloom. This can lead to a sour taste as trapped gases interfere with extraction.
8. Complete the brew.
- What to do: Slowly and steadily pour the remaining hot water over the grounds, following your brewer’s specific technique.
- What “good” looks like: A steady stream of coffee filling the carafe. The brew time should be within the recommended range for your method (e.g., 2-4 minutes for pour-over).
- Common mistake: Pouring too fast or unevenly. This can cause grounds to escape the filter or lead to over/under-extraction.
9. Remove brewer and discard grounds.
- What to do: Once brewing is complete, remove the brewer and filter. Dispose of the used grounds.
- What “good” looks like: No drips or mess left behind. A clean workspace.
- Common mistake: Leaving the brewer on the hot plate. This can cause the coffee to continue to cook and become bitter.
10. Serve immediately (or transfer to thermal).
- What to do: Pour into your pre-warmed mug. If you’re not drinking it all right away, transfer it to a pre-warmed thermal carafe.
- What “good” looks like: Hot, delicious coffee in your hand or safely stored in a thermal vessel.
- Common mistake: Letting brewed coffee sit on a standard hot plate for extended periods. It degrades the flavor quickly.
Common mistakes (and what happens if you ignore them)
| Mistake | What it causes | Fix |
|---|---|---|
| Using stale, pre-ground coffee | Weak, flat, or bitter coffee. Lacks aroma and nuanced flavors. | Grind beans fresh just before brewing. Store whole beans in an airtight container. |
| Incorrect grind size for the brewing method | Over-extraction (bitter, astringent) or under-extraction (sour, weak). | Match grind size to brewer: coarse for French press, medium for drip, fine for espresso. Experiment if unsure. |
| Water not hot enough (below 195°F) | Under-extraction, sourness, and weak body. Coffee won’t taste its best. | Use a thermometer or a kettle with temperature control. Aim for 195-205°F. |
| Water too hot (above 205°F) | Over-extraction, burnt or bitter taste. Scorch the grounds. | Let boiling water sit for 30-60 seconds before brewing, or use a temperature-controlled kettle. |
| Not rinsing paper filters | Papery taste that masks coffee flavors. | Rinse paper filters with hot water before adding coffee grounds. Discard the rinse water. |
| Coffee sitting on a hot plate for too long | “Cooked” or burnt flavor, bitterness, and loss of delicate aromas. | Brew directly into a thermal carafe or transfer immediately. Avoid leaving coffee on a hot plate for more than 20-30 minutes. |
| Dirty brewer or carafe | Off-flavors, stale coffee taste, potential for mold. | Clean your brewer and carafe after every use. Descale regularly (every 1-3 months). |
| Inconsistent coffee-to-water ratio | Inconsistent strength and flavor, either too weak or too strong. | Use a scale to weigh your coffee and water for precise, repeatable results. Start with a 1:15 to 1:18 ratio. |
| Pouring water too fast or unevenly | Uneven extraction, channeling, and potential for grounds to bypass the filter. | Pour slowly and deliberately, using a circular motion. For pour-over, aim for a consistent flow rate. |
| Not pre-warming the carafe/mug | Coffee cools down much faster as it hits a cold surface. | Fill your serving vessel with hot water while the coffee brews. Discard the water just before serving. |
Decision rules (simple if/then)
- If your coffee tastes bitter, then you likely over-extracted. Try a coarser grind or a slightly lower water temperature.
- If your coffee tastes sour, then you likely under-extracted. Try a finer grind or ensure your water is hot enough (195-205°F).
- If your brewed coffee cools too quickly, then you’re not pre-warming your carafe or mug sufficiently. Use hot water to pre-heat them.
- If you want coffee to stay hot for hours, then use a thermal carafe or a high-quality insulated travel mug.
- If you only brew one cup at a time, then consider a single-serve brewer or a manual method like AeroPress or pour-over.
- If your coffee tastes “off” or stale, then check the freshness of your beans and ensure your brewing equipment is clean.
- If you’re using a drip machine with a glass carafe, then avoid letting it sit on the hot plate for more than 30 minutes to prevent bitterness.
- If your coffee strength is inconsistent, then start weighing your coffee and water for repeatable results.
- If you find sediment in your cup, then your grind might be too fine for your filter, or your filter isn’t seated properly.
- If you want to improve your coffee’s aroma, then always grind your beans right before brewing.
- If your brewer is making strange noises or brewing slowly, then it’s probably time to descale it.
- If you’re brewing for a crowd, then a larger capacity brewer with a thermal carafe is your best bet for keeping it hot.
FAQ
How can I keep coffee hot in a standard drip coffee maker?
Your best bet is to pre-warm your carafe with hot water before brewing. Then, transfer the brewed coffee to a thermal carafe or insulated mug as soon as possible. Avoid leaving it on the hot plate for too long.
What’s the deal with thermal carafes?
Thermal carafes have a double-walled, vacuum-sealed design. This insulation keeps your coffee hot for hours without needing a heating element, preserving the flavor better than a hot plate.
Is it okay to reheat coffee?
Reheating coffee generally degrades its flavor. It can become bitter and lose its fresh aroma. It’s much better to brew only what you’ll drink soon or use methods to keep it hot from the start.
How long does coffee stay hot in a thermal mug?
A good quality thermal mug can keep coffee hot for 4-6 hours, sometimes even longer. It depends on the mug’s insulation and how full it is.
Should I turn off my coffee maker’s hot plate?
If you’re not drinking the coffee immediately, it’s best to turn off the hot plate after brewing or after about 20-30 minutes. Leaving it on for extended periods cooks the coffee and makes it bitter.
What about those coffee makers with built-in grinders?
These can be convenient, but the grinder might not be as precise as a dedicated burr grinder. Still, they offer the advantage of grinding fresh beans right before brewing, which is a big plus for flavor.
Does the type of coffee bean affect how long it stays hot?
No, the bean type itself doesn’t directly affect how long the brewed coffee stays hot. That’s more about the brewing equipment and serving vessel.
Can I brew coffee directly into a travel mug?
Yes, if your brewer allows it and the mug fits. This saves a step and keeps your coffee hot from the moment it’s brewed. Just make sure the mug is safe for hot liquids.
What this page does NOT cover (and where to go next)
- Specific recommendations for individual coffee maker brands or models. (Search for reviews of specific brewers.)
- Detailed analysis of different coffee bean varietals and their flavor profiles. (Explore coffee origin guides.)
- Advanced brewing techniques like siphon or cold brew. (Look for guides on specialty brewing methods.)
- The science behind coffee extraction and solubility. (Dive into coffee chemistry resources.)
- Troubleshooting specific error codes or mechanical failures of your coffee maker. (Consult your brewer’s manual or manufacturer support.)