Homemade Shelf-Stable Coffee Syrups
Quick Answer
- Sanitize everything. Seriously, sterilize your jars and lids.
- Use proper canning techniques. This isn’t just about pouring hot liquid into a jar.
- Acid is your friend. Lemon juice or citric acid helps with preservation.
- Sugar is key. It’s a natural preservative, so don’t skimp.
- Seal it right. A good seal means it’s safe to store.
- Store in a cool, dark place. Sunlight and heat are syrup enemies.
Who This Is For
- The home barista who wants to level up their coffee game.
- Anyone tired of store-bought syrups with weird ingredients.
- Folks who love a good DIY project and want to save some cash.
What to Check First
Brewer Type and Filter Type
This isn’t directly applicable to making syrups, but it’s good practice for brewing. If you’re using a drip machine, make sure your paper filters are clean and the basket is snug. For pour-over, use the right cone filter for your dripper. A clogged filter means a weak brew, which means weak coffee for your syrup base.
Water Quality and Temperature
For syrup, you’re essentially making a sugar solution. Use filtered water if your tap water has a strong taste. You want that pure flavor to come through. The temperature here is critical for dissolving sugar and activating pectin if you’re using fruit. Aim for boiling for most sugar syrups.
Grind Size and Coffee Freshness
Again, this is more for the brewing side. If you’re making a coffee-flavored syrup, use freshly roasted beans. A medium grind is usually best for most brewing methods, giving you a balanced extraction. Stale beans won’t give you that rich coffee flavor you’re after.
Coffee-to-Water Ratio
For syrup, the ratio is all about sugar to liquid. A common starting point is 1:1 (sugar to water by volume), but for shelf-stable, you often need more sugar. Think 2:1 or even 3:1 sugar to water. This high sugar concentration is what makes it shelf-stable.
Cleanliness/Descale Status
This is HUGE for shelf-stable syrups. Everything that touches your syrup needs to be spotless. Jars, lids, spoons, pots – you name it. If you’re using a coffee machine for an espresso syrup base, make sure it’s descaled. Buildup can affect flavor and, more importantly, sanitation.
Step-by-Step: How to Make Shelf-Stable Coffee Syrups
This is a general process. Specific recipes will vary, especially with added flavors like fruit.
1. Gather Your Ingredients and Equipment.
- What to do: Get your sugar, water, flavorings (like coffee extract or brewed coffee), acid (lemon juice/citric acid), and jars/lids ready. You’ll also need a pot, funnel, and ladle.
- What “good” looks like: Everything is measured out and within easy reach.
- Common mistake: Forgetting an ingredient or not having enough jars. Double-check your recipe!
Make sure you have plenty of clean canning jars ready to go. These are essential for safely storing your homemade syrups.
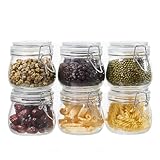
- 【Premium Glass Jars with Airtight Lids】These airtight glass jars feature a wire clip fastening system with clear preserving seals, locking in freshness and flavor. Ideal for dry goods and long-term food storage.
- 【Perfect Size: 17 oz Capacity – Set of 6】Each jar holds 17oz, just right for storing beans, flour, sugar, cereal, pasta, or snacks. Comes as a 6 pack to organize your kitchen efficiently.
- 【Durable & Safe Food Storage Containers】Made from thick, lead-free, glass food storage containers that are BPA-free, odor-resistant, and safe for everyday use.
- 【Multi-Purpose Glass Canisters for Kitchen & Pantry】Great for kitchen canning and pickling jars – also suitable for DIY jam, honey, kimchi, spices, and more. A functional and elegant solution for pantry storage jars.
- 【Stylish & Practical Storage Jars】Sleek square design saves space and looks beautiful on shelves. These glass storage jars are easy to stack and clean, combining utility with minimalist decor.
2. Sanitize Your Jars and Lids.
- What to do: Wash jars and lids in hot, soapy water. Then, either run them through a dishwasher on a hot cycle, boil them in water for 10 minutes, or bake them in a 225°F oven for at least 15 minutes.
- What “good” looks like: Jars are sparkling clean and hot.
- Common mistake: Not sanitizing properly. This is the #1 reason for spoilage. Don’t skip this.
Don’t forget to sanitize your canning lids along with the jars; a proper seal is critical for shelf-stability.
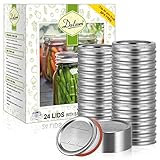
- 🥒 48Pcs/24Sets Regular Mouth Canning Lids with Ring fit ball and kerr brand preserving jars. (24Lids + 24Rings for Regular Mouth Jar)
- 🍓 Food grade metal mason jar lids with BPA-free silicone seals. Rings are reusable, lids are for one-time use only.
- 🍒 100% Fit & Airtight for regular mouth mason jars for canning food, jams, fruits, etc.
- 🍅 Write the date, time. Enjoy freshly made foods tonight or tomorrow.
- 🥭 100% SATISFACTION - If you receive a damaged product or have any other dissatisfaction, contact us and we will do our best to offer a satisfactory solution for you within 24 hours.
3. Prepare Your Flavor Base.
- What to do: If using brewed coffee, make a strong concentrate. For coffee extract, have it ready. For other flavors, prepare them according to your recipe (e.g., muddle fruit, steep spices).
- What “good” looks like: You have a concentrated flavor ready to go.
- Common mistake: Using a weak coffee brew. You need a robust flavor that won’t get lost in the sugar.
4. Combine Sugar and Water.
- What to do: In your pot, combine your sugar and water.
- What “good” looks like: All sugar and water are in the pot.
- Common mistake: Measuring incorrectly. Too little sugar means it won’t be shelf-stable.
You’ll need a good amount of sugar for this process, as it’s a key ingredient for both sweetness and preservation. Using granulated sugar is generally recommended for reliable results.

- MEET ORGANIC DOLCA SLIM. Organic cane sugar infused with prebiotic fiber for the same taste and texture you love—now with 25% fiber and fewer calories per serving for a smarter everyday choice. EASY 1:1 SWAP: Use it 1:1 anywhere you use sugar—coffee, tea, smoothies, oatmeal, baking, and cooking—no recipe changes needed. REAL SUGAR PERFORMANCE: It dissolves, bakes, and browns like real sugar, so your favorite recipes keep the results you expect. CLEAN SWEETNESS: No artificial sweeteners or sugar alcohols—just a better way to sweeten your day.
- 1:1 SUGAR REPLACEMENT: Swap 1:1 in coffee, tea, baking, and cooking—no recipe changes needed.
- BAKES & BROWNS LIKE REAL SUGAR: Performs like traditional sugar in cookies, cakes, and everyday recipes—dissolves, bakes, and browns as expected.
- 25% FIBER & FEWER CALORIES PER SERVING: A smarter everyday sweetener with added fiber per serving and fewer calories than standard sugar.
- NO ARTIFICIAL SWEETENERS OR SUGAR ALCOHOLS: Clean sweetness without artificial sweeteners or sugar alcohols.
5. Heat and Dissolve Sugar.
- What to do: Heat the mixture over medium heat, stirring constantly, until the sugar is completely dissolved. Do NOT boil vigorously yet if adding delicate flavors.
- What “good” looks like: The liquid is clear, with no sugar crystals at the bottom.
- Common mistake: Not dissolving sugar fully. Undissolved sugar can crystallize later.
6. Add Flavorings and Acid.
- What to do: Stir in your coffee base, acid (like lemon juice or citric acid), and any other flavorings.
- What “good” looks like: All ingredients are well incorporated.
- Common mistake: Adding acid too early if it needs to simmer. Check your recipe.
7. Bring to a Boil and Simmer.
- What to do: Bring the mixture to a rolling boil, then reduce heat to maintain a simmer. Simmer for the time specified in your recipe (often 5-15 minutes). This cooks off excess water and thickens the syrup.
- What “good” looks like: The syrup is thickening and has a pleasant aroma.
- Common mistake: Over-boiling. This can lead to a hard candy consistency.
8. Test for Syrup Consistency (Optional but Recommended).
- What to do: Chill a spoon and dip it into the syrup. If it coats the back of the spoon evenly, it’s likely ready. For more advanced testing, look up “cold plate test” for jams.
- What “good” looks like: The syrup has a nice, syrupy texture.
- Common mistake: Not letting it cool enough to test properly. Hot syrup will seem thinner than it is.
9. Fill Sanitized Jars.
- What to do: Carefully ladle the hot syrup into your hot, sanitized jars, leaving about 1/2 inch headspace. Wipe the rims clean with a damp cloth.
- What “good” looks like: Jars are filled evenly, with clean rims.
- Common mistake: Overfilling jars. This prevents a proper seal.
10. Apply Lids and Rings.
- What to do: Place the sanitized lids on the jars and screw on the rings fingertip-tight.
- What “good” looks like: Lids are centered and rings are snug but not cranked down.
- Common mistake: Overtightening rings. This can prevent air from escaping during sealing.
11. Process in a Boiling Water Bath (Crucial for Shelf-Stability).
- What to do: Place the filled jars on a rack in a large pot. Fill the pot with enough water to cover the jars by at least 1 inch. Bring to a rolling boil and process for the time recommended by your specific recipe (typically 10-15 minutes for syrups). Adjust for altitude if needed.
- What “good” looks like: Jars are submerged and boiling evenly.
- Common mistake: Not processing long enough or not covering jars with water. This is essential for killing spoilage organisms.
12. Cool and Check Seals.
- What to do: Carefully remove jars from the water bath and place them on a towel-lined counter to cool undisturbed for 12-24 hours. You should hear “pings” as they seal. Check seals by pressing the center of the lid; it should not flex.
- What “good” looks like: Lids are concave and don’t move when pressed.
- Common mistake: Stacking jars before they are fully cool. This can break seals.
Common Mistakes (and What Happens If You Ignore Them)
| Mistake | What It Causes | Fix |
|---|---|---|
| Inadequate Sanitization | Mold, bacterial growth, spoilage, botulism risk | Sterilize all jars, lids, and utensils thoroughly before use. Boil jars for 10 mins, or bake at 225°F for 15 mins. |
| Insufficient Sugar Content | Syrup will spoil quickly, potentially leading to mold or fermentation | Use a recipe with a high sugar-to-liquid ratio (e.g., 2:1 or 3:1 sugar to water). Sugar is a key preservative. |
| Not Using Enough Acid | Can affect preservation and flavor balance; may not be shelf-stable | Add lemon juice or citric acid as per recipe instructions. Acid helps preserve and can enhance fruit flavors. |
| Improper Headspace | Jars won’t seal properly, or lids may rust | Leave 1/2 inch of headspace in jars before applying lids. Too much or too little can cause sealing issues. |
| Overtightened Rings | Air cannot escape during processing, preventing a proper seal | Screw rings on “fingertip-tight” only. They should be snug enough to hold the lid but not so tight that air is trapped. |
| Not Processing in a Water Bath | Syrup is not adequately preserved and will spoil at room temperature | Always process shelf-stable syrups in a boiling water bath for the time specified in a tested recipe. This is non-negotiable for safety and shelf-life. |
| Opening Jars Before Cool | Can break the vacuum seal, leading to spoilage later | Let jars cool completely undisturbed for 12-24 hours before checking seals or removing rings. |
| Using Stale Ingredients (Coffee/Flavor) | Weak or off-flavors in the final syrup | Use fresh coffee beans and high-quality flavorings. The syrup will only be as good as its components. |
| Incorrect Water Bath Processing Time | Under-processing leads to spoilage; over-processing can degrade quality | Follow tested recipe times precisely. Adjust for altitude if you live above 1,000 feet. |
| Not Wiping Jar Rims Clean | Prevents a good seal | Ensure jar rims are free of any syrup or food debris before placing lids on. A damp cloth works well. |
Decision Rules
- If your goal is to store syrup for more than a week without refrigeration, then you must follow proper canning procedures because this ensures shelf-stability.
- If your syrup tastes weak after brewing, then you likely need a stronger coffee concentrate or more coffee-to-water ratio in your syrup base because the sugar will mute subtle flavors.
- If you are unsure about the acidity of your fruit, then add a measured amount of lemon juice or citric acid because it contributes to preservation and flavor.
- If you are making a syrup with fresh fruit, then consider using a pectin recipe because it will help achieve a thicker, more stable consistency.
- If your jars don’t seal after processing, then refrigerate them immediately and use them within a few weeks because they are no longer shelf-stable.
- If you hear a “thunk” or “ping” sound while jars are cooling, then that’s a good sign the lid is sealing because the vacuum is pulling it down.
- If you see any signs of mold or fermentation in your stored syrup, then discard the entire jar immediately because it is unsafe to consume.
- If you are new to canning, then start with simple sugar syrups before tackling more complex recipes because this builds confidence and understanding of the process.
- If you want to extend the shelf life of a syrup that wasn’t processed for shelf-stability, then store it in the refrigerator because this slows down spoilage significantly.
- If you are using a pre-made coffee extract, then ensure it’s a high-quality product because cheap extracts can lead to artificial or weak flavors.
- If the syrup seems too thick after cooling, then you can thin it slightly with a bit of hot water or more coffee concentrate, but be aware this may affect its shelf-stability.
FAQ
How long will homemade shelf-stable coffee syrup last?
Properly canned syrups can last for at least a year, often longer, when stored in a cool, dark place. Always check for a good seal before opening.
Can I use any kind of sugar?
Granulated white sugar is generally recommended for its purity and reliable preservation properties. Other sugars might work but can affect color, flavor, and preservation.
What’s the deal with headspace?
Headspace is the empty space between the top of the food and the jar lid. It’s crucial for creating a vacuum seal during processing. Too little or too much can cause sealing failures.
Do I really need to process it in a water bath?
Yes, for true shelf-stability. Boiling the sealed jars kills spoilage microorganisms and creates the vacuum seal that prevents them from getting back in. Skipping this means refrigeration is required.
What if my syrup doesn’t seal?
If a jar doesn’t seal within 12-24 hours, refrigerate it immediately. It’s no longer shelf-stable but can still be enjoyed for a few weeks.
Can I make sugar-free coffee syrup?
Shelf-stable sugar-free syrups are trickier. Sugar is a key preservative. You’d need to research specific sugar substitutes and preservation methods carefully, as they won’t last as long at room temperature. Refrigeration is usually required.
What are the best flavorings to add to coffee syrup?
Beyond coffee itself, consider vanilla, caramel, hazelnut, peppermint, or even seasonal spices like cinnamon and nutmeg. Fruit purees can also work but require careful canning.
How do I store the finished syrup?
Store sealed jars in a cool, dark pantry or cupboard. Avoid areas with extreme temperature fluctuations. Once opened, always refrigerate.
What This Page Does Not Cover (and Where to Go Next)
- Advanced flavor infusion techniques beyond simple steeping or extracts.
- Specific recipes for every conceivable coffee syrup flavor.
- Detailed explanations of microbial spoilage and food safety science.
- Using artificial sweeteners for shelf-stable syrups (this requires different preservation methods).
Next steps would involve exploring specific tested recipes for flavors you’re interested in, learning about altitude adjustments for water bath canning, and understanding the principles of food preservation in more depth.