Exploring Japanese Coffee Brewing Methods
Quick Answer: How to Make Japanese Coffee
- Mastering Japanese coffee brewing is about precision and patience.
- Focus on a slow, controlled pour-over technique for optimal extraction.
- Use high-quality, freshly roasted beans and filtered water.
- Dial in your grind size to match your brewer – usually medium-fine for pour-over.
- Pay close attention to coffee-to-water ratios, often leaning towards a slightly stronger brew.
- Cleanliness is king; a spotless brewer makes a world of difference.
Who This Is For
- The home barista looking to elevate their daily cup beyond the ordinary.
- Coffee enthusiasts curious about the meticulous artistry behind Japanese brewing.
- Anyone who appreciates a clean, nuanced, and exceptionally smooth coffee experience.
What to Check First
Before you dive into the pour, let’s get the basics dialed in.
Brewer Type and Filter Type
Japanese coffee often means pour-over, but there are variations. The most common is the cone-style dripper (like a Hario V60 or Kalita Wave). The filter is usually paper, but metal filters exist too.
For a classic Japanese pour-over experience, consider the Kalita Wave dripper, known for its flat bottom and three small holes that promote consistent extraction.
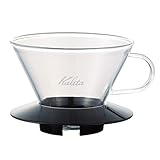
- PULLS THE PERFECT CUP: The pantented wave design reduces contact between the brewing space and the filter itself for a more balanced extraction and a flavorful, full-bodied cup of coffee every time. The design of the dripper and filter together help create a pool of water on top of the coffee bed that can help control agitation, helping maintain a uniform extraction without too much turbulation (which could lead to over extraction).
- PERFECT FOR BEGINNERS AND PROFESSIONALS: You'll find the Kalita Wave pour over coffee dripper in the world's top specialty cafes and professional coffee-making competitions. But it is also the perfect dripper for pour-over beginners. Cone drippers require perfect grinds and pouring technique in order to prevent stalling and over-extraction. The wave's flat bottom, on the other hand, maintains a wide and even coffee bed, allowing water to permeate and leave the dripper evenly through three holes.
- MADE SPECIALLY FOR KALITA FILTERS: The design of the dripper and filter together help create a pool of water on top of the coffee bed that can help control agitation, helping maintain a uniform extraction without too much turbulation (which could lead to over extraction).
- FITS MOST CUPS AND CARAFES: The Kalita Wave's flat-bottomed coffee bed has a dripping area diameter of 2", while the full bottom measures 4" across. These dimensions ensure the Wave coffee dripper fits on almost all cups and carafes without having to worry about coffee dripping over the edges.
- What to check: What brewer are you using? What kind of filter does it take?
- Good looks like: You’ve got the right filter that fits your brewer snugly. For paper filters, a quick rinse with hot water is key.
- Common mistake: Using the wrong filter size or type. This can lead to channeling or grounds in your cup. Always check your brewer’s manual.
Water Quality and Temperature
Water makes up 98% of your coffee. Seriously. Bad water equals bad coffee, no matter how fancy your brewer.
- What to check: Are you using filtered water? What’s your target water temperature?
- Good looks like: Your water tastes clean and neutral. For most pour-overs, aim for water between 195°F and 205°F (90°C to 96°C).
- Common mistake: Using tap water with strong mineral flavors or brewing too hot/cold. Too hot burns the coffee, too cold under-extracts. I learned this the hard way on a camping trip once – turned a good bean into bitter mud.
Grind Size and Coffee Freshness
This is where the magic happens. Grind size controls how fast water flows through the coffee. Freshness is non-negotiable.
- What to check: Is your coffee fresh? What’s your grind size?
- Good looks like: Beans roasted within the last 2-3 weeks. For pour-over, a grind that looks like coarse sand or fine sea salt is a good starting point.
- Common mistake: Using pre-ground coffee or a grind that’s too fine/coarse. Pre-ground stales fast. Too fine chokes the brewer; too coarse makes watery coffee. A burr grinder is your best friend here.
Coffee-to-Water Ratio
This dictates the strength and flavor balance of your brew. Japanese methods often favor a slightly higher coffee-to-water ratio for clarity.
- What to check: What ratio are you using?
- Good looks like: A common starting point is 1:15 to 1:17 (grams of coffee to grams of water). For example, 20g of coffee to 300g of water.
- Common mistake: Guessing the amounts. Using a scale ensures consistency. Too little coffee makes it weak, too much can make it overpowering.
Cleanliness/Descale Status
A dirty brewer is a flavor killer. Coffee oils build up and turn rancid, impacting every cup.
- What to check: When was the last time you thoroughly cleaned your brewer and kettle?
- Good looks like: Your brewer parts are spotless. If you have an electric kettle, check for mineral buildup.
- Common mistake: Neglecting to clean the brewer or not descaling the kettle. This is an easy fix that has a massive impact. Just rinse everything after each use and descale periodically.
Step-by-Step: The Japanese Pour-Over Workflow
Let’s brew some killer coffee. This assumes a cone-style pour-over brewer.
To achieve the precision needed for Japanese pour-over, a dedicated Japanese pour over coffee maker, often featuring a gooseneck kettle for controlled pouring, is highly recommended.

- Pour Over Coffee: Manual Pour Over Coffee Maker allows you to brew an excellent cup of Coffee in minutes
- Stainless steel: Includes a new and improved permanent, stainless steel mesh filter that helps extract your coffee's aromatic oils and subtle flavors instead of being absorbed by a paper filter
- Coffee Carafe: Made of durable, heat-resistant borosilicate glass with Cork Band detailing that is both functional and elegant; single wall
- Quick and Easy: Simply add coarse ground Coffee to filter, pour a small amount of water in a circular motion over ground Coffee until soaked then add the remaining water and let drip
- Servings: Pour Over Coffee Maker makes 8 cups of Coffee, 4 oz each; dishwasher safe
1. Heat your water: Get your filtered water heating to your target temperature (195°F-205°F).
- Good looks like: Water is at the right temp, not boiling furiously. A gooseneck kettle gives you control.
- Common mistake: Boiling water straight off the heat. Let it sit for 30-60 seconds to cool slightly.
2. Prepare the filter: Place your paper filter in the brewer and rinse it thoroughly with hot water. Discard the rinse water.
- Good looks like: The paper taste is gone, and the brewer is pre-heated.
- Common mistake: Skipping the rinse. This can leave a papery taste in your coffee.
3. Grind your beans: Weigh your fresh coffee beans and grind them to a medium-fine consistency.
- Good looks like: The grind looks even, like coarse sand. Grind right before brewing.
- Common mistake: Grinding too early. Coffee loses aromatics fast once ground.
4. Add coffee grounds: Place the brewer over your mug or carafe, add the ground coffee, and gently shake to level the bed.
- Good looks like: An even bed of coffee grounds, ready for the first pour.
- Common mistake: Leaving the grounds uneven. This can lead to uneven extraction.
5. The Bloom (First Pour): Start a timer. Gently pour just enough hot water (about twice the weight of the coffee) to saturate all the grounds. Wait 30-45 seconds.
- Good looks like: The coffee bed expands and bubbles, releasing CO2. This is the “bloom.”
- Common mistake: Pouring too much water or not waiting long enough. The bloom is crucial for degassing.
6. First Main Pour: Begin pouring in slow, concentric circles, starting from the center and moving outwards, avoiding the edges. Pour about half of your total water.
- Good looks like: A steady, controlled pour that keeps the water level consistent.
- Common mistake: Pouring too fast or aggressively. This can create channels and uneven extraction.
7. Second Main Pour: After the water level drops slightly, continue pouring in slow circles, maintaining a consistent flow. Aim to hit your target water weight.
- Good looks like: The water level stays relatively stable, and you’re approaching your total water volume.
- Common mistake: Letting the water level drop too low between pours. This can interrupt extraction.
8. Final Drip: Allow all the water to drip through the grounds. The total brew time should ideally be between 2:30 and 3:30 minutes for a typical 12-16 oz brew.
- Good looks like: A clean drip, no pooling water. The brew time feels right.
- Common mistake: Brew time is too short (under-extracted, sour) or too long (over-extracted, bitter).
9. Remove brewer: Once dripping stops, remove the brewer and discard the grounds.
- Good looks like: A clean, empty brewer.
- Common mistake: Leaving the brewer on too long, allowing bitter compounds to drip through.
10. Serve and Enjoy: Swirl the brewed coffee gently if in a carafe, then pour and savor.
- Good looks like: A clear, aromatic cup of coffee.
- Common mistake: Not swirling the carafe. This helps homogenize the brew.
Common Mistakes (and What Happens If You Ignore Them)
| Mistake | What It Causes | Fix |
|---|---|---|
| Using stale or pre-ground coffee | Flat, dull, lifeless flavor; rapid staling | Buy fresh, whole beans; grind just before brewing. |
| Incorrect grind size (too fine) | Choked brewer, slow drip, bitter/astringent taste | Coarsen your grind. Check your grinder’s settings. |
| Incorrect grind size (too coarse) | Fast drip, watery, weak, sour taste | Fine your grind. Ensure even particle size. |
| Inconsistent water temperature | Under- or over-extraction; burnt or sour notes | Use a thermometer; let boiling water rest for 30-60 seconds. |
| Uneven pouring technique | Channeling, uneven extraction, weak spots | Practice slow, concentric circles; use a gooseneck kettle. |
| Skipping the filter rinse | Papery or cardboard taste in coffee | Rinse paper filters thoroughly with hot water before adding grounds. |
| Incorrect coffee-to-water ratio (too little coffee) | Weak, watery, diluted flavor | Increase coffee dose or decrease water. Use a scale! |
| Incorrect coffee-to-water ratio (too much coffee) | Overly strong, thick, potentially bitter flavor | Decrease coffee dose or increase water. Use a scale! |
| Dirty brewer or kettle | Rancid oils, off-flavors, muted aromatics | Clean brewer after every use; descale kettle regularly. |
| Not blooming the coffee | Gassy brew, uneven extraction, sourness | Allow 30-45 seconds for the bloom after the initial pour. |
Decision Rules for Japanese Coffee Brewing
- If your coffee tastes sour, then your grind is likely too coarse or your water is too cool because under-extraction leads to sourness.
- If your coffee tastes bitter, then your grind is likely too fine or your brew time is too long because over-extraction leads to bitterness.
- If your coffee tastes weak and watery, then you’re probably using too little coffee or too much water because the ratio is off.
- If your coffee tastes muddy or has sediment, then your grind is likely too fine or your filter is damaged because fines are passing through.
- If your bloom is weak and doesn’t bubble much, then your coffee might be stale or your water isn’t hot enough because degassing is crucial.
- If your pour-over is draining way too fast, then your grind is too coarse or your filter might be improperly seated because water is flowing through too easily.
- If your pour-over is draining way too slow, then your grind is too fine or you’re pouring too aggressively because the grounds are too compacted.
- If your coffee tastes “off” or has an unpleasant flavor, then check the cleanliness of your brewer and kettle because old oils can ruin a cup.
- If you want a more intense flavor, then try a slightly lower water-to-coffee ratio (e.g., 1:15 instead of 1:17) because less water means a more concentrated brew.
- If you want a cleaner, brighter cup, then ensure your water is filtered and your beans are fresh because impurities and staleness mask delicate flavors.
FAQ
Q: What’s the best coffee bean for Japanese-style brewing?
A: Light to medium roasts, especially single-origin beans, shine here. Think Ethiopian Yirgacheffe or Kenyan coffees. They highlight delicate floral and fruity notes.
Q: How long should the total brew time be?
A: For most pour-overs, aim for a total brew time of 2:30 to 3:30 minutes for a standard 12-16 oz cup. Adjust based on your brewer and grind.
Q: Do I really need a gooseneck kettle?
A: It’s not strictly mandatory, but highly recommended. A gooseneck kettle gives you precise control over the pour rate and placement, which is key for even extraction.
Q: What’s the deal with rinsing the paper filter?
A: Rinsing removes any papery taste from the filter and pre-heats your brewer. It’s a small step that makes a big difference in flavor purity.
Q: How can I make my coffee taste less bitter?
A: Try a coarser grind, slightly cooler water (around 195°F), or a slightly lower coffee-to-water ratio. Ensure your brew time isn’t too long.
Q: My coffee tastes too sour. What am I doing wrong?
A: Your grind might be too coarse, or your water isn’t hot enough. Try a finer grind or hotter water (up to 205°F). Make sure to let the coffee bloom properly.
Q: Can I use a metal filter with Japanese brewing methods?
A: Yes, you can. Metal filters allow more oils and fines through, resulting in a fuller-bodied cup with a different flavor profile than paper filters.
Q: How often should I clean my pour-over brewer?
A: Ideally, rinse it thoroughly with hot water after every use. A deeper clean with a coffee-specific cleaner should be done weekly or bi-weekly, depending on usage.
What This Page Does Not Cover (And Where to Go Next)
- Specific pour-over brewer comparisons (e.g., V60 vs. Kalita Wave).
- Advanced water chemistry for coffee brewing.
- Detailed explanations of extraction theory (TDS, extraction yield).
- Recipes for cold brew or other Japanese coffee methods like siphon brewing.
- Bean sourcing and specific roast profile recommendations.