Enjoying Coffee Anywhere: Using a Portable Coffee Maker
Quick answer
- Pack it up and go. Your portable coffee maker is ready for adventure.
- Always start with fresh, whole beans. Grind them right before brewing.
- Use filtered water. Tap water can mess with the taste.
- Get the grind size right for your brewer. Too fine clogs, too coarse is weak.
- Measure your coffee and water. Consistency is key.
- Keep it clean. A dirty brewer makes bad coffee, period.
- Heat your water to the right temp. Around 195-205°F is usually good.
- Don’t rush the brew. Let it do its thing.
Who this is for
- The camper who craves a real cup, not just instant.
- The traveler who wants decent coffee on the road.
- Anyone who enjoys a good brew away from their home setup.
What to check first
Brewer type and filter type
Portable coffee makers come in a few flavors. You might have a pour-over style, a French press, or even a small, manual espresso maker. Each uses different filters, or sometimes none at all (like a French press). Know your rig. A paper filter for a pour-over won’t work in a French press. Check the manual if you’re not sure.
For a classic and durable option, consider a travel coffee press; they’re simple to use and require no paper filters.
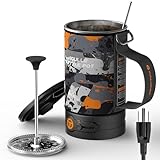
- Innovative 2-in-1 Design: A portable coffee maker and electric kettle in one. Boil, steep, and press in the same vessel—no extra tools required. Perfect electric french press coffee maker for home, travel, camping, or office use.
- Fast Boil & Reliable Brewing: Heats water to a rolling boil in about 5 minutes, then brews bold french press coffee anywhere. Smart heating logic delivers consistent results, even at high altitudes.
- Coffee Anywhere, Anytime: Enjoy fresh French press coffee at camp, on the road, in your RV, or during quick office breaks. Lightweight and portable coffee maker with 120V power compatibility lets you brew without boundaries.
- Durable & Safe Materials: Made with 304 stainless steel and aviation-grade PPS. Durable enough for outdoor adventures, safe enough for daily use—built to go wherever coffee takes you.
- Compact & Easy to Clean: 16 oz capacity, ideal for one or two servings. Slim body, removable lid, and simple one-button control make this portable french press coffee maker easy to use, clean, and pack.
Portable coffee makers come in a few flavors, and if you’re looking for a versatile option, this portable coffee maker is a great choice for brewing on the go.

- 【LIGHTWEIGHT & PORTABLE】: OutIn Portable Espresso Machine weighs only 670 grams. Made of food-grade stainless steel and sustainable materials, OutIn espresso maker Easy to disassemble and wash.
- 【FAST SELF-HEATING & RICH CREMA】: OutIn Nano coffee machine heats 1.7oz of 77°F room temperature water to 198°F within 200 seconds. 20-bar pressure ensures a smooth extraction with rich crema comparable to results from professional desktop coffee machines!
- 【PREMIUM BATTERY CAPACITY 】: Travel espresso maker comes with 3 × 2500mAh lithium batteries, compatible with 10–15 watts USB-C car chargers for universal charging, which supports up to 5 hot shots with 1.7oz 77°F room temperature water or 200+ shots with hot water.
- 【2-in-1 BREWER & ONE-BUTTON CLICK】: Compatible with both Ground Coffee & Capsule, the camping coffee maker has been tested with hundreds of designs to ensure ease of use. With just ONE-BUTTON CLICK, you can enjoy perfect espresso in just 3-4 minutes.
- 【OutIn SERVICE】 The OutIn Nano portable espresso machine is equipped with a leak-proof and insulated design, providing a 12-month support period. If you have any questions, you can consult our Amazon OutIn Store.
Water quality and temperature
This is huge. If your tap water tastes funky, your coffee will too. Use bottled or filtered water whenever possible. For temperature, most brewers need water just off the boil. Think 195°F to 205°F. Too hot burns the grounds, too cool under-extracts. A small, portable kettle is a good companion.
Grind size and coffee freshness
Freshly ground beans are non-negotiable for good coffee. Pre-ground stuff goes stale fast. For portable makers, you’ll likely want a medium to medium-fine grind, depending on the type. Think coarse sand for a French press, a bit finer for a pour-over. Experiment a little.
Coffee-to-water ratio
This is your recipe. A good starting point is a 1:15 to 1:17 ratio. That means for every gram of coffee, use 15 to 17 grams of water. For us folks using ounces, try about 2 tablespoons (around 0.5 oz) of coffee for every 6 oz of water. Adjust to your taste.
Cleanliness/descale status
This is probably the most overlooked part. If your brewer isn’t clean, your coffee will taste bitter or stale. Rinse it out after every use. For a deeper clean, use a descaling solution or vinegar and water mix periodically. Check your brewer’s manual for specific instructions.
Step-by-step (brew workflow)
1. Heat your water. Get your water to the target temperature, around 195-205°F.
- What “good” looks like: Water is steaming but not violently boiling.
- Common mistake: Using boiling water directly, which can scorch the coffee. Avoid this by letting it sit for 30-60 seconds after it boils.
2. Prepare your filter (if applicable). If your brewer uses a paper filter, rinse it with hot water.
- What “good” looks like: The filter is wet and seated properly in the brewer.
- Common mistake: Not rinsing the filter, which can leave a papery taste in your coffee.
3. Grind your coffee beans. Grind just enough beans for your brew, aiming for the correct size.
- What “good” looks like: Evenly ground particles that feel right for your brewer.
- Common mistake: Grinding too fine (clogs, bitter) or too coarse (weak, sour). A burr grinder is best for consistency.
4. Add coffee grounds to the brewer. Place the fresh grounds into your filter or brewing chamber.
- What “good” looks like: Grounds are evenly distributed.
- Common mistake: Tamping down the grounds too much, which restricts water flow. Just gently level them.
5. Bloom the coffee (for pour-overs). Pour just enough hot water to wet all the grounds. Wait 30 seconds.
- What “good” looks like: The grounds puff up and release CO2, looking bubbly.
- Common mistake: Skipping the bloom. This releases trapped gases for a more even extraction and better flavor.
6. Begin pouring water. Slowly and steadily pour the remaining hot water over the grounds.
- What “good” looks like: A consistent, controlled pour that saturates the grounds evenly.
- Common mistake: Pouring too fast or in uneven bursts, leading to channeling and inconsistent extraction.
7. Allow to brew/steep. Let the water pass through the grounds (pour-over) or let the coffee steep (French press).
- What “good” looks like: The brewing process is happening at a reasonable pace. For French press, steeping for about 4 minutes is standard.
- Common mistake: Rushing the process or letting it steep too long, both affecting taste.
8. Press the plunger (French press) or remove the filter. Once brewing is complete, separate the grounds from the liquid.
- What “good” looks like: A clean separation with minimal grounds in the final cup.
- Common mistake: Plunging too hard or too fast on a French press, forcing fine grounds through the filter.
9. Serve immediately. Pour your freshly brewed coffee into your mug.
- What “good” looks like: A hot, aromatic cup of coffee.
- Common mistake: Letting coffee sit on a burner or in the brewer, which makes it taste burnt and bitter.
10. Clean your brewer. Rinse all parts thoroughly with hot water.
- What “good” looks like: All coffee residue is gone.
- Common mistake: Leaving grounds or oils in the brewer, which will make your next cup taste bad.
Common mistakes (and what happens if you ignore them)
| Mistake | What it causes | Fix |
|---|---|---|
| Using stale, pre-ground coffee | Weak, flat, or bitter coffee | Buy whole beans and grind them just before brewing. |
| Water too hot or too cold | Burnt taste (too hot), sour/weak taste (too cold) | Use a thermometer or let boiling water sit for 30-60 seconds before brewing. |
| Incorrect grind size | Under-extraction (sour) or over-extraction (bitter) | Adjust grind based on brewer type; aim for consistency. |
| Inconsistent coffee-to-water ratio | Coffee is too strong or too weak | Use a scale or consistent measuring tools for both coffee and water. |
| Not rinsing paper filters | Papery taste in the coffee | Rinse paper filters with hot water before adding grounds. |
| Pouring water too fast or unevenly | Uneven extraction, “channels” in grounds | Pour slowly and in a circular motion, ensuring all grounds are saturated. |
| Not cleaning the brewer regularly | Stale, bitter, or oily taste | Rinse thoroughly after each use and descale periodically. |
| Letting brewed coffee sit too long | Burnt, bitter, and unpleasant flavor | Serve immediately after brewing; don’t leave it on a heat source. |
| Using poor quality tap water | Off-flavors, muted coffee notes | Use filtered or bottled water for a cleaner taste. |
| Forgetting the bloom phase (pour-over) | Gassy coffee, less even extraction | Let the initial pour of water saturate grounds and bubble for 30 seconds before continuing. |
Decision rules (simple if/then)
- If your coffee tastes sour, then try grinding finer because under-extraction causes sourness.
- If your coffee tastes bitter, then try grinding coarser because over-extraction causes bitterness.
- If your coffee is too weak, then use more coffee or less water because your ratio is off.
- If your coffee is too strong, then use less coffee or more water because your ratio is off.
- If your brewer is dripping slowly, then your grind might be too fine or the filter is clogged because this restricts water flow.
- If water is gushing through your pour-over too fast, then your grind might be too coarse because it’s not offering enough resistance.
- If your French press coffee has a lot of sediment, then your grind is likely too fine or the plunger isn’t seated properly because fine particles are passing through the filter.
- If your portable maker is hard to clean, then disassemble it according to the manual and soak the parts to loosen residue because a clean brewer is essential.
- If you notice a metallic taste, then check your water source or consider if a metal component in your brewer needs cleaning or is reacting with your water because some materials can impart odd flavors.
- If your coffee tastes like burnt plastic, then check that you’re not using boiling water directly on delicate plastic parts or that the plastic itself isn’t degrading.
- If your brew time is significantly longer than recommended, then your grind might be too fine or you’re using too much coffee for the amount of water because it’s creating too much resistance.
FAQ
What’s the best portable coffee maker for camping?
That really depends on your preference. French presses are simple and durable. Pour-over systems are lightweight. Small manual espresso makers offer a different experience. Think about what kind of coffee you like best.
If you’re craving a stronger, espresso-style shot, a manual espresso maker can deliver a rich and concentrated brew, perfect for those who like their coffee bold.
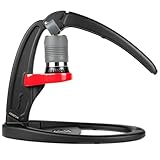
- HANDCRAFT SHOTS OF ESPRESSO - With the Flair Espresso Maker, you have a complete manual espresso machine that can produce professional quality of espresso from your home, or wherever you are. Add 60ml of boiled water and a dose of up to 18 grams to yield a 40 ml shot with beautiful crema.
- FULLY MANUAL & COMPLETELY BEAUTIFUL – The Flair Classic is a 100% human-powered, direct lever espresso press. There are no plugs or electronics, meaning the Flair will look beautiful in any coffee station or kitchen.
- ADVANCED & BEGINNER ESPRESSO BREWING – The relaunched Flair Classic comes with both our Bottomless 2-in-1 Portafilter and our Flow Control Portafilter, meaning you can brew for convenience or control.
- BUILT TO LAST WITH A WARRANTY – The Flair Classic is made from durable materials like cast aluminum and stainless steel, you can be sure your manual espresso maker, by Flair, is built to last. Both the aluminum press stand and the stainless steel brewing head are backed by a 3-year warranty.
- EASY TO CLEAN – The Flair Classic manual espresso machine is the only manual espresso maker with a completely detachable brewing head. This patented design allows for users to completely remove the brewing head, separate the parts, and rinse under cool water.
How do I keep my portable coffee maker clean on the go?
Rinse it with hot water immediately after each use. If you can, carry a small brush or sponge. For longer trips, a small ziplock bag of coffee grounds can sometimes help scrub out residue when rinsed with water.
Can I use any coffee grounds in my portable maker?
No, the grind size is important. Generally, medium to medium-fine is a good starting point for most portable brewers. Check your brewer’s manual for specific recommendations.
How hot should the water be?
Aim for 195°F to 205°F (90°C to 96°C). If you don’t have a thermometer, let boiling water sit for about 30-60 seconds before pouring.
What if I don’t have a grinder with me?
You can buy pre-ground coffee, but it won’t be as fresh. If you do, try to get a grind size suited for your brewer and use it within a week or two for the best flavor.
How much coffee should I use?
A good starting point is a ratio of 1:15 to 1:17 (coffee to water by weight). If you’re measuring by volume, try about 2 tablespoons of coffee for every 6 oz of water. Adjust to your taste.
My coffee tastes weak. What’s wrong?
Your grind might be too coarse, your coffee-to-water ratio might be off (too little coffee), or your water temperature might be too low. Try adjusting one of these variables at a time.
My coffee tastes bitter. What’s wrong?
Your grind might be too fine, your coffee-to-water ratio might be off (too much coffee), or your water temperature might be too high. Again, adjust one variable at a time.
What this page does NOT cover (and where to go next)
- Specific maintenance for electric portable coffee makers (like descaling specific components).
- Advanced brewing techniques like siphon or Aeropress methods in detail.
- Reviews of specific portable coffee maker brands or models.
- Detailed water chemistry analysis for optimal brewing.
- How to troubleshoot issues with integrated grinders on some portable machines.