Easy Vanilla Coffee Creamer Using Half-and-Half
Quick answer
- Store-bought creamers are loaded with sugar and weird additives. You can whip up a better version at home in minutes.
- It’s super simple: heat half-and-half, stir in vanilla and sweetener, then chill.
- This homemade creamer tastes way better and lets you control exactly what goes in.
- You can adjust the sweetness and vanilla to your exact liking.
- It’s perfect for folks who want a touch of flavor without all the junk.
- Keep it in the fridge, and it’ll last about a week.
Who this is for
- Anyone who loves a flavored coffee but hates the ingredient list on store-bought stuff.
- Coffee drinkers who want a simple, quick way to upgrade their morning cup.
- People who like to control the sweetness and flavor intensity of their drinks.
What to check first
Brewer type and filter type
This is about creamer, not brewing, so no worries here. Just make sure your coffee is brewed how you like it.
Water quality and temperature
Again, not brewing. But if your coffee tastes off, it might be your water. Use filtered water for better coffee.
Grind size and coffee freshness
This is for brewing. Freshly ground beans make a huge difference.
Coffee-to-water ratio
This is for brewing. Too much or too little coffee impacts flavor.
Cleanliness/descale status
This is for brewing. A clean machine means better-tasting coffee.
Step-by-step (brew workflow)
This recipe is for making the creamer itself, not brewing coffee.
1. Gather your ingredients. You’ll need half-and-half, vanilla extract, and your preferred sweetener. Sugar, honey, or maple syrup all work.
- What “good” looks like: You have everything ready to go on your counter.
- Common mistake: Forgetting an ingredient. Double-check before you start.
2. Measure your half-and-half. A standard recipe uses about 2 cups, but you can scale it up or down.
- What “good” looks like: You have the right amount measured out.
- Common mistake: Eyeballing it. Precision matters for consistency.
3. Pour into a saucepan. Use a small to medium saucepan.
- What “good” looks like: The liquid is safely in the pan, ready for heating.
- Common mistake: Using a pan that’s too small, leading to spills.
4. Heat gently. Warm the half-and-half over medium-low heat. You want it warm, not boiling.
- What “good” looks like: Small bubbles just starting to form around the edges.
- Common mistake: Boiling it. This can scald the milk and change the flavor.
5. Add sweetener. Stir in your chosen sweetener. Start with a tablespoon or two and taste as you go.
- What “good” looks like: The sweetener is fully dissolved.
- Common mistake: Adding too much at once. You can always add more, but you can’t take it out.
6. Stir in vanilla extract. Add about 1-2 teaspoons for every 2 cups of half-and-half. Again, adjust to your taste.
- What “good” looks like: The vanilla is evenly distributed.
- Common mistake: Using imitation vanilla if you have the real stuff. Pure vanilla extract has a richer flavor.
7. Whisk well. Give everything a good stir to combine all the flavors.
- What “good” looks like: No streaks of sweetener or vanilla visible.
- Common mistake: Not whisking enough, leading to uneven flavor distribution.
8. Remove from heat. Once everything is mixed and warm, take the saucepan off the burner.
- What “good” looks like: The pan is safely off the heat source.
- Common mistake: Leaving it on the heat too long.
9. Let it cool. Allow the mixture to cool for a bit before transferring it.
- What “good” looks like: It’s no longer steaming heavily.
- Common mistake: Pouring hot liquid into a plastic container. Let it cool first.
10. Transfer to a storage container. Use a clean glass jar or bottle with a lid.
- What “good” looks like: The creamer is safely stored.
- Common mistake: Using a dirty container. This will spoil your creamer fast.
11. Chill thoroughly. Refrigerate for at least an hour before using. This lets the flavors meld.
- What “good” looks like: The creamer is cold and ready to use.
- Common mistake: Using it while it’s still warm. It won’t taste as good.
For storing your delicious homemade creamer, a clean glass jar with a lid is perfect. This one is a great option for keeping your creamer fresh.
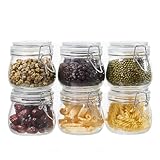
- 【Premium Glass Jars with Airtight Lids】These airtight glass jars feature a wire clip fastening system with clear preserving seals, locking in freshness and flavor. Ideal for dry goods and long-term food storage.
- 【Perfect Size: 17 oz Capacity – Set of 6】Each jar holds 17oz, just right for storing beans, flour, sugar, cereal, pasta, or snacks. Comes as a 6 pack to organize your kitchen efficiently.
- 【Durable & Safe Food Storage Containers】Made from thick, lead-free, glass food storage containers that are BPA-free, odor-resistant, and safe for everyday use.
- 【Multi-Purpose Glass Canisters for Kitchen & Pantry】Great for kitchen canning and pickling jars – also suitable for DIY jam, honey, kimchi, spices, and more. A functional and elegant solution for pantry storage jars.
- 【Stylish & Practical Storage Jars】Sleek square design saves space and looks beautiful on shelves. These glass storage jars are easy to stack and clean, combining utility with minimalist decor.
Common mistakes (and what happens if you ignore them)
| Mistake | What it causes | Fix |
|---|---|---|
| Using imitation vanilla extract | Less rich, artificial vanilla flavor. | Use pure vanilla extract for a better taste. |
| Boiling the half-and-half | Scalded milk flavor, potential curdling. | Heat gently until just warm; avoid boiling. |
| Not dissolving sweetener completely | Gritty texture, uneven sweetness. | Whisk thoroughly until all sweetener is dissolved. |
| Adding sweetener/vanilla when cold | Harder to dissolve, flavors don’t meld as well. | Add to warm half-and-half for best results. |
| Using a dirty storage container | Spoilage, off-flavors, reduced shelf life. | Always use clean, sanitized jars or bottles. |
| Not chilling long enough | Flavors are muted, not as refreshing in coffee. | Refrigerate for at least an hour before first use. |
| Using too much sweetener initially | Overly sweet creamer, difficult to correct. | Start with less sweetener and add more to taste. |
| Not tasting and adjusting | Flavor isn’t quite right for your preference. | Taste as you go and adjust vanilla and sweetener levels. |
| Storing at room temperature | Rapid spoilage, potential bacterial growth. | Always keep refrigerated. |
| Using old or questionable half-and-half | Off-flavors, spoilage. | Ensure your dairy product is fresh. |
Decision rules (simple if/then)
- If you prefer a very sweet coffee, then add more sweetener to your creamer because you can control the sweetness level.
- If you like a strong vanilla flavor, then add a bit more vanilla extract because it’s easy to adjust.
- If you notice a slightly “cooked” taste, then you likely overheated the half-and-half, so next time heat it more gently.
- If your creamer tastes bland, then you need more sweetener or vanilla, so taste and adjust accordingly.
- If you want to make a bigger batch, then simply multiply all ingredients by the same factor because the ratios will remain consistent.
- If you’re out of half-and-half, then you can try using whole milk or a mix of milk and heavy cream, but the texture will be different because half-and-half has a specific fat content.
- If you want a dairy-free option, then use a full-fat coconut milk or a store-bought barista-blend oat milk, but expect a different flavor profile.
- If you want to avoid sugar, then use a sugar-free sweetener like stevia or erythritol, but be mindful of any aftertaste.
- If you want to add other flavors, then experiment with a tiny bit of cinnamon or nutmeg, but start with a very small amount because they are potent.
- If the creamer seems too thick after chilling, then stir in a tablespoon of regular milk or water to thin it out because it will thicken slightly as it cools.
FAQ
How long does homemade vanilla coffee creamer last?
It usually lasts about a week in the refrigerator. Always check for any off smells or textures before using.
Can I make this sugar-free?
Absolutely. You can use sugar substitutes like stevia, erythritol, or monk fruit. Just add them to taste, as they can be more potent than sugar.
What kind of vanilla extract should I use?
Pure vanilla extract is best for the richest flavor. Imitation vanilla can work in a pinch, but the taste won’t be as complex.
Can I use a different sweetener?
Yes, honey, maple syrup, agave, or even simple syrup work well. Each will impart its own subtle flavor.
What if I don’t have half-and-half?
You can substitute with whole milk for a lighter creamer, or a mix of whole milk and heavy cream for a richer one. It won’t be exactly the same, but it’ll still be tasty.
Why is my creamer separating?
This can happen if the half-and-half was heated too high or if it’s nearing its expiration date. Give it a good shake or stir before using.
Can I add other flavors besides vanilla?
Sure! You can add a pinch of cinnamon, a drop of almond extract, or even a tiny bit of cocoa powder. Just start small.
Is this creamer safe to store at room temperature?
No, absolutely not. Like any dairy product, it needs to be kept refrigerated to prevent spoilage and bacterial growth.
What this page does NOT cover (and where to go next)
- Detailed recipes for different types of coffee brewing methods (e.g., pour-over, French press).
- Information on specific coffee bean origins and roast profiles.
- Advanced techniques for latte art or milk steaming.
- Comparisons of commercial coffee creamer brands.
- Recipes for non-dairy or vegan coffee creamers.