Easy Steps for Layered Iced Coffee Drinks
Quick Answer
- Use cold brew concentrate or a strong, chilled espresso for the coffee base.
- Chill your serving glass thoroughly before assembling.
- Layer denser liquids (like syrups or sweetened condensed milk) at the bottom.
- Pour coffee slowly over the back of a spoon to create distinct layers.
- Add ice last, carefully, to avoid disturbing the layers.
- Sweeten and flavor your components before layering for best results.
Who This Is For
- Home baristas looking to elevate their iced coffee game beyond a simple chilled brew.
- Anyone who enjoys visually appealing and customizable coffee beverages.
- Individuals seeking to impress guests or create a cafe-like experience at home.
What to Check First for Layered Iced Coffee
Before you start building your layered masterpiece, a few foundational elements will ensure success.
Brewer Type and Filter Type
The type of coffee brewer you use impacts the final coffee concentrate. Drip coffee makers, French presses, or pour-over devices can all produce coffee. For layered iced coffee, a strong brew is often preferred. This means either using a finer grind, a longer brew time, or a higher coffee-to-water ratio than you might for hot coffee. The filter type (paper, metal, cloth) can also affect clarity and body. Paper filters generally yield a cleaner cup, while metal filters allow more oils and fine particles through, which can contribute to a richer mouthfeel but might cloud layers.
Water Quality and Temperature
The quality of your water significantly impacts the taste of your coffee. If your tap water has a strong taste or odor, consider using filtered water. For iced coffee, the initial brewing temperature is important for extraction, typically between 195-205°F for hot brewing methods. However, for layered iced coffee, you’ll be cooling this brew or using a cold brew concentrate. Ensure your coffee base is fully chilled before layering to prevent it from mixing prematurely with other ingredients.
Grind Size and Coffee Freshness
The grind size is crucial for proper extraction. For most brewing methods, a medium grind is a good starting point, but you might adjust this based on your specific brewer. For example, a French press typically uses a coarser grind, while espresso machines require a very fine grind. Freshly roasted and ground coffee beans will always yield the best flavor. Aim to grind your beans just before brewing. Stale coffee can result in a flat, uninspired taste that no amount of layering can fix.
Coffee-to-Water Ratio
The ratio of coffee grounds to water determines the strength of your brew. For layered iced coffee, you generally want a stronger concentrate than you would for a regular cup of hot coffee. This is because the ice will dilute the drink as it melts. A common starting point for hot brewing might be around 1:15 (coffee to water by weight), but for an iced coffee concentrate, you might lean towards 1:10 or even 1:8. For cold brew, ratios can be even stronger, often starting around 1:4 to 1:6. Experiment to find what works best for your taste and brewing method.
Cleanliness/Descale Status
A clean brewing system is paramount for good-tasting coffee. Coffee oils can build up over time and turn rancid, imparting bitter and unpleasant flavors. Regularly clean your coffee maker, grinder, and any other brewing equipment according to the manufacturer’s instructions. If you have a machine that uses steam or heat, descaling is also essential. Mineral buildup can affect brewing temperature, flow rate, and ultimately, the taste of your coffee. A clean machine is the first step to achieving clear, distinct layers.
Step-by-Step: How to Make Layered Iced Coffee
This workflow focuses on creating a visually appealing, multi-layered iced coffee drink.
1. Prepare Your Coffee Concentrate: Brew a strong batch of coffee using your preferred method (e.g., pour-over, French press, espresso machine). Alternatively, prepare a cold brew concentrate.
- What “good” looks like: A rich, flavorful coffee liquid that is significantly stronger than your usual cup. It should be free from bitterness or sourness from improper extraction.
- Common mistake: Brewing a weak coffee. This will result in a muddy, indistinct layer that doesn’t provide a good flavor base.
- How to avoid: Use a higher coffee-to-water ratio or a finer grind than you normally would.
For the best results, consider using a dedicated iced coffee maker to brew a strong, concentrated coffee base. This ensures a rich flavor that can stand up to dilution from ice.

- BREW BY THE CUP OR CARAFE: Brews both K-Cup pods and coffee grounds.
- MULTISTREAM TECHNOLOGY: Saturates the grounds evenly to extract full flavor and aroma in every cup, hot or cold.
- BREW OVER ICE: Adjusts temperature for maximum flavor and less ice melt for single-cup iced coffees and teas.
- STRONG BREW & EXTRA HOT FUNCTIONALITY: Brews a stronger, more intense-flavored cup and the extra hot feature brews a hotter single cup.
- MULTIPLE BREW SIZES: Brew 6, 8, 10, or 12oz single cups or 6, 8, 10, or 12-cup carafes. 12-cup glass carafe specially designed to limit dripping.
2. Chill Your Coffee: Allow the brewed coffee to cool completely to room temperature, then refrigerate it until thoroughly chilled.
- What “good” looks like: Cold, dense coffee concentrate.
- Common mistake: Pouring warm or room-temperature coffee into the glass. This will immediately start to melt the ice and mix with other layers.
- How to avoid: Plan ahead and ensure your coffee is well chilled before assembly.
3. Chill Your Serving Glass: Place your serving glass in the freezer for at least 15-30 minutes.
- What “good” looks like: A frosty, very cold glass.
- Common mistake: Using a room-temperature glass. This offers no thermal advantage and can cause rapid melting.
- How to avoid: Make this a consistent part of your preparation.
Using clear, chilled iced coffee glasses is essential for showcasing your layered creation. Make sure they’re frosty cold before you begin assembling your drink.
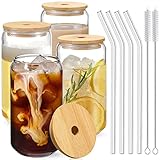
- PRODUCT CONFIGURATION: Drinking glass set includes 4 glass cups [ Diameter - 3 inches, Height - 5.6 inches ],4 nature bamboo lids, 4 reusable glass straws and 2 cleaning brushes, Classic design tumbler
- DURABLE and SAFE: The glasses are made of high-quality durable clear glass, Lead-free and BPA-free. It can be used safely for a long time. This thick clear glass can withstand the sudden changes in the temperature difference between -68°F to 212°F, making them dishwasher safe. If you want to decorate this glass, you can do DIY easily without breakage
- MULTI-PURPOSE: The glassware Great for any Occasion, any hot and cold drinks, home essentials. It is widely loved by families, kitchen, breweries, cafes, bars and restaurants. You can use it to make perfect tea, bubble Pearl Milk Tea, soda, water, iced coffee, smoothie, fruit juice or any other interesting holiday drinks
- AMAZING GIFT: This jar is very fashionable, aesthetic and characteristic. Excellent workmanship. Perfect Gifts for Women, House warming gifts, Tea mug Sets, Highball Glasses, Home Bar Accessories, Birthdays, Graduation, Weddings and Christmas Gifts
- SATISFIED SERVICE: This glass set is packaged in the heavy bubble holder and thick carton box to prevent damage while in transport. If the glass set you received was damaged or imperfect or you are not satisfied, we will offer a satisfactory solution
4. Add Sweeteners/Flavorings to the Bottom: If you’re using syrups, sweetened condensed milk, or flavored creamers, add them to the bottom of your chilled glass first. These are often denser and will naturally settle at the base.
- What “good” looks like: A layer of liquid at the bottom of the glass that is evenly distributed.
- Common mistake: Adding these after the coffee. They may not mix well or will float on top, ruining the layered effect.
- How to avoid: Always add your densest, sweetest components first.
To achieve those beautiful bottom layers, a coffee syrup dispenser can be incredibly helpful for precise and even pouring of sweeteners and flavorings. This ensures a clean base for your drink.

- Syrup Dispenser Set: Ideal Gift Choice, gyosugang high quality syrup dispenser set includes 2 Customized glass syrup bottles, 2 BPA-Free PVC Black pumps, 1 funnel and 18 label set(16 syrup labels and 2 blank labels)
- Uniquely Designed Pump: This pump design adds the coffee syrup dispenser more elegant lines; Our pump is made of BPA-free, food-safe plastic and food grade PVC; It is sturdy and highly leak-proof, every press dispensing about half teaspoon at a time(2 mL)
- 18 Syrup Labels: gyosugang coffee syrup dispenser set contains 16 syrup labels and 2 blank labels(blank label stickers for DIY). syrup dispenser labels are versatile, waterproof and easy to stick and remove, can meet your needs maximize
- Versatile Usage: This syrup dispenser is not only a great choice as a coffee syrup dispenser, but also glass syrup bottle are ideal for a wide variety of liquids or other condiments; It can also be used as a fashionable decoration for bars, coffee bars
- An Excellent Gift: This coffee syrup dispenser set are perfect for commercial or home use, which will be a great present for Christmas, New Year's Day, Thanksgiving, Mother's Day, Father's day, Birthday, housewarmings and so on
5. Add Ice: Carefully fill the glass with ice. Use cubes or crushed ice, depending on your preference.
- What “good” looks like: A glass filled with ice, leaving enough room for the coffee and any other layers.
- Common mistake: Overfilling the glass with ice, leaving no room for liquids. This can cause overflow when you add coffee.
- How to avoid: Leave about 1-2 inches of space at the top.
6. Prepare Your Milk/Creamer Layer: If you’re using milk or a creamer, it’s often best to pre-chill it. For extra visual appeal, you can froth it slightly or mix it with a sweetener or flavor.
- What “good” looks like: Cold, smooth milk or creamer. If frothed, it should have a light foam.
- Common mistake: Using lukewarm milk, which will melt the ice too quickly.
- How to avoid: Ensure your milk is well-chilled and pour it gently.
7. Pour the Milk/Creamer Layer: Slowly pour the milk or creamer over the ice. The goal is to create a distinct layer above any sweeteners at the bottom.
- What “good” looks like: A visible layer of milk or creamer sitting above the bottom ingredients, with minimal mixing.
- Common mistake: Pouring too quickly, causing it to mix with the bottom layer.
- How to avoid: Pour slowly and steadily.
8. Pour the Coffee Concentrate: This is the critical layering step. Hold a spoon upside down just above the surface of the milk/creamer layer. Slowly and carefully pour the chilled coffee concentrate over the back of the spoon.
- What “good” looks like: The coffee should form a distinct layer above the milk, creating a beautiful visual separation.
- Common mistake: Pouring the coffee directly into the glass. This will cause it to immediately mix with the milk layer.
- How to avoid: Use the back-of-the-spoon technique for a controlled pour.
9. Add Optional Toppings: If desired, you can add a dollop of whipped cream or a drizzle of chocolate syrup on top.
- What “good” looks like: A visually appealing finishing touch that complements the drink.
- Common mistake: Adding too many toppings, which can obscure the layers.
- How to avoid: Keep toppings simple and elegant.
10. Serve Immediately: Present your layered iced coffee and enjoy the visual appeal and distinct flavors.
- What “good” looks like: A stunning drink that is ready to be savored.
- Common mistake: Letting the drink sit too long before serving, allowing layers to meld.
- How to avoid: Assemble just before you plan to drink it.
Common Mistakes (and What Happens If You Ignore Them)
| Mistake | What It Causes | Fix |
|---|---|---|
| Using warm coffee | Layers mix immediately, creating a muddy appearance and diluted flavor. | Chill coffee thoroughly before assembly. |
| Pouring liquids too quickly | Ingredients blend, preventing distinct layers and a less appealing visual. | Pour all liquids slowly, especially over the back of a spoon for the coffee layer. |
| Not chilling the serving glass | Ice melts faster, causing layers to mix and diluting the drink prematurely. | Freeze the serving glass for at least 15-30 minutes before starting. |
| Using weak coffee concentrate | The coffee layer is thin, easily mixes, and lacks a robust flavor profile. | Brew coffee with a higher coffee-to-water ratio or a finer grind for a stronger concentrate. |
| Adding ingredients in the wrong order | Denser liquids (like syrups) might float on top or lighter liquids sink. | Layer densest ingredients at the bottom, followed by milk/creamer, then coffee. |
| Not using a spoon for coffee pouring | Coffee streams directly into the other layers, causing them to blend. | Use the back of a spoon held just above the liquid surface to diffuse the coffee pour. |
| Overfilling the glass with ice | Insufficient space for liquids, leading to spills and difficulty in layering. | Leave adequate space (1-2 inches) at the top of the glass for pouring. |
| Using stale coffee beans | The coffee tastes flat, bitter, or off, regardless of layering technique. | Use freshly roasted and ground coffee beans for the best flavor. |
| Not cleaning brewing equipment | Rancid oils impart off-flavors that detract from the layered drink’s appeal. | Clean your coffee maker, grinder, and any other equipment regularly. |
| Using tap water with strong flavors | The water’s taste will negatively impact the coffee’s flavor profile. | Use filtered water for brewing to ensure a clean coffee taste. |
Decision Rules for Layered Iced Coffee
Here are some simple rules to guide your layered iced coffee creation:
- If you want the sweetest layer at the very bottom, then add syrups or sweetened condensed milk first because they are typically the densest.
- If you’re using a very strong coffee concentrate (like espresso), then you might need less ice to prevent over-dilution because the coffee itself is already intense.
- If your milk layer is mixing too much with the coffee, then pour the coffee even slower and closer to the surface of the milk because a gentler pour is key to separation.
- If you want a foamy texture on top, then lightly froth your milk or creamer before pouring it because this adds a visual and textural element.
- If you notice your layers are not separating well, then re-evaluate your coffee’s strength and temperature because a cold, strong base is crucial.
- If you want to add a drizzle of chocolate or caramel, then do it as a final topping after the coffee layer because it’s meant to be decorative.
- If your coffee tastes bitter, then the issue is likely with your brewing method, not the layering technique, because bitterness comes from over-extraction.
- If you want a very clean separation and are using a drip coffee, then consider using a paper filter to remove more sediment and oils.
- If you’re in a hurry and don’t have time to chill coffee, then consider making a strong espresso shot directly over ice and then layering, as espresso cools faster.
- If you want to add a splash of flavored liqueur, then consider adding it to the bottom layer with your syrups because it will likely be denser.
- If your drink is too sweet, then you can adjust by using less syrup or a less sweet creamer in your bottom layers.
- If you want a more visually striking drink, then use clear serving glasses to showcase the distinct layers.
FAQ
What is the best coffee to use for layered iced coffee?
Cold brew concentrate or a strong, chilled espresso are excellent choices. They provide a rich, intense flavor that stands up well to ice and other ingredients without becoming watery.
How do I make sure my layers don’t mix?
The key is density and careful pouring. Denser liquids (like syrups) go on the bottom. Pour liquids slowly, especially the coffee, over the back of a spoon held just above the surface of the layer below. Ensure all components are well-chilled.
Can I use hot brewed coffee and chill it?
Yes, you can. Brew your coffee stronger than usual, let it cool to room temperature, and then chill it thoroughly in the refrigerator. Avoid pouring warm coffee directly over ice, as it will melt too quickly and dilute the drink.
What if I don’t have a spoon for layering?
While a spoon is ideal, you can also use a small pitcher with a spout or even a straw held very close to the liquid surface. The goal is to diffuse the stream of liquid so it doesn’t directly impact the layer beneath.
How can I make my layered iced coffee sweeter?
Add sweeteners like simple syrup, sweetened condensed milk, or flavored syrups to the bottom of your glass. You can also sweeten your milk or creamer layer before pouring.
What is the role of ice in layered iced coffee?
Ice is essential for keeping the drink cold and providing a base for layering. It also dilutes the coffee as it melts, which is why using a strong concentrate is recommended.
Can I make this without any dairy?
Absolutely. Use plant-based milks like almond, oat, or soy milk. You can also use dairy-free creamers or simply enjoy a layered coffee and water or coffee and flavored syrup combination.
How long will the layers stay distinct?
This depends on the temperature of your ingredients and the amount of ice. Generally, the layers will remain distinct for a good 10-15 minutes if everything is properly chilled and poured carefully. Over time, they will naturally meld.
What are some common flavor combinations?
Popular choices include mocha (chocolate syrup, coffee, milk), caramel (caramel syrup, coffee, milk), and vanilla (vanilla syrup, coffee, milk). You can also experiment with seasonal flavors like pumpkin spice or peppermint.
What This Page Does Not Cover (and Where to Go Next)
- Specific machine cleaning instructions: For detailed cleaning and descaling procedures, always refer to your coffee maker’s manufacturer manual.
- Advanced espresso techniques: This guide focuses on accessible layering. For in-depth espresso knowledge, explore resources on dialling in shots and latte art.
- Cold brew recipes and ratios: While cold brew is mentioned, detailed guides on optimizing cold brew extraction, grind sizes, and steeping times are beyond this scope.
- Syrup and flavoring recipes: This article assumes you are using store-bought or pre-made flavorings. Creating homemade syrups or infusions is a separate topic.