DIY: How To Make A Coffee Filter Butterfly Craft
Quick answer
- Gather your supplies: coffee filters, washable markers, water, pipe cleaners, and scissors.
- Color your coffee filters with washable markers. Get creative with patterns!
- Lightly dampen the colored filters with water. Watch the colors bleed and blend.
- Twist a pipe cleaner around the center to create the body and antennae.
- Gently shape the wings.
- Add extra details if you like.
- Hang them up or use them for decorations.
Who this is for
- Crafty kids looking for a fun, easy project.
- Anyone who wants a simple, colorful decoration.
- People who like upcycling common household items.
What to check first
Brewer type and filter type
This craft uses standard basket or cone coffee filters. You know, the paper kind you use for brewing. No special types needed here. Just grab what you usually use for your morning cup.
Water quality and temperature
For this craft, tap water is totally fine. You’re not drinking it, so no need for fancy filtered stuff. Just make sure it’s not too hot to handle. Cool or room temperature is perfect.
Grind size and coffee freshness
This part doesn’t apply to the craft itself. We’re not brewing coffee here, just using the filters. So, don’t worry about grind size or how fresh your beans are.
Coffee-to-water ratio
Again, not relevant for making a butterfly. You’re using the filter, not the coffee grounds. So, no ratios to worry about.
Cleanliness/descale status
Make sure your filters are clean and dry before you start coloring. They should be fresh out of the box. No need to descale anything here!
Step-by-step (brew workflow)
Step 1: Gather your materials
- What to do: Collect your coffee filters, washable markers (the washable kind is key!), a small spray bottle or cup of water, pipe cleaners, and scissors.
- What “good” looks like: All your supplies are laid out and ready to go. No hunting around for things.
- A common mistake and how to avoid it: Using permanent markers. They won’t blend or bleed nicely with water. Stick to washable!
For vibrant, blendable colors, consider using a set of high-quality washable markers. They are perfect for achieving that beautiful watercolor effect.
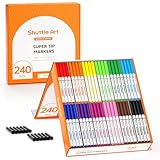
- LARGE VALUABLE SET: Shuttle Art 240 pack washable marker set comes in a box, containing 20 each of 12 different colors including red, orange, pink, yellow, grass green, green, sky blue, sapphire blue, purple, brown, plum, black.
- VERSATILE CONICAL TIP: Premium super tip markers with special conical tips allow you to draw 1mm fine lines with the point and 3mm broad strokes with the side. Excellent for coloring, drawing and writing, perfect for students and teachers as classroom supplies.
- BONUS 12 CAPS: If the original caps were missing, you can use the bonus to protect your markers from drying! These broad line markers are long-lasting suit for students & adults drawing, art projects, homework assignments, and crafts.
- NON-TOXIC & ACID-FREE:These washable marker pens are completely safe for kids and toddlers. We use non-toxic and acid-free ink which is safe on the skin, also conforming to ASTM-D4236.
- SERVICE GUARANTEE: Your satisfaction is our top priority, please rest assured to purchase our products. If you are not satisfied with our products or have any questions, please feel free to contact us at any time.
Step 2: Color the filters
- What to do: Lay a coffee filter flat and start coloring it with your washable markers. Create patterns, stripes, or just fill it in. You can use one color or many.
- What “good” looks like: Vibrant colors and interesting designs on your filter. It should look like a colorful canvas.
- A common mistake and how to avoid it: Pressing too hard with the markers, which can tear the filter. Be gentle.
Step 3: Dampen the filter
- What to do: Lightly mist the colored filter with water from your spray bottle, or dip it quickly into a cup of water. You want it damp, not soaked.
- What “good” looks like: The colors start to spread and blend together, creating a watercolor effect. It should look pretty cool.
- A common mistake and how to avoid it: Soaking the filter. This can make it fall apart. A light spritz is all you need.
Step 4: Let it dry (partially)
- What to do: Let the damp filter sit for a few minutes. The colors will continue to bleed and blend as it dries.
- What “good” looks like: The colors have softened and merged into a unique pattern. It’s starting to look like butterfly wings.
- A common mistake and how to avoid it: Not letting it dry enough. If it’s too wet, it’ll be hard to shape.
Step 5: Fold the filter
- What to do: Once the filter is slightly damp but not dripping, fold it in half lengthwise.
- What “good” looks like: A neat fold down the middle, creating two halves that will become wings.
- A common mistake and how to avoid it: Folding it unevenly. Try to make the edges match up as best you can.
Step 6: Shape the wings
- What to do: Gently pinch the folded edge and gather the filter in the middle.
- What “good” looks like: The filter starts to resemble a butterfly shape, with the folded edge forming the top of the wings.
- A common mistake and how to avoid it: Bunching it up too tightly. You want a gentle gather, not a crumpled mess.
Step 7: Add the body
- What to do: Take a pipe cleaner and twist it around the gathered middle of the coffee filter. This forms the butterfly’s body.
- What “good” looks like: The pipe cleaner is snug around the filter, holding the wings in place and creating a defined center.
- A common mistake and how to avoid it: Twisting it too loosely. The wings might pop open if it’s not secure.
Step 8: Create antennae
- What to do: Bend the ends of the pipe cleaner upwards to create antennae. You can add a little curl to the tips if you want.
- What “good” looks like: Two distinct antennae sticking up from the butterfly’s “head.”
- A common mistake and how to avoid it: Making the antennae too short or too long. Adjust them to look balanced.
Step 9: Final adjustments
- What to do: Gently spread out the coffee filter wings to give your butterfly its full shape.
- What “good” looks like: A beautiful, colorful butterfly ready to be displayed!
- A common mistake and how to avoid it: Ripping the wings. Be delicate when you’re shaping them.
Common mistakes (and what happens if you ignore them)
| Mistake | What it causes | Fix |
|---|---|---|
| Using permanent markers | Colors won’t blend, sharp lines, no watercolor effect. | Switch to washable markers. |
| Soaking the filter with water | Filter tears easily, colors become muddy and indistinct. | Lightly mist or dip; let excess water drip off. |
| Not letting the filter dry enough | Difficult to fold and shape, colors might smudge. | Allow a few minutes for the water to absorb and colors to spread. |
| Folding the filter unevenly | Asymmetrical wings, butterfly looks lopsided. | Align edges carefully when folding in half. |
| Gathering the filter too tightly | Wings look bunched and flat, less dimension. | Pinch gently to create a natural gather. |
| Twisting the pipe cleaner too loosely | Wings may not stay in place, butterfly can fall apart. | Twist securely around the gathered middle. |
| Ripping the coffee filter | Holes in the wings, affects the overall look. | Handle the filter gently, especially when damp. |
| Not using washable markers | Colors won’t bleed, project looks less artistic. | Always opt for washable markers for this craft. |
Decision rules (simple if/then)
- If the colors aren’t blending, then add a tiny bit more water because the marker ink needs moisture to spread.
- If the filter is tearing, then be more gentle with your handling because damp paper is fragile.
- If the pipe cleaner feels loose, then twist it a bit tighter because it needs to hold the wings securely.
- If the wings look too flat, then gently fan them out more because you want a nice, full butterfly shape.
- If you want more vibrant colors, then use darker marker shades initially because the water will lighten them.
- If you want a softer look, then use lighter marker shades and just a little water because the effect will be more subtle.
- If the antennae are wobbly, then bend them into a more stable shape because they should stand up nicely.
- If the butterfly looks a bit plain, then add more patterns or colors before dampening it because more detail makes a prettier result.
FAQ
Can I use any kind of coffee filter?
Yes, standard basket or cone coffee filters work best. They have the right size and absorbency for this craft.
What kind of markers should I use?
Washable markers are essential. They are designed to bleed and blend with water, which is the key to the watercolor effect.
How much water should I use?
Just enough to dampen the filter. You want the colors to spread, not for the filter to become saturated and tear. A light mist from a spray bottle is usually perfect.
Can kids do this project by themselves?
Younger children might need a little help with the water and pipe cleaner steps, but generally, it’s a very kid-friendly craft.
How long does it take to make one butterfly?
It’s pretty quick! Once you have your supplies, you can probably make one in about 10-15 minutes, not including drying time.
What else can I do with these butterflies?
You can string them together to make a garland, tape them to windows, or even attach them to presents for a decorative touch.
Can I use something other than pipe cleaners for the body?
You could try a chenille stem, or even a small piece of colorful yarn twisted around, but pipe cleaners are the easiest to work with for the antennae.
Will the colors fade over time?
If kept out of direct sunlight and away from moisture, the colors should hold up pretty well. They are made with washable markers, so extreme conditions might affect them.
What this page does NOT cover (and where to go next)
- Using permanent markers or other art supplies not designed for water bleeding.
- Advanced techniques for creating specific wing patterns or textures.
- Using coffee filters for actual coffee brewing.
- Detailed instructions on how to make a coffee filter garland or mobile.