DIY Coffee Roaster: Roasting Beans At Home
Quick Answer
- Roasting coffee beans at home requires careful attention to temperature, airflow, and timing.
- A DIY coffee roaster can be built using common kitchen appliances like a popcorn popper or a modified oven.
- The goal is to achieve an even roast, typically between first and second crack, for optimal flavor.
- Always ensure proper ventilation and fire safety precautions are in place when experimenting with heat.
- Start with small batches to get a feel for the process and your specific setup.
- Experimentation with different roast profiles is key to discovering your preferred taste.
For those looking to dive into home roasting, a DIY coffee roaster can be a rewarding project. You can even build one using common kitchen appliances like a popcorn popper or a modified oven.

- Fresh and Flavorful Coffee Guaranteed: Commercially roasted whole bean coffee starts to lose flavor in just three days but green (un-roasted) beans stay fresh for about 2 years. Our Fresh Roast coffee roasting products provide the freshest roast on earth by allowing you to roast at home
- Versatile Roasting Capacity: Roast any kind of coffee including espresso up to 8oz / 226 Grams (Wet Processed). Features precise real-time temperature display and nine level power settings for precise coffee roasting control. Roast exotic green coffee beans from decaffeinated, organic, fair trade varieties from around the world
- Easy to Use with Full Adjustability: Suitable for the novice and fully adjustable for experienced roasters. Roast 14-28 cups of coffee in less than 10 minutes. Speed roast fluid motion system ensures fast even roasting. Unlock your coffee's hidden flavor with convection fan control and variable heat settings in our easy to use speed roast system
- Custom Coffee Blending: Beans are roasted to your liking, combine different bean varieties and roasting styles to create special blends for yourself, family and friends. Custom coffee blends make thoughtful gifts. Making fresh roasted coffee has never been easier or more affordable to do at home
- USA Family Owned Company: Fresh Roast Home Roasting Supplies LLC is a USA based family owned and operated company that believes that life is too short to have sub par coffee. We offer high quality products for serious coffee connoisseurs and communicate closely with our customers to provide a top level experience and service
Who This Is For
- The adventurous home barista who wants to control every variable of their coffee.
- The budget-conscious coffee lover looking to save money by roasting their own beans.
- The curious tinkerer interested in the science and craft of coffee roasting.
What to Check First: Your DIY Coffee Roaster Setup
Before you begin roasting, it’s crucial to ensure your DIY setup is safe and functional. This checklist will help you prepare.
Brewer Type and Filter Type (if applicable)
- What to check: Identify the primary mechanism of your DIY roaster. Is it a hot air popcorn popper, a modified oven with a rotating drum, or another method?
- What “good” looks like: Your chosen method should allow for consistent heat application and some form of agitation or airflow to ensure beans roast evenly. For example, a popcorn popper naturally tumbles the beans, while an oven might require a perforated pan or a rotisserie.
- Common mistake and how to avoid it: Using a method that doesn’t allow for airflow can lead to uneven roasting or even scorching. Ensure your setup permits hot air to circulate around the beans.
Heat Source and Temperature Control
- What to check: Understand how your DIY roaster generates heat and if you can monitor or control the temperature. This could be the heating element of a popcorn popper, an oven’s thermostat, or a separate heat gun.
- What “good” looks like: You should have a way to consistently apply heat. Ideally, you can monitor the temperature, even if it’s an approximation. For example, using an oven thermometer in an oven setup is a good practice.
- Common mistake and how to avoid it: Relying solely on guesswork for temperature can lead to over-roasting or under-roasting. If your DIY setup doesn’t have a thermometer, consider using visual cues and sound (like the “cracks”) as your primary indicators, but be aware this requires practice.
Agitation and Airflow
- What to check: How will the beans be moved around during the roasting process? Is there sufficient airflow to carry away chaff and smoke?
- What “good” looks like: Beans should tumble or be stirred to prevent sticking and ensure even heat exposure. Airflow is essential for removing chaff (the papery skin of the bean) and smoke, which can impart bitter flavors.
- Common mistake and how to avoid it: Insufficient agitation can cause beans to clump together, leading to dark spots and uneven roasting. Lack of airflow can cause smoke buildup, making your roast taste acrid.
Ventilation and Safety Measures
- What to check: Where will the smoke and chaff go? Are you in a well-ventilated area? Do you have fire safety equipment nearby?
- What “good” looks like: Roasting produces smoke and chaff. You should be in a space with open windows, an exhaust fan, or even outdoors. Keep a fire extinguisher or baking soda readily accessible.
- Common mistake and how to avoid it: Roasting indoors without adequate ventilation can fill your home with smoke and potentially trigger smoke alarms. Never leave a roasting operation unattended.
Step-by-Step: Roasting Beans with a DIY Coffee Roaster
This workflow assumes you’re using a common DIY method, like a hot air popcorn popper. Adjust steps based on your specific setup.
1. Prepare your space: Move your DIY roaster to a well-ventilated area, such as outdoors, under a range hood, or near an open window. Ensure you have a heat-resistant surface underneath and fire safety equipment (like a fire extinguisher or baking soda) within reach.
- What “good” looks like: A clear, safe workspace with no flammable materials nearby and an escape route for smoke.
- Common mistake and how to avoid it: Roasting in a confined space without ventilation. This can create a smoke-filled room and a fire hazard.
2. Preheat your roaster (if applicable): Some DIY methods benefit from preheating, similar to an oven. Turn on your popcorn popper or preheat your oven to the desired starting temperature.
- What “good” looks like: The roaster is at a consistent, ready temperature.
- Common mistake and how to avoid it: Adding beans to a cold roaster, which can lead to a slower, less even roast.
3. Measure your green coffee beans: Weigh out a small batch of green coffee beans. For a typical popcorn popper, start with about 1/4 to 1/3 cup. For oven methods, you might use a bit more, but always check your DIY roaster’s capacity.
- What “good” looks like: A measured amount of beans that fits comfortably within your roaster’s capacity, allowing for expansion and movement.
- Common mistake and how to avoid it: Overfilling the roaster. This prevents proper airflow and agitation, leading to uneven roasting and potential stalling.
When measuring your green coffee beans for a DIY setup, it’s important to consider the capacity of your coffee bean roaster. For a typical popcorn popper, start with about 1/4 to 1/3 cup.
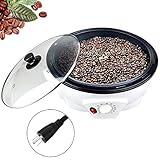
- 【Premium Quality】Operating at 110V and 800W, this electric coffee bean roaster features a non-stick chassis for easy cleaning. Equipped with a stirring rod, it ensures even roasting by continuously agitating the beans during the process. The professional thermostat provides automatic, constant temperature heating, and allows for adjustable temperature settings, enabling you to roast a variety of cereals to perfection.
- 【Honeycomb Non-Stick Bottom】The roasting chamber features a honeycomb-shaped design with a black food-grade Teflon coating. This ensures safe, easy cleaning and provides even, uniform heating for consistently perfect roasts.
- 【Professionally designed】The roaster features a heat-resistant, durable transparent cover with a four-hole ventilation system. This allows you to monitor the roasting process and observe changes in the coffee beans effortlessly while maintaining optimal ventilation.
- 【Large Capacity】Featuring an 800g tank, this roaster can accommodate a substantial amount of coffee beans, allowing you to roast in larger batches quickly and conveniently. For optimal results, we recommend roasting between 300g and 500g of beans at a time.
- 【Multifunction Use】This versatile machine is not only perfect for roasting coffee beans but also for baking a variety of other items, including beans, peanuts, chestnuts, barley, dried fruit, and popcorn. Ideal for home use, coffee shops, or restaurants, it allows you to craft and customize your unique coffee flavors to your preference.
4. Add beans to the roaster: Carefully add the measured green beans to your preheated DIY roaster.
- What “good” looks like: Beans are distributed evenly and begin to tumble or circulate immediately.
- Common mistake and how to avoid it: Pouring beans in too quickly, which can cause them to spill or create a dense clump.
5. Begin roasting and monitor: Start the roasting process. For popcorn poppers, this means turning them on. For oven methods, start the timer and rotation. Listen for the beans to begin cracking.
- What “good” looks like: Beans start to change color from green to yellow, then to light brown. You’ll hear the first audible “cracks” as moisture escapes.
- Common mistake and how to avoid it: Not paying attention during the initial stages. The yellowing phase is crucial for developing aroma.
6. Listen for First Crack: First crack is the most important indicator of roast development. It sounds like popcorn popping, but less intense. This typically happens around 400-420°F (205-215°C).
- What “good” looks like: A consistent, rhythmic popping sound. The beans will start to expand and turn a light to medium brown.
- Common mistake and how to avoid it: Mistaking chaff popping for first crack, or not listening carefully enough.
7. Manage the roast duration after First Crack: The time between first crack and when you stop the roast determines the final roast level. For a medium roast, you might stop the roast 1-3 minutes after first crack begins.
- What “good” looks like: Beans are developing a richer brown color, and aromas are becoming more pronounced.
- Common mistake and how to avoid it: Letting first crack go on for too long without intervention, leading to a darker roast than intended.
8. Listen for Second Crack (optional): Some roasters aim for second crack, which is a more aggressive, crackling sound, indicating a darker roast. This usually occurs at higher temperatures, around 440-450°F (225-230°C).
- What “good” looks like: A more rapid, finer popping sound than first crack. Beans will be darker brown to almost black.
- Common mistake and how to avoid it: Missing the start of second crack, which can quickly lead to over-roasting and burnt flavors.
9. Stop the roast: Once you reach your desired roast level (just after first crack for light/medium, or carefully through second crack for darker roasts), immediately stop the heat and remove the beans.
- What “good” looks like: Beans are removed promptly to halt the roasting process.
- Common mistake and how to avoid it: Delaying the removal of beans. They will continue to roast from residual heat, potentially overshooting your target.
10. Cool the beans rapidly: This is a critical step to stop the roasting process and prevent the beans from continuing to cook. Shake them in a colander, use a fan, or a cooling tray.
- What “good” looks like: Beans cool down within a few minutes, and the chaff is mostly separated.
- Common mistake and how to avoid it: Letting hot beans sit in a pile. They retain heat and will continue to roast, negatively impacting flavor.
11. Separate chaff: After cooling, shake the beans in a colander or sieve to remove as much chaff as possible.
- What “good” looks like: Most of the papery chaff is removed.
- Common mistake and how to avoid it: Not separating chaff well. It can impart a papery, sometimes bitter taste to your brewed coffee.
12. Degas the beans: Roasted beans need to degas for 12-72 hours (depending on roast level) before brewing. Store them in a container with a one-way valve or loosely covered.
- What “good” looks like: Beans are stored in a way that allows CO2 to escape but prevents oxygen from entering.
- Common mistake and how to avoid it: Brewing immediately after roasting. The excess CO2 will interfere with extraction and create a sour or underdeveloped flavor.
Common Mistakes (and What Happens If You Ignore Them)
| Mistake | What It Causes | Fix |
|---|---|---|
| Inadequate Ventilation | Smoke-filled room, potential fire hazard, acrid coffee taste. | Roast outdoors, use a powerful exhaust fan, or open multiple windows. Have fire safety equipment ready. |
| Overfilling the Roaster | Uneven roasting, beans sticking together, stalling the roast. | Roast in smaller batches that allow for good airflow and bean movement. Check your DIY roaster’s capacity. |
| Inconsistent Heat Application | Wildly different roast levels within a batch, scorching, underdeveloped flavors. | Monitor temperature if possible. If not, focus on consistent timing and visual/auditory cues. Ensure your heat source is stable. |
| Insufficient Agitation | Dark spots on beans, uneven browning, potential scorching. | Ensure your DIY setup tumbles or stirs beans effectively. If using a pan, shake it frequently. |
| Rushing the Cooling Process | Beans continue to roast, leading to over-roasting and burnt flavors. | Cool beans rapidly using a fan, colander, or cooling tray. Aim to cool them within a few minutes. |
| Brewing Immediately After Roasting | Sour, underdeveloped, or metallic flavors due to excess CO2. | Allow beans to degas for at least 12-24 hours (longer for darker roasts) before brewing. Store in a valve bag or loosely covered. |
| Ignoring First Crack | Missing the optimal window for light to medium roasts, leading to over-roasting. | Listen carefully for the distinct popping sound of first crack and be ready to manage the roast duration accordingly. |
| Not Separating Chaff Properly | Papery, bitter flavors in brewed coffee. | Shake cooled beans thoroughly in a colander or sieve to remove as much chaff as possible. |
| Using Stale Green Beans | Flat, dull flavors, poor development during roasting. | Purchase fresh green coffee beans from reputable suppliers and store them properly (cool, dry, dark place). |
| Incorrect Grind Size | Over-extraction (bitter) or under-extraction (sour) during brewing. | Adjust grind size based on your brewing method (finer for espresso, coarser for French press). |
Decision Rules for DIY Roasting
- If you hear a rapid, sharp crackling sound (second crack) and you’re aiming for a medium roast, then stop the roast immediately because you’re likely over-roasting.
- If your beans are developing dark spots and clumps, then your roaster likely has insufficient agitation or airflow, so try shaking it more or reducing the batch size.
- If the smell of your roasting beans turns from sweet and toasty to burnt and acrid, then you are likely scorching the beans, so reduce heat or remove them sooner next time.
- If your beans are taking an unusually long time to yellow and crack, then your roaster may not be reaching a high enough temperature, or you’re using too large of a batch.
- If you notice a lot of smoke and chaff building up without being vented, then your airflow is insufficient, which can lead to bitter flavors and a potential fire hazard.
- If your brewed coffee tastes sour and weak after roasting, then you likely under-roasted your beans or didn’t let them degas properly.
- If your brewed coffee tastes bitter and thin, then you likely over-roasted your beans or ground them too fine for your brewing method.
- If you are using a popcorn popper and the beans are not tumbling well, then try gently tilting the popper or reducing the batch size to improve movement.
- If you are roasting in an oven and the beans are not browning evenly, then stir them more frequently or use a perforated pan to improve airflow.
- If you are unsure about the roast level, then err on the side of stopping the roast slightly earlier, as it’s easier to adjust for a lighter roast than to fix an over-roasted bean.
FAQ
Q: How long does it take to roast coffee beans at home?
A: Roasting times vary greatly depending on your DIY method and desired roast level. A typical batch using a hot air popcorn popper might take 5-10 minutes from start to finish. Oven roasting can take longer, often 15-25 minutes.
Q: What kind of green coffee beans should I use for home roasting?
A: Start with single-origin beans from reputable suppliers. Arabica beans are generally preferred for their complex flavors. Avoid pre-packaged “roasting kits” unless they specify fresh green beans.
If you’re new to home coffee roasting, starting with single-origin beans from reputable suppliers is recommended. Arabica beans are generally preferred for their complex flavors.
- Davids, Kenneth (Author)
- English (Publication Language)
- 256 Pages - 11/20/2003 (Publication Date) - St. Martin's Griffin (Publisher)
Q: Is it safe to roast coffee beans indoors?
A: It can be done, but only with extreme caution and excellent ventilation. Roasting produces significant smoke and chaff. It’s generally safer to roast outdoors or under a powerful, vented hood. Always have fire safety measures in place.
Q: How do I know when my coffee is roasted enough?
A: The best indicators are visual cues and sound. Look for the beans to change color from green to yellow, then brown. Listen for “first crack” (like popcorn popping) and, if desired, “second crack” (a more rapid crackling). The time between these cracks and when you stop the roast determines the final level.
Q: What is “first crack” and “second crack”?
A: First crack is when the bean expands and releases moisture, making a popping sound. Second crack is a more aggressive, brittle crackling sound indicating a darker roast. These are key auditory cues for roast development.
Q: How should I store my freshly roasted beans?
A: Store them in an airtight container, ideally with a one-way valve, or in a bag that allows CO2 to escape. Keep them in a cool, dark place. Avoid refrigerating or freezing them immediately after roasting.
Q: Why do my roasted beans taste bitter?
A: Bitterness can result from over-roasting, scorching, or not separating chaff properly. It can also be caused by grinding the beans too finely for your brewing method or using stale beans.
Q: Can I use a regular kitchen oven to roast coffee?
A: Yes, but it requires modification or careful technique. You’ll need to ensure beans are agitated and airflow is managed. Using a perforated pan and stirring frequently, or employing a rotisserie attachment, can help.
What This Page Does Not Cover (and Where to Go Next)
- Specific DIY roaster build instructions (e.g., detailed plans for modifying appliances).
- Next Steps: Search for detailed guides on modifying specific appliances like air poppers or oven setups.
- Advanced roasting techniques like profiling, cooling curves, and defect identification.
- Next Steps: Explore resources on coffee science, sensory analysis, and advanced home roasting techniques.
- Commercial roasting equipment and large-scale production.
- Next Steps: Research professional coffee roasting equipment and industry best practices.
- Detailed chemical reactions occurring during the roasting process.
- Next Steps: Look into books or academic articles on the Maillard reaction and Strecker degradation in coffee.
