Create Delicious Ice Blended Coffee Drinks
Quick answer
- Use cold brew or strongly brewed, chilled coffee.
- Blend with ice until smooth, not chunky.
- Sweeten and flavor before blending for best results.
- Don’t over-blend, or it gets watery.
- Start with a good ratio; adjust to your taste.
- Clean your blender right after use. Seriously.
Who this is for
- Anyone craving a refreshing coffee treat on a hot day.
- Home baristas looking to expand their drink repertoire beyond hot coffee.
- Folks who want to skip the coffee shop line and save some cash.
What to check first
Brewer type and filter type
Your base coffee matters. A drip machine is fine, but cold brew or a French press often gives a richer, smoother flavor for blended drinks. For cold brew, make sure you’re using a coarse grind and a good filter so you don’t get sediment. Drip coffee? Paper filters are standard, but a metal filter might let more oils through, adding body.
Water quality and temperature
Tap water can mess with flavor. If yours tastes off, use filtered water. For blended drinks, the coffee must be cold. Brew it ahead of time and chill it thoroughly in the fridge. Pouring hot coffee over ice is a recipe for weak, watery disappointment.
Grind size and coffee freshness
For cold brew, think coarse, like sea salt. For drip or French press, medium grind is usually the sweet spot. Always use freshly roasted, freshly ground beans if you can. Stale coffee tastes flat, and that’s amplified when it’s blended.
Coffee-to-water ratio
This is key for strength. For a standard cup (8 oz) of blended coffee, you might start with 4-6 oz of strong, chilled coffee concentrate. Too little coffee, and it’s just flavored ice. Too much, and it might be too intense. You can always add more coffee or liquid.
Cleanliness/descale status
A dirty blender is a flavor killer. Food bits and old coffee residue will turn your delicious drink into something questionable. Make sure your blender blades are sharp and clean. If your coffee maker is due for a descaling, do it. A clean machine makes better coffee, plain and simple.
Step-by-step (brew workflow)
1. Brew your coffee. Make it strong! Cold brew concentrate or a double-strength drip coffee works great.
- Good looks like: A rich, dark liquid. Not watery.
- Mistake to avoid: Brewing weak coffee. You can’t fix weak coffee with ice.
2. Chill your coffee. Refrigerate it until it’s thoroughly cold. Overnight is best for cold brew.
- Good looks like: Ice-cold coffee. No warmth at all.
- Mistake to avoid: Pouring warm coffee into the blender. It melts the ice too fast.
3. Prepare your sweetener/flavorings. Measure out syrups, sugar, or flavor extracts.
- Good looks like: Everything ready to go. No searching mid-blend.
- Mistake to avoid: Forgetting to add these until after blending. They won’t incorporate well.
4. Add ice to the blender. Fill it about halfway to two-thirds full.
- Good looks like: Plenty of ice for texture and chill.
- Mistake to avoid: Overfilling the blender. It makes it hard to blend and can strain the motor.
You’ll need a good ice crusher blender to get that perfect slushy texture. This model is a popular choice for home use.
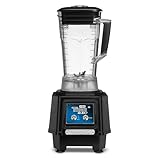
- Motor: 2 Horsepower high-performance motor delivers 24,000 max RPM for consistent blending power in commercial kitchens and bars, ensuring reliable operation during peak service hours
- Container: 64 oz BPA-free copolyester jar with stackable design maximizes storage efficiency while providing durable construction for high-volume blender use in professional settings
- Controls: 2-speed toggle switch provides simple operation with reliable performance for bartenders and kitchen staff in fast-paced commercial environments and busy food service operations
- Drive: Stainless steel user-replaceable drive coupling ensures long-lasting durability and easy maintenance for continuous commercial blender operation in demanding restaurant environments
- Certifications: cULus and NSF approved for commercial food service applications, meeting strict safety and sanitation standards for professional kitchen use in restaurants and bars
5. Add your chilled coffee. Pour in your cold brew or chilled strong coffee.
- Good looks like: Enough liquid to help the ice blend smoothly.
- Mistake to avoid: Adding too much liquid. It’ll make your drink watery.
6. Add sweeteners and flavorings. Pour in your syrups, sugar, extracts, or any other additions.
- Good looks like: All your flavor components are in the pitcher.
- Mistake to avoid: Adding dry sugar. It might not dissolve well. Syrups are easier.
7. Blend on low speed first. Start your blender on a low setting to break up the ice.
- Good looks like: The ice is starting to break down, not just spinning.
- Mistake to avoid: Blasting it on high immediately. This can leave large ice chunks.
8. Increase speed and blend until smooth. Gradually increase the speed until you have a consistent, slushy texture.
- Good looks like: A thick, smooth consistency with no large ice chunks.
- Mistake to avoid: Over-blending. It heats up and melts the ice, making it watery. Stop when it’s just right.
9. Check consistency. If it’s too thick, add a splash more coffee or liquid. If too thin, add a few more ice cubes and blend briefly.
- Good looks like: Your desired thickness.
- Mistake to avoid: Giving up if it’s not perfect the first time. Adjustments are normal.
10. Pour and serve immediately. Get it into a glass before it melts too much.
- Good looks like: A refreshing, chilled drink ready to enjoy.
- Mistake to avoid: Letting it sit too long. It separates and loses its chill.
Common mistakes (and what happens if you ignore them)
| Mistake | What it causes | Fix |
|---|---|---|
| Using hot or warm coffee | Watery, weak drink; ice melts too fast | Brew coffee ahead of time and chill it completely in the fridge. |
| Not brewing coffee strong enough | Bland, diluted flavor; tastes more like ice than coffee | Use a higher coffee-to-water ratio when brewing, or use cold brew concentrate. |
| Over-blending the ice | Drink becomes thin and watery, loses texture | Blend only until smooth. Stop blending as soon as the ice is fully incorporated. |
| Adding sweeteners/flavors after blending | Inconsistent flavor, undissolved sugar | Add all liquid sweeteners and flavorings <em>before</em> blending. |
| Using stale or low-quality beans | Flat, off-flavors that are amplified when blended | Use freshly roasted beans and grind them just before brewing for the best taste. |
| Not cleaning the blender | Lingering old flavors contaminate your drink | Rinse the blender pitcher and blades immediately after use. Deep clean regularly. |
| Using too much ice | Blender struggles, drink is too thick or chunky | Start with about half the pitcher full of ice and add more if needed after initial blending. |
| Not filtering cold brew properly | Gritty texture, sediment in the drink | Use a fine mesh strainer or cheesecloth to filter cold brew concentrate thoroughly. |
| Using tap water with off-flavors | Affects the overall taste of the coffee | Use filtered water for brewing your coffee base. |
| Not chilling coffee long enough | Melts ice too quickly, resulting in a watered-down drink | Ensure your brewed coffee is ice-cold before it ever goes near the blender. Overnight is ideal. |
Decision rules (simple if/then)
- If your blended coffee tastes weak, then add more coffee concentrate next time because you need a higher coffee-to-liquid ratio.
- If your blended coffee is too watery, then you likely over-blended or used warm coffee, so blend for less time and ensure coffee is cold.
- If your blended coffee has chunks of ice, then you need to blend longer or use slightly less ice next time because the ice isn’t fully incorporated.
- If your blended coffee tastes bland, then use fresher beans or a stronger brew method because the coffee flavor isn’t coming through.
- If your blender is struggling to blend, then add a splash more liquid (coffee or water) or reduce the amount of ice because the mixture is too thick.
- If your blended coffee has an off-flavor, then clean your blender thoroughly because residual flavors are likely the culprit.
- If you want a smoother texture, then consider a more powerful blender or blend for slightly longer, but watch out for melting.
- If you’re adding sugar, then use a liquid sweetener like simple syrup or flavored syrup because granulated sugar may not dissolve well.
- If your cold brew has sediment, then you need to filter it more thoroughly next time because fine grounds are getting through your filter.
- If your blended drink separates quickly, then you might have added too much liquid relative to the ice, so adjust your ratios.
FAQ
How do I make my ice blended coffee stronger?
Brew your coffee extra strong, like a concentrate. For cold brew, use more coffee grounds per water. For drip, use less water or a darker roast. Ensure it’s well-chilled before blending.
Can I use regular brewed coffee instead of cold brew?
Absolutely. Just make sure it’s brewed strong and chilled thoroughly in the refrigerator. Hot coffee will melt the ice too fast.
What’s the best way to sweeten an ice blended coffee?
Liquid sweeteners like simple syrup, agave, or flavored coffee syrups blend in easiest. You can also use granulated sugar, but it might not dissolve completely. Add them before blending.
My blended coffee is too thick. What should I do?
Add a small splash of cold coffee, cold water, or milk. Blend again briefly until you reach your desired consistency. Don’t add too much at once.
My blended coffee is too thin. How can I fix it?
Add a few more ice cubes to the blender and pulse a few times until it thickens up. Be careful not to over-blend again.
Can I add milk or cream to my ice blended coffee?
Yes! Milk, cream, or dairy-free alternatives can be added before blending for a creamier texture and richer flavor. Adjust the amount to your liking.
What kind of ice is best?
Regular ice cubes work fine. Some people prefer crushed ice for a finer texture, but it can melt faster. Avoid using ice that has absorbed freezer odors.
How long does it take to make one?
If your coffee is already brewed and chilled, the blending process itself usually takes less than a minute. Prep time for brewing and chilling varies.
What this page does NOT cover (and where to go next)
- Specific blender models and their capabilities. (Check your appliance manual for optimal use.)
- Advanced latte art techniques. (Look for resources on milk steaming and pouring.)
- Detailed information on coffee bean origins and roasting profiles. (Explore specialty coffee guides.)
- Commercial-grade ice blended coffee machine operation. (Consult manufacturer documentation.)
- Nutritional breakdowns of various drink additives. (Refer to ingredient packaging or health resources.)