Beat The Heat With Homemade Slushy Coffee
Quick Answer
- Use a high-powered blender for the smoothest results.
- Freeze strong coffee or espresso into ice cubes.
- Add a touch of sweetener and flavoring if desired.
- Don’t overfill your blender; work in batches if needed.
- Adjust liquid for your perfect slushy consistency.
- Experiment with different coffee roasts for varied flavor profiles.
For the smoothest results, make sure you have a high-powered blender on hand.
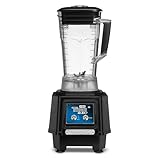
- Motor: 2 Horsepower high-performance motor delivers 24,000 max RPM for consistent blending power in commercial kitchens and bars, ensuring reliable operation during peak service hours
- Container: 64 oz BPA-free copolyester jar with stackable design maximizes storage efficiency while providing durable construction for high-volume blender use in professional settings
- Controls: 2-speed toggle switch provides simple operation with reliable performance for bartenders and kitchen staff in fast-paced commercial environments and busy food service operations
- Drive: Stainless steel user-replaceable drive coupling ensures long-lasting durability and easy maintenance for continuous commercial blender operation in demanding restaurant environments
- Certifications: cULus and NSF approved for commercial food service applications, meeting strict safety and sanitation standards for professional kitchen use in restaurants and bars
Who This Is For
- Anyone looking to beat the summer heat with a cool coffee treat.
- Home baristas who want to experiment beyond their usual pour-over.
- Coffee lovers who enjoy a sweet, icy beverage on a warm day.
What to Check First
Brewer Type and Filter Type
What kind of coffee maker are you using for your base brew? Drip machines, French presses, Aeropress, espresso machines – they all produce different strengths and flavor profiles. This matters for slushy coffee. A stronger brew works best. Your filter type (paper, metal, cloth) also affects clarity and body. For slushy coffee, a clean, strong shot is usually the goal.
Water Quality and Temperature
Your coffee is mostly water, so good water is key. Filtered water is usually the way to go. For slushy coffee, you’ll be freezing this water anyway, so it’s less about brew temperature and more about the starting water’s purity. Think about what you’d drink straight.
Grind Size and Coffee Freshness
Freshly ground beans make a world of difference. For the coffee you’ll freeze, a medium-fine grind is often good for drip or Aeropress. If you’re using espresso, that’s already a fine grind. Stale coffee just tastes… meh. Use beans you’ve roasted or ground recently.
Coffee-to-Water Ratio
This is crucial for flavor strength. For a slushy base, you want it stronger than your morning cup. A good starting point is a ratio of 1:15 or 1:16 for drip, but for freezing, consider going closer to 1:10 or 1:12. This ensures your frozen cubes aren’t too diluted.
Cleanliness/Descale Status
A dirty brewer or blender can ruin even the best beans. Make sure your coffee maker and blender are sparkling clean. If you haven’t descaled your coffee maker in a while, do it. Grime affects taste, and we’re going for pure, icy goodness here.
Step-by-Step: How to Make Slushy Coffee
1. Brew Strong Coffee: Brew a concentrated batch of coffee. Use your favorite method, but aim for a stronger ratio than usual, like 1:10 or 1:12.
- What “good” looks like: A rich, dark liquid with full flavor.
- Common mistake: Brewing a weak batch that will taste watered down when frozen. Avoid this by increasing your coffee grounds or decreasing your water.
2. Sweeten and Flavor (Optional): While the coffee is still hot, stir in your preferred sweetener (sugar, syrup, etc.) and any flavorings (vanilla extract, cocoa powder).
- What “good” looks like: The sweetener is fully dissolved, and the flavors are well-distributed.
- Common mistake: Adding sweetener after freezing, which won’t dissolve well in ice. Do it while it’s liquid.
3. Cool Down: Let the sweetened coffee cool to room temperature. This prevents it from cracking your ice cube trays or freezing too slowly.
- What “good” looks like: The coffee is no longer steaming.
- Common mistake: Pouring hot liquid into plastic trays, which can warp them. Patience is key here.
4. Pour into Ice Cube Trays: Fill your ice cube trays with the cooled, strong coffee. Don’t overfill; leave a little room for expansion.
- What “good” looks like: Trays are filled evenly, with no spills.
- Common mistake: Overfilling trays, leading to messy overflow once frozen.
Pour your cooled, strong coffee into these handy coffee ice cube trays to freeze.

- ONE-TOUCH QUICK RELEASE: No more stuck ice cubes. Our patented one-second press system empties the silicone ice tray instantly into the storage bin, keeping your hands clean and saving busy mornings.
- STACKABLE SPACE SAVING: This high-capacity ice cube maker includes 2 stackable trays (58 cubes) and a clear lid. Perfect for small freezer space, keeping your ice fresh and odor-free.
- BPA-FREE FOOD GRADE MATERIAL: Made from premium, non-toxic PP and flexible silicone. This durable green ice block mold is 100% safe for baby food, everyday family hydration, and meal prep.
- TRENDY DOPAMINE GREEN: Add a joyful pop to your kitchen aesthetics. The vibrant green color makes this stylish ice tray with lid and bin a perfect aesthetic summer gift for coffee lovers and hosts.
- VERSATILE FOR DRINKS & PARTIES: Upgrade your home bar. Ideal for chilling summer cocktails, iced coffee, smoothies, or whiskey. Included ice tongs ensure sanitary serving for backyard poolsides or parties.
5. Freeze Solid: Place the filled trays in the freezer. Let them freeze completely until the cubes are rock solid. This usually takes at least 4-6 hours, or overnight.
- What “good” looks like: Firm, fully frozen coffee cubes.
- Common mistake: Not freezing them long enough, resulting in slushy cubes that melt too fast.
6. Prepare Blender: Get your blender ready. Ensure the blades are sharp and the pitcher is clean.
- What “good” looks like: A clean, dry blender ready for action.
- Common mistake: Using a dirty blender that imparts off-flavors. Rinse it thoroughly.
7. Add Coffee Cubes: Pop the frozen coffee cubes out of the trays and into the blender pitcher.
- What “good” looks like: A pitcher filled with solid coffee ice.
- Common mistake: Trying to cram too many cubes in at once, which can strain your blender motor.
8. Add Liquid (Optional): If you want a thinner slush, add a splash of milk, cream, or even a little cold water. Start with a small amount.
- What “good” looks like: Just enough liquid to help the blending process, not so much that it becomes watery.
- Common mistake: Adding too much liquid upfront, turning your slushy into a coffee smoothie or drink.
9. Blend Until Smooth: Secure the lid and start blending on a low speed, gradually increasing to high. Use the tamper if your blender has one, to push cubes down towards the blades.
- What “good” looks like: A thick, icy, smooth mixture with no large chunks.
- Common mistake: Blending for too short a time, leaving icy chunks. Or blending too long, which can melt the slush.
10. Check Consistency: Stop and check the texture. If it’s too thick, add another tiny splash of liquid and blend again. If it’s too thin, you might need more coffee cubes (if you have them) or just accept it as a more liquid treat.
- What “good” looks like: A consistent, scoopable or drinkable slushy texture.
- Common mistake: Giving up too soon. A little extra blending or liquid can make a big difference.
11. Serve Immediately: Pour your homemade slushy coffee into a chilled glass. Garnish with whipped cream or a drizzle of chocolate syrup if you’re feeling fancy.
- What “good” looks like: A frosty, delicious drink ready to be enjoyed.
- Common mistake: Letting it sit too long, causing it to melt and separate. Drink it fresh!
Common Mistakes (and What Happens If You Ignore Them)
| Mistake | What It Causes | Fix |
|---|---|---|
| Using stale coffee beans | Flat, dull, or bitter taste in your slushy. | Use freshly roasted and ground beans for the best flavor. |
| Brewing weak coffee for freezing | Diluted, watery, and uninspiring slushy coffee once blended. | Brew a stronger coffee-to-water ratio (e.g., 1:10) for your ice cubes. |
| Pouring hot coffee into ice trays | Warped or cracked plastic ice cube trays; slow freezing. | Let the coffee cool to room temperature before pouring into trays. |
| Not freezing cubes long enough | Cubes melt too quickly, resulting in a watery drink instead of a slushy. | Ensure cubes are completely solid before blending. Freeze overnight if possible. |
| Overfilling the blender pitcher | Strained blender motor, uneven blending, or spills. | Blend in batches if necessary; don’t pack the pitcher too full. |
| Adding too much liquid initially | Turns your slushy into a thin coffee drink or smoothie. | Start with minimal liquid and add more only if needed to achieve the desired consistency. |
| Not cleaning the blender thoroughly | Off-flavors from previous uses, making your slushy taste weird. | Wash the blender pitcher and blades immediately after use. |
| Using tap water with strong odors/tastes | Your slushy will taste like your tap water. | Use filtered water for brewing your coffee base. |
| Not dissolving sweetener in hot coffee | Gritty texture in the frozen slushy, as sugar won’t dissolve in ice. | Stir sweeteners into the coffee while it’s still hot and liquid. |
| Blending for too short a time | Icy chunks remain, making the texture unpleasant. | Blend until completely smooth and consistent. |
Decision Rules
- If your coffee tastes bitter, then reduce the brewing time or use a coarser grind.
- If your slushy is too watery, then you likely didn’t freeze the coffee cubes long enough or added too much liquid.
- If your blender is struggling, then stop and add a small amount of liquid or remove some frozen cubes.
- If you want a richer flavor, then use a darker roast coffee for your base.
- If you’re sensitive to caffeine, then use decaf coffee for your frozen cubes.
- If you prefer a less sweet drink, then reduce or omit the sweetener added during the brewing stage.
- If your slushy separates quickly, then it might be too warm or blended for too long. Serve immediately.
- If you don’t have ice cube trays, then you can freeze coffee in a shallow pan and break it up into chunks before blending.
- If your coffee has a sour taste, then check your water quality or consider a different roast.
- If you want to add dairy or non-dairy creamer, then add it sparingly during the blending stage.
FAQ
What kind of coffee is best for slushy coffee?
Darker roasts tend to yield a richer, more robust flavor that holds up well when frozen and blended. However, use what you enjoy! A medium roast can also be great.
Can I use instant coffee?
Yes, you can use instant coffee to make your slushy base. Just mix it with hot water according to package directions, making it strong, and then sweeten and freeze as usual.
How thick should my slushy coffee be?
This is totally up to you! A good starting point is a texture like a thick smoothie or a soft-serve ice cream. You can adjust the amount of liquid added during blending to get your preferred consistency.
Can I make this without a blender?
It’s tough to get a true “slushy” texture without a blender. You could try crushing the coffee ice manually with a mallet (carefully!) and mixing it with a bit of liquid, but it won’t be as smooth.
How long do the coffee ice cubes last?
Coffee ice cubes can last for several weeks in a well-sealed container or freezer bag in your freezer. They might pick up freezer odors over time, so it’s best to use them within a month or so.
What if I don’t have strong coffee?
If your brewed coffee isn’t strong enough, you can add a bit of instant coffee granules directly to the blender along with the frozen cubes and any other liquids.
Can I add alcohol to my slushy coffee?
Absolutely! A shot of rum, vodka, or Irish cream liqueur can turn your slushy coffee into a delightful adult beverage. Add it during the blending stage.
What This Page Does NOT Cover (And Where to Go Next)
- Detailed guides on specific coffee brewing methods (e.g., espresso machine maintenance, pour-over techniques).
- Advanced flavor pairings or complex recipe modifications beyond simple additions.
- Nutritional information for various sweeteners or dairy alternatives.
To learn more about specific brewing techniques, consult your brewer’s manual or search for guides on your particular coffee maker. For recipe inspiration, explore general beverage and dessert-making resources.