A Guide to Your Little Silver Coffee Maker
This guide will walk you through using your little silver coffee maker, often a compact drip coffee machine, to brew delicious coffee at home. We’ll cover the essentials from setup to troubleshooting, ensuring you get the best possible cup.
This guide will walk you through using your little silver coffee maker, often a compact drip coffee machine, to brew delicious coffee at home. If you’re in the market for a reliable option, consider a quality silver drip coffee maker like the [product name].
- Certified Safe & Reliable: Unlike uncertified machines on the market, our coffee maker is fully ETL, CE, ROHS, and Intertek certified, meeting North American and EU commercial electrical safety standards. Buy with confidence and serve with peace of mind.
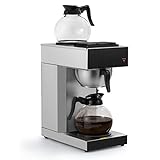
- Fast Brewing for Commercial Use: Brew up to 12 cups of fresh coffee in under 10 minutes. Engineered for offices, restaurants, hotels, and busy kitchens, this high-efficiency drip coffee maker keeps productivity and energy up—right from the first cup.
- Dual Warmers for Coffee Maker: Equipped with two warming plates, this machine lets you brew a fresh pot while keeping another warm, ensuring uninterrupted coffee service. Simple controls and indicator lights make operation effortless.
- Multi-Stream Shower Head: Our multi-stream spray head evenly saturates coffee grounds, paired with a flat-bottom filter basket for optimal water-ground contact. Enjoy consistent, robust flavor in every brew—ideal for discerning coffee lovers.
- Drip-free Carafes: Proprietary lid and spout design that arcs the pour of the coffee into the cup and wicks the coffee dribbles back into the coffee pot preventing a mess on cup or counter.
Quick answer
- Ensure your coffee maker is clean and descaled before brewing.
- Use fresh, whole bean coffee ground to a medium consistency.
- Measure your coffee and water accurately for a balanced brew.
- Always use filtered water for a cleaner taste.
- Preheat your mug for a hotter final cup.
- Experiment with grind size and coffee-to-water ratio to find your preference.
Who this is for
- Beginners looking to understand the basic operation of their drip coffee maker.
- Home coffee drinkers who want to improve the taste of their daily brew.
- Anyone with a “little silver coffee maker” who needs a clear, step-by-step guide.
What to check first
Brewer type and filter type
Your “little silver coffee maker” is most likely a standard automatic drip coffee machine. These machines use a heating element to warm water and drip it over coffee grounds held in a filter basket.
Your “little silver coffee maker” is most likely a standard automatic drip coffee machine. These machines use a heating element to warm water and drip it over coffee grounds held in a filter basket. For those with limited counter space, a compact coffee machine is an excellent choice.

- SMALL SPACE SAVER: Compact at 4" wide for brewing the perfect cup of coffee in small kitchens, dorm rooms, offices, and surfaces with limited space.
- 12 OZ CUP: Features a One Cup reservoir for a freshly brewed cup, up to 12 oz.
- TRAVEL MUG FRIENDLY: Fits up to a 7.25” to-go coffee cup so you can brew and go!
- FRESH & MODERN: Featuring a sleek, minimal design that blends with your lifestyle.
- ELEVATED COLORS: Available in aesthetic colors that match your style. *Cup not included*
The type of filter is crucial. Most machines use either disposable paper filters or a reusable mesh filter. Paper filters can absorb some oils, leading to a cleaner cup, while mesh filters allow more oils and fine particles through, potentially creating a richer, fuller-bodied coffee. Check your machine’s manual or look at the filter basket to see what type it’s designed for. Using the wrong filter can lead to overflow or poor extraction.
Water quality and temperature
The quality of your water significantly impacts coffee flavor. Tap water can contain minerals or chlorine that impart an off-taste. Using filtered water, whether from a pitcher filter or a faucet attachment, is highly recommended. Avoid distilled water, as some minerals are necessary for good extraction.
Ideally, your coffee maker heats water to between 195°F and 205°F (90.5°C and 96°C). This temperature range is optimal for extracting the desirable flavors from coffee grounds. Most automatic drip machines aim for this range, but if your coffee tastes weak or sour, water temperature might be a factor.
Grind size and coffee freshness
The grind size is critical for proper extraction. For most drip coffee makers, a medium grind is ideal. It should resemble coarse sand. Too fine a grind can lead to over-extraction, resulting in bitter coffee, and can also clog the filter. Too coarse a grind will result in under-extraction and weak, sour coffee.
Freshness is paramount. Coffee beans start to lose their flavor compounds rapidly after roasting. For the best taste, buy whole beans and grind them just before brewing. Look for roast dates on the coffee bag. Aim to use beans roasted within the last few weeks. Stale coffee will produce a dull, lifeless cup regardless of how well you brew it.
Coffee-to-water ratio
The ratio of coffee grounds to water determines the strength and balance of your brew. A common starting point for drip coffee is the “golden ratio,” which is approximately 1:15 to 1:18. This means for every gram of coffee, you use 15 to 18 grams of water.
In US customary units, this often translates to about 1 to 2 tablespoons of coffee grounds per 6 oz cup of water. For example, for a 12 oz carafe, you might use 4 tablespoons of coffee grounds and 12 oz of water. It’s best to measure by weight for accuracy, but volume can be a good starting point.
Cleanliness/descale status
A clean coffee maker is essential for good-tasting coffee. Coffee oils and mineral buildup (scale) can accumulate over time, affecting flavor and performance.
Regular cleaning involves washing the carafe, lid, and filter basket with soap and water after each use. Descaling is a deeper cleaning process that removes mineral deposits. Most manufacturers recommend descaling every 1-3 months, depending on your water hardness and usage. If your coffee tastes bitter, metallic, or your machine is taking longer to brew, it’s likely time to descale. Check your brewer’s manual for specific descaling instructions, which often involve running a solution of vinegar or a descaling agent through the machine.
Step-by-step (how to use your little silver coffee maker)
1. Prepare the machine: Ensure the coffee maker is plugged in and placed on a stable, heat-resistant surface. Check that the power switch is in the “off” position.
- What “good” looks like: The machine is ready to receive water and coffee, and the brewing area is clear.
- Common mistake: Forgetting to turn the machine off before adding water or grounds. This can lead to spills or electrical hazards. Always ensure it’s off.
2. Add fresh, filtered water: Open the water reservoir lid and pour in the desired amount of cold, filtered water. Use the markings on the reservoir or carafe to measure.
- What “good” looks like: The water level is at or below the maximum fill line and matches the number of cups you intend to brew.
- Common mistake: Overfilling the reservoir. This can cause water to spill during brewing or result in weak coffee if you’ve added too much.
3. Insert the filter: Place the correct type of filter (paper or reusable mesh) into the filter basket. If using a paper filter, some people rinse it with hot water first to remove any papery taste.
- What “good” looks like: The filter is seated correctly and securely within the filter basket.
- Common mistake: Not using a filter or using one that is too small or improperly seated. This will lead to grounds in your coffee or overflow.
4. Add coffee grounds: Measure your freshly ground coffee and add it to the filter. Use the recommended ratio (e.g., 1-2 tablespoons per 6 oz cup) as a starting point.
- What “good” looks like: The coffee grounds are evenly distributed in the filter.
- Common mistake: Tamping down the grounds or creating a mound in the center. This can lead to uneven water flow and extraction. Gently level the grounds.
5. Close the filter basket: Ensure the filter basket is properly seated back into the coffee maker. Some machines have a mechanism that locks it in place.
- What “good” looks like: The filter basket is securely in its designated position, ready to brew.
- Common mistake: Not closing the filter basket completely. This can cause hot water and grounds to spill out when brewing begins.
6. Place the carafe: Position the empty carafe on the warming plate directly under the filter basket. Ensure it is centered.
- What “good” looks like: The carafe is correctly aligned and can receive the brewed coffee.
- Common mistake: Forgetting to place the carafe or misaligning it. This will result in coffee spilling onto the warming plate or the counter.
7. Turn on the coffee maker: Flip the power switch to the “on” position. The brewing cycle will begin shortly as the water heats up.
- What “good” looks like: The indicator light (if present) turns on, and you can hear the machine starting to heat water.
- Common mistake: Pressing the brew button too soon or not turning the machine on. Wait for the water to start dripping.
8. Brewing process: The machine will heat the water and drip it through the coffee grounds. You’ll see coffee begin to fill the carafe.
- What “good” looks like: A steady stream of coffee is dripping into the carafe, and the aroma is pleasant.
- Common mistake: Impatience. Resist the urge to remove the carafe mid-brew unless your machine has a “pause and serve” feature, and even then, do so only briefly.
9. Wait for completion: Allow the brewing cycle to finish completely. Most machines will stop dripping and may make a gurgling sound as the last bit of water passes through.
- What “good” looks like: Dripping has stopped, and the carafe is full.
- Common mistake: Removing the carafe too early. This can interrupt the brewing process and result in under-extracted coffee.
10. Serve: Carefully remove the carafe from the warming plate. Pour the coffee into your preheated mug.
- What “good” looks like: Hot, aromatic coffee is being poured smoothly.
- Common mistake: Pouring too quickly, which can lead to drips. Pour at a steady pace.
11. Turn off the machine: Once you’ve served your coffee, turn the coffee maker off to conserve energy and prevent the warming plate from overheating.
- What “good” looks like: The indicator light is off, and the machine is no longer heating.
- Common mistake: Leaving the machine on indefinitely. This can damage the warming plate and is a fire hazard.
12. Clean up: Discard the used coffee grounds and filter. Wash the carafe, lid, and filter basket with warm, soapy water.
- What “good” looks like: All used components are clean and ready for the next brew.
- Common mistake: Leaving dirty components in the machine. This leads to residue buildup and stale flavors in future brews.
Common mistakes (and what happens if you ignore them)
| Mistake | What it causes | Fix |
|---|---|---|
| Using stale coffee | Weak, flavorless, or bitter coffee | Buy whole beans and grind just before brewing; check roast dates. |
| Incorrect grind size (too fine) | Bitter coffee, clogged filter, overflow | Use a medium grind (like coarse sand); check your grinder settings. |
| Incorrect grind size (too coarse) | Weak, sour, watery coffee | Use a medium grind; adjust grinder settings for a finer grind. |
| Using tap water with impurities | Off-flavors (chlorine, metallic, mineral notes) | Use filtered water (pitcher, faucet, or whole house). |
| Not cleaning the machine regularly | Bitter, stale, or oily coffee; slow brewing | Wash carafe/basket daily; descale monthly or as recommended by the manufacturer. |
| Incorrect coffee-to-water ratio | Coffee too strong or too weak | Start with 1:15 to 1:18 ratio (coffee:water); adjust to taste. Measure by weight for precision. |
| Using old, dirty filters | Papery taste, off-flavors, poor water flow | Use fresh filters or clean reusable ones thoroughly. |
| Removing carafe mid-brew (no pause) | Under-extraction, weak coffee, messy overflow | Wait for brewing to finish; only use “pause and serve” briefly if available. |
| Leaving coffee on the warming plate | Bitter, burnt taste; can damage carafe/plate | Serve immediately; transfer to a thermal carafe for longer keeping; turn off after brewing. |
| Forgetting to turn off the machine | Wasted energy, potential fire hazard, damaged machine | Always turn the machine off after brewing and serving. |
Decision rules (how to use your little silver coffee maker)
- If your coffee tastes bitter, then check your grind size because too fine a grind causes over-extraction.
- If your coffee tastes weak and sour, then check your grind size and coffee freshness because too coarse a grind or stale beans lead to under-extraction.
- If your coffee has off-flavors (e.g., chemical, metallic), then switch to filtered water because tap water can contain minerals or chlorine that affect taste.
- If your coffee tastes stale or dull, then ensure you’re using freshly roasted beans and grinding them right before brewing because pre-ground coffee loses flavor quickly.
- If your coffee maker is brewing slowly or making strange noises, then descale your machine because mineral buildup is likely hindering performance.
- If you’re getting grounds in your cup, then check your filter type and ensure it’s seated correctly because an incorrect or poorly placed filter can lead to grounds passing through.
- If your coffee is too strong, then reduce the amount of coffee grounds or increase the water because a higher coffee-to-water ratio makes coffee stronger.
- If your coffee is too weak, then increase the amount of coffee grounds or decrease the water because a lower coffee-to-water ratio makes coffee weaker.
- If you notice a papery taste, then rinse your paper filter with hot water before adding grounds because this can remove any residual paper taste.
- If your coffee is consistently not hot enough, then preheat your mug with hot water before pouring because a cold mug will quickly cool down your coffee.
- If your coffee maker overflows, then ensure you’re not overfilling the water reservoir and that the filter is properly seated because too much water or a misplaced filter can cause spills.
FAQ
How much coffee grounds should I use?
A good starting point is 1 to 2 tablespoons of ground coffee for every 6 ounces of water. For a standard 12-cup coffee maker, this might mean using around 8-12 tablespoons of coffee. It’s best to experiment to find what strength you prefer.
What kind of water is best for my coffee maker?
Filtered water is highly recommended. It removes impurities like chlorine and minerals that can negatively affect the taste of your coffee and cause scale buildup in your machine. Avoid distilled water, as some minerals are needed for proper flavor extraction.
How often should I clean my coffee maker?
You should wash the carafe, lid, and filter basket with warm, soapy water after each use. Descaling, which removes mineral buildup, should be done every 1 to 3 months, depending on how often you use it and the hardness of your water.
Why is my coffee tasting bitter?
Bitter coffee is often caused by over-extraction. This can happen if the grind is too fine, the water is too hot, or the coffee-to-water ratio is off. Ensure you’re using a medium grind and the correct amount of coffee.
Why is my coffee tasting weak or sour?
This is usually a sign of under-extraction. It can result from a grind that is too coarse, stale coffee beans, or not enough coffee grounds for the amount of water. Try using a finer grind or more coffee.
Can I leave coffee on the warming plate?
While convenient, leaving brewed coffee on the warming plate for extended periods can make it taste bitter or burnt. It’s best to drink it fresh or transfer it to a thermal carafe. Always turn off the warming plate when you’re done serving.
What does “descaling” mean?
Descaling is the process of removing mineral deposits (scale) that build up inside your coffee maker from the water. This buildup can affect performance, flavor, and the lifespan of your machine.
How do I know if my coffee maker needs descaling?
Signs include slower brewing times, the machine making unusual noises, or coffee tasting dull or metallic. If you have very hard water, you’ll likely need to descale more frequently.
What this page does NOT cover (and where to go next)
- Specific troubleshooting for error codes or electronic malfunctions beyond basic cleaning. (Consult your brewer’s manual or manufacturer support.)
- Detailed comparisons of different coffee bean origins or roast profiles. (Explore coffee blogs and tasting notes from roasters.)
- Advanced brewing techniques like pour-over or espresso. (Look for guides on manual brewing methods or espresso machine operation.)
- Maintenance for commercial-grade or specialized coffee equipment. (Refer to the manufacturer’s specific guidelines for those machines.)